Followers

Showing posts with label Brocade Backgrounds. Show all posts

Friday, 22 July 2022

One Stamp Two Ways

Hello everyone, I hope that you are keeping well. I have a couple of projects to share with you today showcasing some of the retired stamps that we brought to the TV shows on Create and Craft last month.

I always love to show the versatility of a stamp and this lovely leafy stamp from Brocade Backgrounds, an all time favourite of mine, is no exception, I have used it a lot over the years. You can find plenty of fabulous stamps in the current range of Chocolate Baroque stamps that would work equally as well for these techniques.

For my first card, I used a piece of grey card, and stamped the leaf using black ink all over the background. I used Koh-I-Noor colouring pencils to colour the images, and added a touch of green ink around the edge of the card. I added a sentiment from Amazing Mackintosh Words and a piece of green velvet ribbon to finish.

For my second card, I stamped the leafy image with Versamark and clear embossing powder over a piece of Drawing Cartridge before colouring the background with Distress Ink. I covered the background with paper and ironed off the embossing powder, creating a faux batik finish. I then stamped the second image over the top using a dark blue Versfine Clair ink. I added a sentiment from another of the retiring sets.


I have thoroughly enjoyed revisiting some of these old favourites, but there are so many more exciting things to come! Thanks so much for stopping by, take care, xx


Monday, 21 February 2022

More Anything Goes Projects

Hello everyone, I hope that you are all keeping well. I have a couple of projects to share with you today on an 'Anything Goes' theme. There are so many stamps to choose from in the Chocolate Baroque stamp collection that I had a hard time narrowing down my choices for my final blog post this month!

For my first card, I decided to make a useful Birthday card to add to my stash box, handy for when I need a card in a hurry. I took a piece of fabric and frayed the edges. I painted the fabric using watered down acrylic paint, I used an ochre colour. Using Plum Archival ink, I stamped an image from the Brocade Backgrounds stamp set. I stamped a sentiment from Loving Sentiments onto an inked die cut rectangle. To complete the card, I added some pretty pleated ribbon and some metallic card as a mount.


 For my second card, I had a left over background from a previous project created using Brushos. I stamped the large butterfly from Patchwork Butterfly in one corner. I masked the butterfly using masking tissue, and stamped images from Make your Mark and Numerology over the background, plus the sentiment from Patchwork Butterfly

Once I had built up the background sufficiently, I removed the Masking Tissue, and coloured the image with Faber Castell Black Edition pencils. I added a couple of grey pencils around the edges of the butterfly to give a shadow and to create the feeling of depth. The pencils coloured over the Brusho background quite well, avoiding the need to cut out another butterfly and decoupage over the top.


I have really had fun dipping into my library of stamps this month, and hope that you have enjoyed my posts. Thanks for stopping by, take care, xx


Sunday, 23 January 2022

Colours of Nature

Hello everyone, I hope that you are keeping well. I have a couple of projects to share with you today featuring stamps that were showcased on last month's TV shows on The Craft Store.


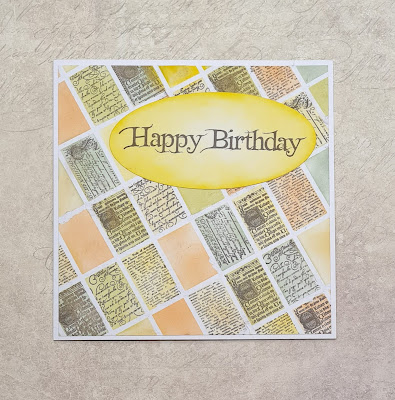
My first card features stamps from the Mini Scripts stamp set. I created a grid using very fine masking tape, and coloured each segment using Distress Ink in natural colours. I stamped some of the script stamps randomly in the segments using black ink.I chose to leave a few segments plain, as I felt it would be too dark if I stamped in every segment. I carefully peeled the tape away to reveal the tiled effect. I added a large sentiment from Birthday Words stamped onto a die cut which I had also coloured with Distress Ink.

TIP: The masking tape was a little bit too tacky, and I would ensure that I had placed it on something first before using it, so that it had lost a little bit of its stickiness. You can see where a couple of pieces of the design have been pulled if you look carefully. However, I want you to learn from my experiences, which is why I am pointing this out 😉

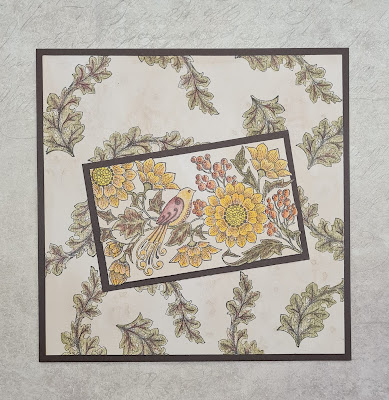
My second project is a remake of another project, using the Song Thrush stamp and a lovely leaf from Brocade Backgrounds. I coloured some Drawing Cartridge with some tea, and left it to dry. I stamped the main image, and then used a larger piece to stamp the leafy image randomly to create a background. I coloured all of the image with Inktense pencils, and blended them with a waterbrush.

I matted both pieces with dark brown card before adhering them to the base card. I hope that you have enjoyed seeing my projects this month. I will be back next month with more projects to share with you. Thanks for stopping by, xx


Tuesday, 11 January 2022

Teeny Weeny Flowers

Hello everyone, I hope you are keeping well. I have a couple of projects to share with you today featuring stamps that were showcased on The Craft Store last month.

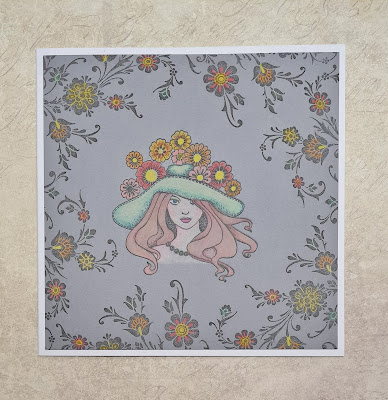
My first project uses the Lady in Hat stamp stamped on grey card, and I stamped a border using an image from Brocade Backgrounds. I coloured these images with Faber Castell Black Edition pencils.

Using a coloured background like this gives a completely different effect to the images, and the colours really pop.

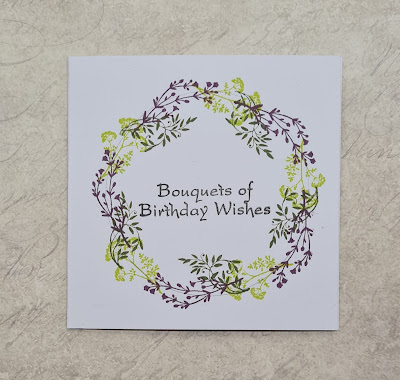
My second card is a really quick project; a little 4" x 4" card. I stamped a sentiment from Birthday Words in the centre of the card, and drew a pencil circle on the card. Using Versafine Clair ink, I stamped some of the images from Teeny Weeny Meadow around the circle to create a wreath.

I will be back later in the month with more projects to share with you, thanks for stopping by, xx


Saturday, 24 April 2021

Florals in Reds and Golds

Hello everyone, I have a few more projects to share with you, featuring stamps from last month's TV shows. 

My first card was created using a Brusho background, I have lots of these in my stash, waiting to be used when I need them. I make a batch in lots of different colours, which I can pull out when I need them in a hurry. Very handy when I am making DT samples!

I stamped a leafy sprig from the Autumn Poppy stamp set randomly over the background. It is not an exact match to the main image, but is close enough. I coloured the image with Staedtler Ergosoft pencils, choosing a lovely olive green and soft red. These are fast becoming a favourite medium to use.

I die cut an oval and stamped the Flora Musica image, adding a bit of Distress Ink around the edges to soften the whiteness of the card. I coloured the image with pencils once more, coordinating with the colours of the background. I chose some toning ribbons to pull the project together. 

To create my second project I made a wrinkle free distress background, using Distress Inks on a craft mat, which I mopped up with a piece of drawing cartridge. I stamped around the edges with the Large Crackle Background, and added the splatter stamp from the Timeless stamp set. 

I die cut a rectangle and stamped the Crackling Rose which I coloured with pencils. The sentiment comes from the Life is so much Better stamp set.


The stamp from my final card was not actually featured on the show Song Thrush, its silhouette companion made an appearance. I made this card and so will share it as you could create something very similar. I used a tea stained background, and stamped a leafy image from Brocade Backgrounds over the top.

I stamped the main image twice, and coloured the images with pencils. I decoupaged some of the flowers before matting the layers onto brown card. The sentiment once more is taken from Life is so much Better

I had so much fun this month working with a lot of these older stamps. For some of you they will be brand new. It was great to revisit the images and get to use them again, mixing them with newer stamps that were not around when the stamps first came out.

Thanks for stopping by, stay safe and take care, xx


Related Posts Plugin for WordPress, Blogger...