Followers

Thursday 22 September 2022

End of an Era

Hello everyone, I hope that you are keeping well. Firstly, before I share my project for today, I have to announce that we will be bringing the Chocolate Baroque Design Team Blog to a close at the end of this month. The Design Team will no longer be posting on the blog, as we are finding that our vistor numbers are sadly dwindling, and the preference these days is for Facebook and Instagram. We have a dedicated Facebook Group which is very friendly, you can join and see lots of inspiration over there. The Design Team share their projects there too, and we are always dropping in to answer questions if you want to ask us anything. You can post pictures of projects you have made with Chocolate Baroque stamps, we would love to see them. We have an Instagram Page too, which is full of fabulous projects. You can give us a like, or leave a quick comment, we really appreciate a visit.

We would like to thank you for your support over the years, and appreciate all of your visits and comments. The Blog was created for you, our readers, and would not have kept going for so long without you.

I will still be posting regularly here on my own blog, and would love it if you still popped by to see me here. I will share my tips and projects as always each month here and on my own Instagram page @judithatpoppycottage

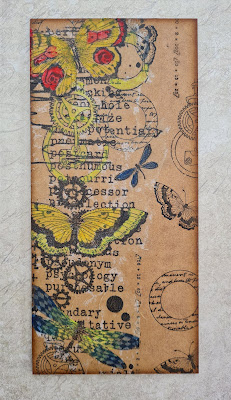
Now onto my project for today. I decided to create a panel using one of the long collage stamps from last month's TV show, stamped onto a serviette for this project. We often use patterned serviettes in our mixed media projects, and peel away the two or three layers behind, which get discarded or do not get used for anything. These plain layers are great for stamping on, and using just like their patterned counterparts.

I stamped the large The Phenomenal Butterfly Slim Strip image using Versafine Clair Nocturne and left it to dry for a few moments. Also using Versafine Clair Nocturne, I stamped some of the images from The Phenomenal Butterfly Elements and Out of the Trees Elements over the MDF panel, checking that they were in the area that would not be covered by the serviette once it was stuck down. 

I covered the reverse of the serviette with Matte Medium and adhered it to the panel. Now this worked fine twice at home, but in the studio, with the air conditioning blasting away, it was a completely different matter! The serviette was wafting about all over the place, and anyone who saw the show will have seen that I had a heart stopping couple of minutes while they turned the air con off and I attempted to lay the misbehaving serviette onto the MDF panel. Phew!

I gently brushed a bit more Matte Medium over the top, and this does take a very gentle touch, as too much can cause the serviette to disintegrate. I left the surface to dry completely before moving on to the next stage. I painted the image using transluscent paints in several colours. You could water your opaque paints down obviously, but I wanted to paint my colours neat, so this option worked for me. I chose a limited palette of colours.


I really like the unfinished MDF against the painted area, and hope that you will try this idea for yourselves.

Thanks for stopping by, xx


Saturday 10 September 2022

Dotty Strip Stamp

Hello everyone, I hope that you are keeping well. I have a couple of projects to share with you today showcasing stamps featured on last month's shows from Create and Craft.

I started my project with a large card blank, and drew along the opening edge using one of the Chocolate Baroque Draw and Tear Rulers Set 1 using a pencil. I cut the excess card away. On the inside of the card, I stamped the long dotty strip from Slim Word Strip 2 with a yellow dye based ink. I stamped a word strip from Slim Word Strip 1 over the top. I used one of the leaves from the From Nature 2 stamp set to stamp randomly over the front of the card using second generation stamping. I wanted a paler background because I did not want to detract from the other parts of the card.I added a splatter stamp from Timeless, using green and yellow ink.

I took a whiteboard heart and coloured it with the same yellow and green inks, and then stamped the same word strip as I had used along the card edge. I filled the heart, moving the strip across each time I stamped, to get a random compilation of the words. It looks great on one of these hearts. 


This card was fairly quick to complete, and I can see lots of possibilities for adapting the design to suit lots of occasions. Using the big word strips, especially now we have two sets for you to choose from gives lots of choices, and I hope that you will try out this idea, or a variation of the theme.

I decided to make another card featuring the dotty strip from the Slim Word Strip 2 stamp set. I stamped the strip onto a piece of Drawing Cartridge several times using shades of green and orange Distress Ink to create an ombre effect. I stamped the fruit tree from The Tree of Knowledge stamp set onto a piece of book paper, and coloured it with Zig Clean Colour markers. I added some shading around the edges using green Distress Ink. This card would be suitable for lots of occasions- a graduation, a book lover's birthday, or even just to show someone you are thinking about them.


 Thanks for stopping by, take care, xx


Thursday 8 September 2022

Leafy Bokeh Card

Hello everyone, I hope that you are keeping well. It's time for another monthly Fifteen Minute Card spot, and this month, I'm in a leafy mood. I have chosen to use the beautiful leaves from the From Nature 2 stamp set to create a quick Christmas card.

I stamped and embossed the leaves using a silver glittery embossing powder, and added a few snowflakes using white embossing powder. Keeping my background very speedy, I added shading with green and blue Distress Inks. I added some white circles with a stencil and Brilliance Ink for a bokeh effect. Finally, I added a sentiment from the Pears and Baubles stamp set. I love the font on this sentiment.

If you get the chance to make a quick card in Fifteen Minutes or less, then head over to the Chocolate Baroque Facebook Group where I have created an album for this month. You can pop your cards or other projects in there. We would love to see what you have made. Thanks for stopping by, 

Take care xx


Thursday 1 September 2022

Creating Stamps Using Leaves From The Garden

Hello everyone, I hope that you are keeping well. I have some cards to share with you today showcasing some of the wonderful stamps that we brought to the TV shows last month on Create and Craft. If you watched the shows, you will have heard the story behind some of these images, and how they came to be created. From Nature 1 was an incredibly beautiful stamp set, created from leaves collected around where David and Lesley work. I offered to send some leaves to Lesley from my garden in Norfolk, as I have some interesting leaves which are unusual, and would make fabulous stamps. So, I packed them up in resealable bags, and sent them to Lesley. The leaves were in pretty good shape when she received them, and therefore, From Nature 2 was created. I did craze Lesley to add a particular leaf to the stamp set, but they are all so versatile, and I had great fun creating my projects with them.

For my first card, I created a Distress Ink background and added a few extra paint splatters. I stamped some of the various words and sentiments over the top. I chose colours that would tone in with the focal part of my card, using Versafine Clair Inks. I used a small spare piece of this background card for a sentiment too.

To create my topper, I covered a piece of Drawing Cartridge with cold tea, and added sea salt to the background while it was still wet. I left the background to dry naturally, and then brushed the salt away. The salt leaves great markings on the background. I stamped and embossed the three sizes of ivy leaf onto the background. You can use clear or white embossing powder, it doesn't matter, although white embossing powder will enable you to see where you are embossing more easily. I then added Distress Ink all over the top of the background. 

I placed some copy paper over the background, and then ironed the embossing powder off the design. I kept checking that the embossing powder had all gone, replacing the piece of paper each time I checked. You can use brown paper if you prefer. By taking away the embossing powder, you get a completely flat surface, this is called a 'faux batik' effect, it looks like the batik material that originates from Indonesia, which is created by using wax as a resist when dyeing fabric. I also felt that by using the tea dye behind the Distress Ink, the irregularities looked like the background had been sun bleached, as if I had created a cyanotype effect. 

I used blue inks on another piece to really highlight this effect.

My second project features the stunning Plume Poppy leaf, or Macleaya Cordata if you prefer the latin name. I used an actual leaf to create the background, using a technique that my lovely friend Elaine, an ex Chocolate Baroque Design Team member, taught me. To create the topper, I simply stamped and embossed the leaf, and added colour using Distress Inks, water and a brush. A few splatters of brown ink, and one of the smaller stamps from the set complete the design.


For my final card, I chose to use the Smoke Bush or Cotinus leaves, there are two on the stamp set. I arranged them in clusters, just as you would see them on the bush, and coloured them with pencils. For the larger background, I simply stamped them with a plum coloured ink. Both backgrounds are simple Distress Ink backgrounds, and I have edged both layers with a plum coloured ink to avoid using extra card to mat and layer.

I hope that you have enjoyed the story behind these stamps and will try out some of the ideas that I have shared with you. I will be back later in the month to share more leafy projects with you. Thanks so much for stopping by, take care, xx


Related Posts Plugin for WordPress, Blogger...