Followers

Showing posts with label Fragile Wings. Show all posts

Tuesday, 30 May 2023

Reuse, Recycle

Hello everyone, I hope that you are keeping well. I have a few projects to share with you today featuring stamps from this month's TV shows on Create and Craft.

My first project features a bit of recycling, and when I showed it Lesley, we both laughed, as we had both thought up very similar projects! I started by creating a vibrant background using red, orange and yellow Brushos on a piece of Drawing Cartridge. These backgrounds are a great starting point for a project and you could have a crafty afternoon making lots of them and save them for later.

I then cut up a brown paper shopping bag, the sort that you get your groceries in from a supermarket, and ironed a smalled piece nice and flat. I stamped the Poppy Ledger image using Versafine Clair Nocturne ink. I put a small amount of yellow, orange, red and olive green Brusho onto an acrylic block and gently spritzed each colour with water. I used a brush and some extra water to paint the image with these colours. I then used a couple of the colours to splat the image with my brush afterwards, to make it look a bit older. 

I added a piece of scrap card behind the image to make it a bit stiffer, then attached it to a piece of corrugated card that I had trimmed to become a mount. I think that this card would look great with some little tickets and some twine added to finish it off, don't you?

I have a couple of older projects to share with you. On my next project, I decided to stamp the lovely focal image from Fragile Wings onto dark blue card for a change. I used white pencil for highlights and than added some blue and green pencil for a pop of colour. The blue/green background uses a couple of useful background stamps that tie in well with the main image.


Next, this card featuring Floral Study is another older card, but I like the greens contrasted with the pinks and oranges, it feels quite warm. I have added stamping from the Glorious stamp set in the background, and used watercolour pencils to colour the main image.

I am also sharing some projects using some stamps from the tree house stamps that we brought to the shows. My next project uses the fabulous Tree House stamp set, and I chose to stamp the image onto a piece of patterned paper created by Lesley a while ago. The paper had lovely pink and green elements, and this became the basis for my colour scheme. I created a background for the card using Picked Raspberry and Shabby Shutters Distress Inks, then added a tree image and sentiment from the Trees a Crowd stamp set using a dark green ink. I stamped both repeatedly over the background.

I coloured the focal image with pencils, and then added extra shading around the main image and background using the Picked Raspberry Distress Ink.

You could create a similar look if you did not have the patterned paper, using a piece of black and white script paper or a piece of plain smooth white stamping card. You could add script and a subtle floral image to the plain background, or some coloured stamping to the script background, plus a bit of shading. You can very easily achieve a patterned background that looks every bit as nice as the one that I started out with.

I have some older 'house' projects to share with you today, to round off this month's selection. I hope that you enjoy them. 

This one is created using the Mushroom House, and the moon reflecting on the house at night.


This one is the Heath Robinson House. I stamped the main image on a tag, coloured it with pencils, and used one of the sentiments to create a background over a gelli print.


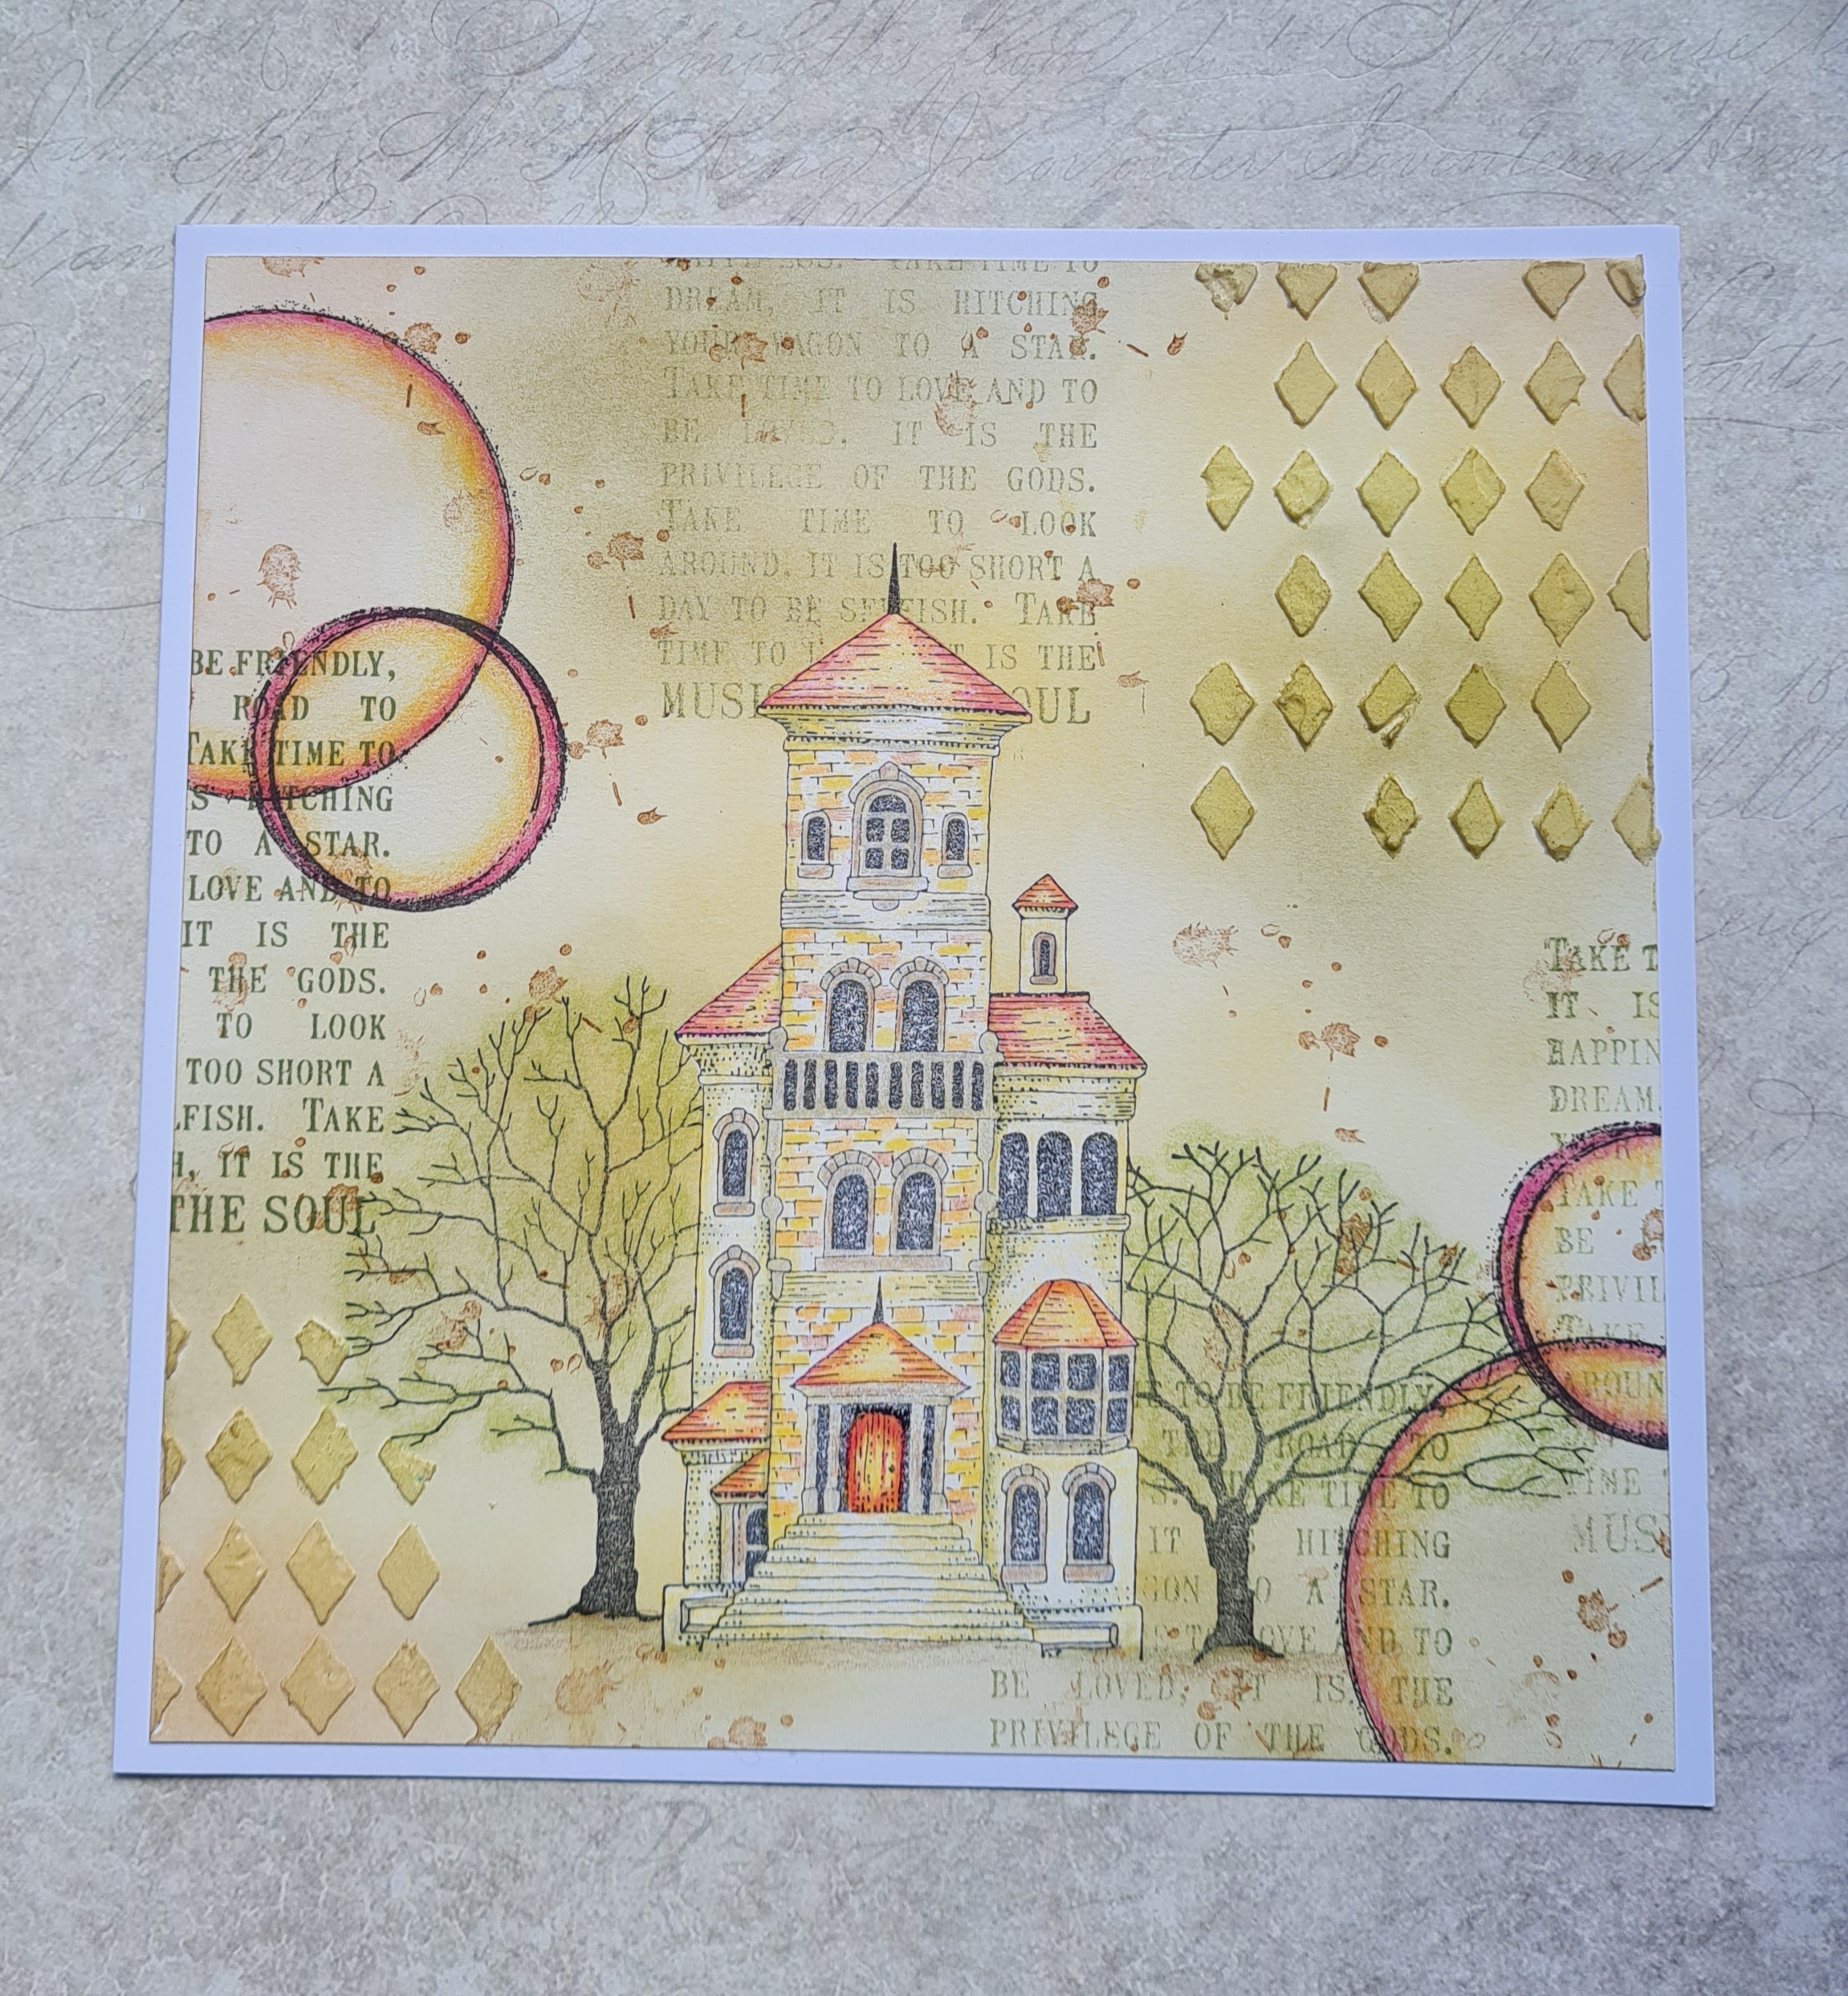
 This one is Italian House, with a couple of Trees from Orchard Design a Tree, words from Words of Wisdom, and circles from Make Your Mark. I have added texture paste through a stencil and coloured the images with pencils.
This card was created using the Dutch House, and a tree from Trees a Crowd. I wanted the colourful houses to look like a street in Amsterdam in the Spring. 

Finally, a project from the Garden House. I stamped the image onto book paper, using the Tagtastic stamp as a frame. I added a couple of bees from the Honey Bee set and a sentiment onto the watercoloured background.

Thanks so much for stopping by and take care xx


Thursday, 11 May 2023

In Flight

Hello everyone, I hope that you are keeping well. I have some projects to share with you featuring stamps that were part of this month's TV shows on Create and Craft. 

My first project was created by adding some Distress Oxide Inks to a craft mat, (I used Wilted Violet and Evergreen Bough), and spritzing them with water. I patted a piece of Drawing Cartridge onto the mat to pick up the colour. I dried the Drawing Cartridge and then picked up some of the left over colour, to get a layered effect on my background. I am explaining this technique purely for any new stampers out there. I know that I use this technique a lot, but due to the time constraints of a TV demo, I need to add colour to a background very quickly, and this works very well.

For the next stage of my project, I brayered Evergreen Bough Distress Ink onto some smooth stamping card, (on my original card, I used a gelli plate for this step). I added some extra texture to the background by stamping over the top using the Square Bubbles stamp and Lucky Clover Distress Oxide Ink. I then stamped the A Year of Stamping Issue 5 - May image using Versafine Clair Nocturne Ink. After ensuring that the image was completely dry, I coloured the dragonflies using Artway shimmer paints. I coloured the dotted areas of the wings with Inktense pencils to add a bit of shading.

To finish the card, I found a piece of patterned paper in my stash, to which I added shading with Distress Inks so that it matched my overall colour scheme. I stamped a sentiment from the Fragile Wings stamp set. I trimmed the main image around the outline, and then ran a black inkpad around the other components of the card to match. I allowed everything time to dry before attaching it all to a card blank.

My second project features the very pretty Bird of Joy stamp. This is such a versatile stamp, as the words can also be removed and stamped separately, or not at all. I chose to create a large, colourful tag, and started by stamping the image with Versafine Clair Nocturne. I masked the image and also used a circle mask for a sun. I added background colour in blue and green. I then used a couple of floral images from the Walk Tall stamp set, stamping them in plum and olive shades. I added the wording using a grey Versafine Clair Ink, and second generation stamping, so that the words were not too prominent.

I removed the masks and added yellow ink for the sun, and coloured the image with Zig Clean Colour markers. I love how vibrant these pens are, and how they blend so easily.


I have another card using this fabulous stamp that I created a while ago, and I thought that I would share it with you again. I made a gelli print directly onto a square card blank, and then stamped the Bird of Joy over the gelli print. I simply coloured the image with pencils. I obviously like this colour option, as both birds are very similar! 

I will be back very soon with more cards to share with you. Thanks so much for stopping by, take care xx

Friday, 24 June 2022

Blue And Green

Hello everyone, I hope that you are keeping well. I have a couple of projects to share with you today, showcasing stamps that we brought to you on last month's TV shows on Create and Craft.

My first card uses a variety of stamp sets, but the hero of the card is the lovely dragonfly collage from the Fragile Wings stamp set. I decided to stamp this image on a coloured background, a deep teal colour, for a change. We often use black, kraft, grey, etc., but I wanted to reflect the wonderful dragonfly colours in the card background. I used Versafine Clair Nocturne to stamp the image, and Koh-I-Noor pencils to colour the image. I used white pencil first to create a base to add the rest of the colours, and to give a real sense of light to the image.

I created a background using green and blue Distress Ink, and then added stamps from Just Useful and Ace Card, using blue, green and black ink. I matted both layers using black card.

To create my second card, I coloured some Drawing Cartridge using tea, a favourite technique of mine. It's a really quick way of adding colour to a background and creates a vintage feel to a project. I stamped the playing card from Ace Card randomly over the background, and added a touch of turquoise around the edges using a watercolour pen, brush and water. I stamped the large image onto another piece of the rawing Cartridge and coloured the image in the same way using turquoise, green and brown watercolour pens. I edged the layers with the same dark brown ink that I had stamped all of the images with.

I chose to use a piece of scrap corrugated packaging as a mount; I dry brushed the edges with paint to match my colour scheme. Always keep that packaging, you never know when it will come in handy!


I had great fun creating these cards. I hope that they have inspired you. Thanks for stopping by, take care, xx


Friday, 26 February 2021

Dragonfly Dreams

Hello everyone, I am sharing a card showcasing stamps from last month's One Day Special on Hochanda. These stamps have been such great fun to work with and I hope that I have given you a few ideas to use yourself.

I started my project by taking a piece of tea stained drawing cartridge from my stash. I have a few of these ready for a quick start to a project. I added salt when the background was wet for extra texture. I stamped the large playing card image from Ace Card with black Versafine ink, and masked the image with Masking Tissue. I added the small script from the same stamp set along one edge, and then the woodgrain image designed by our great friend Kim Moody from the Fragile Wings stamp set all over the background. 

I stamped out three of the smaller playing cards onto a spare piece of background, plus the sentiment. I added some Seedless Preserves Distress ink around the edges of all of the pieces. I coloured the main image with Inktense pencils and blended the colours with a waterbrush. When the image was dry, I added extra details with darker colours. I used a clear Wink of Stella pen over the dragonfly wings.

Thanks for stopping by, take care and stay safe, xx


Thursday, 18 February 2021

Just Useful Collages (by Judith)

Hello everyone, I have a couple of projects to share with you today. I posted one of the projects a few weeks ago on social media to help promote last month's One Day special on Hochanda, so some of you may have seen this card already. To create the card, I stamped the paint splash onto a piece of drawing cartridge several times using Versafine Clair Ink in three different colours. I chose bold colours for lots of impact. I stamped the dragonfly image from the Fragile Wings stamp set onto the background, and added the slim script  and splatters from the Just Useful stamp set to extend the collage. I also added circles from the Make Your Mark stamp set.

I stamped and embossed the dragonflies onto some patterned paper, and cut them out. I then attached them to the background. The sentiment comes from the Fragile Wings stamp set as before.


I created an acrylic tag as my second project, I really enjoy making these, they are really fun to create. I chose a piece of A5 Double Sided Designer Paper, and using Archival Ink, added lots of detail. I used elements from the Just Useful stamp set to create a collage, showing that you do not need a hero image to create a real focal piece of artwork. You could add this to a card, or give it as a special gift to someone, hang up as a stand alone piece of artwork, or include it on a larger piece of mixed media. The stamps I have used are all great for incorporating in backgrounds and building up your collage pieces. I have some real favourites amongst them already, some real go to stamps. As you experiment and play with them, I hope that you will find yourself reaching for these stamps too.

I will be back later in the month with some more projects to share with you, thanks for stopping by. Take care and stay safe, xx


Related Posts Plugin for WordPress, Blogger...