Followers

Saturday, 25 May 2019

Stamping on Patterned Paper

Hello everyone, I have some more projects to share with you today showcasing the beautiful bookmark style houses that we brought to Hochanda last month. These three projects formed part of a TV demo that I did on one of the shows. I wanted to demonstrate how to stamp onto a patterned surface, and when an image is coloured, the image pops out, and the patterned surface recedes to the background.

I used a piece of Lesley's Chic Script Designer paper pack, and cut  a piece of the script paper to size. I stamped the Tree House onto the paper. I added a few lines at the bottom using a fineliner pen to finish the landscape, and coloured the image with pencils. I added shading with grey pencil for added depth.

I took a plain piece of green paper from the pach, and using one of the trees from Trees a Crowd and a sentiment, I created a piece of background paper using Pistachio Memento Ink. This was really quick to create, and you can have your own designer background in minutes! I inked the edges of both pieces of paper with the green ink for definition. As you can see, the script paper looks great as a background, and the house sits really well on the pattern.

For my second card, I used the large Tagtastic stamp and stamped onto a piece of book paper. I stamped the Garden House image inside the tag, and coloured the image with pencils once again. I added a bit of shading on the background using Distress Inks.

For the large background, I used a large acrylic block and added pink, blue and green Distress Oxide which I spritzed with water. I smooshed it across a piece of drawing cartridge in one go. I stamped two bees from the Honey Bee stamp set, and added a sentiment. I coloured the bees with pencils and added Stickles to the wings.

For my final card, I created a gelli print background, adding a bubble effect texture, and stamping a sentiment randomly over the background. I used a Crafty Individuals script effect tag and stamped the Heath Robinson House, which I then coloured with pencils. I added bright red highlights which I matched with a bright red ribbon. I added shading to the tag with Distress Inks, matching the colour of the gelli print background.

I hope that you have enjoyed my projects this month, I will be back next month with lots more to share with you, thanks for stopping by, xx


Thursday, 16 May 2019

Large Trees

Hello everyone, I have two projects appearing on the Design Team Blog today in the Fifteen Minute blog post. This is a monthly feature made up of quick cards and projects, each taking no more than fifteen minutes to complete.

My first card was made using a scrap of background from my stash, which had originally been created by inking around some leaves from my garden, using Ripe Persimmon Distress Ink on yellow card. I stamped the large tree from Trees a Crowd onto a piece of watercolour paper using Black Archival Ink, then carefully sprinkled red, green and orange Brushos just where I wanted them. I spritzed the Brushos with water. I used some green Brusho and a waterbrush to 'ground' the tree. I inked around the panel with Ripe Persimmon Distress Ink. I added a sentiment strip to complete the card, inking around it as before.

My second project is a large tag, I added background colour by covering a large acrylic tag with Distress Ink and spritzing it with water before swiping it across the tag. I used the same tree image as before and added a smaller tree image from the same stamp set stamped using green ink in first and second generation stamping to create the foliage. Again, I used some extra Distress Ink to 'ground' the tree, as I do not want the tree to be floating in mid air. A sentiment, ribbon, and hand drawn birds completed the tag.

Do check out the Design Team blog to see what my Team mates have been up to with their Fifteen Minute creations. Thanks for stopping by, xx

Thursday, 9 May 2019

Beautiful Homes


Hello everyone, I am sharing two projects today showcasing the fabulous bookmark style houses that we brought to Hochanda last month. These lovely designs drawn by Sue have been a delight to work with,I hope that you will enjoy my samples this month.

My first project is an acrylic tag, and I have stamped the Garden House onto the reverse of the tag using Archival Ink, then painted the image using acrylic paints. I used a piece of patterned paper from the Chic Script Designer paper pack, and stamped the sentiment onto the paper before adhering the paper to the tag using Matte Medium. The photograph does not really do this tag justice, I love the way these acrylic tags turn out, and they may become addictive!

To create my second project, I stamped the Acorn House twice, masking the image as I went along. (I took care not to ink the sun in the second repeat of the image, by covering it with masking tape first, inking the image and peeling off the masking tape before stamping). I coloured the background with a watercolour wash, then stamped the large tree from the Trees a Crowd stamp set several times. I added foliage using Glade Design a Tree and several colours of Versafine Clair ink, building the colours with first and second generation stamping.

I removed the masks and coloured the house with pencils. Finally I added a sentiment to finish.

The sentiments on these stamp sets are so uplifting and would be suitable for lots of occasions.

I will be back later in the month with more projects to share with you, thanks for stopping by, xx


Monday, 29 April 2019

Butterflies and Bubbles

Hello everyone, I have a couple of projects to share with you today, showcasing stamps featured in last month's TV shows on Hochanda.


For my first project, I wanted to compare the card that we brought to the show, a mixture of gloss and matt card, and to see how each surface worked with ink. I embossed an image from Punky Romance on both pieces of card using Versamark and white embossing powder, before creating a background, blending Versafine Clair Ink on the surface. I used a mix of purple and mustard, which is very cheery. I stamped another image from the same stamp set using Memento Ink in a deep purple shade over the top, taking care to rub away any ink that covered the white embossing with a piece of kitchen paper.

It is not very easy from the photograph to tell the difference between the two surfaces. The glossy card (on the right) really shines, and takes the ink very well. The matt card (on the left), apart from the embossing, looks printed, it is so smooth. It depends which effect you prefer, I like them both. This card will be a staple product on the website in the future, just like our Drawing Cartridge and Textured Art card.

I embossed three butterflies onto vellum using the white embossing powder, and cut them out, adding them to the background to complete the card.

To create my second card, I created a wash over a piece of drawing cartridge, using blue watercolour ink. I added a bit of sea salt and left the background to dry. I stamped the heart image from A Heart Full of Love onto another piece of card using dark blue ink. I coloured the image using Ecoline markers and added a bit of sparkle using a silver sparkle pen. Once the background was dry, I removed the salt and stamped around the edge with a bubble image from Floral Heart to tie in with the bubbles on the main image, adding highlights with the silver sparkle pen once more.

Thanks for stopping by, xx


Monday, 15 April 2019

Fifteen Minute Cards


Hello everyone,  today sees the monthly Fifteen Minute Cards blog post over on the Chocoloate Baroque Design Team blog. I have created two projects for the post, the first card was created by stamping and embossing the heart image randomly over a piece of scrapbook paper using a teal embossing powder. I used the same colour for the sentiment on a smaller strip of the paper. I edged both pieces of the paper with Teal ink, allowing them to dry before assembling the card.


For my second card, I stamped the broken heart using red Memento ink onto a white card blank. I then stamped the heart again onto a mini gelli plate before then using the gelli plate as a stamp and stamping the image from the gelli plate beside my first stamped image on the card blank to complete the heart. I added the sentiment using black ink, then flicked some watered down red Distress Ink over the card to create splatters.

Do hop over to the Design Team blog to check out the projects that my team mates have created.

Thanks for stopping by, xx

Friday, 12 April 2019

Hearts Full of Love

Hello everyone, I have a few projects to share with you from last month's TV shows on Hochanda, featuring the lovely heart stamps.

My first projects are three very quick cards, 4" square, using images from the Floral Heart stamp set. I stamped straight onto the card blanks to create a set of clean and simple cards that could be used as little notelets.


The first card uses three different colours of blue Memento ink and the bubble heart, around one of the sentiments which was stamped in black ink. I covered the card very quickly, simply stamping the heart in the different colours to create an all over background.


The second card was created by stamping the large heart, and then stamping the flower cluster down the side using four different colours. I then painted the flowers in the large heart using the four colours and added white highlights.


The third card was created by stamping the heart in second generation randomly over the background with red ink. I stamped the sentiment in black ink as before. Using a small white board circle from the Hearts and Circles pack, I added red ink before coating the circle with UTEE, heating it with my heat gun and stamping the same heart image into the hot embossing powder. I brushed some gold mica powder over the image to pick out the detail. The variations that you could create using this little stamp set are huge, and these little cards can mean so much to someone. I quite like working on this small size!

The following cards were shown as a demonstration on one of the TV shows last month. I created a Toile de Jouy background using the flower sprig from the A Heart Full of Love stamp set, stamping onto 160gsm Luxury Smooth paper I cut a smaller square of the paper to stamp the corresponding heart image. I coloured the heart with pencils, before matting both layers with coordinating card. I coloured a piece of ribbon with Distress Ink to get the ribbon to match the project exactly. I created a couple of colour options for the show, one pale, and one much brighter, to show that by changing the colours, you can create a very different effect. Apologies for the photo of the paler card, it has been given away now, so I cannot photograph it again.


I stamped the first card using a Blue Archival Ink, and the second using Grey Archival Ink. They are not necessarily colours that you would think to use, but once you start to colour the images,the ink colour recedes into the background. Toile de Jouy is created in lots of different colour options anyway.


I will be back later in the month with more projects to share with you, thanks for stopping by, xx


Saturday, 30 March 2019

Positive Thoughts

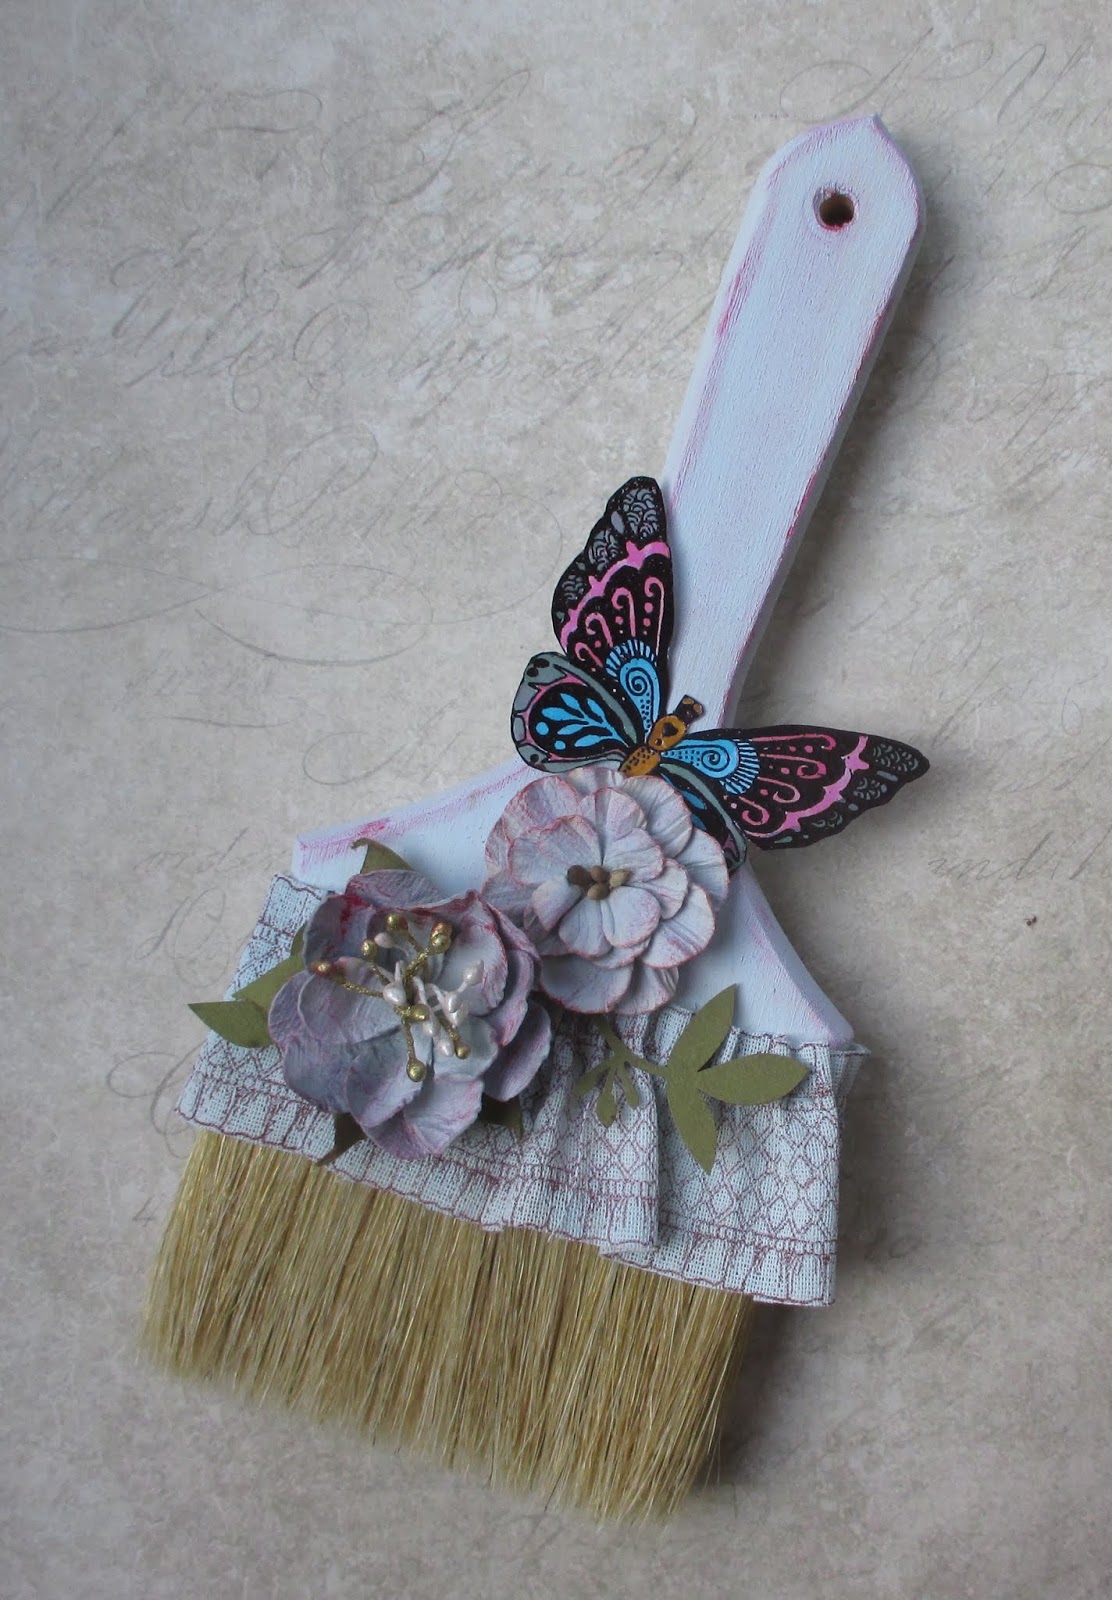
Hello everyone, I have two projects for you today, the first was created using a limited edition kit that we brought to Hochanda last month featuring a wide paintbrush, which I decorated. I painted the brush using a pale blue paint from Little Birdie and dry brushed it with Quinacridone Magenta paint for an accent colour. I stamped some linen fabric which had also been painted with the blue paint, using Plum Archival Ink. I chose one of the ribbon trim images from the Floral Mannequins stamp set. I cut the image out and gathered it up around the top of the bristles with cotton, and stuck it down using double sided tape. I added some Little Birdie Flowers that had been dry brushed with the magenta paint. To complete the project, I stamped part of the large image from The Folk Art Garden onto card, coloured it with Zig clean colour brush markers and cut it out, before adhering it to the paintbrush. Who says paintbrushes should be used for decorating!

To create my second project, I cut a piece of luxury smooth 160 gsm ivory paper to the required size, and made a gelli print. I used two colours of Distress Ink, and added a textured pattern to the plate before I pulled a print. I added the stamped image from The Folk Art Garden all over the background using Sepia Archival Ink. I stamped the sentiment onto a spare piece of paper created in the same way.

To complete the card, I added a strip of hessian, and some toning ribbon before adhering the background to a card blank. The sentiments on this stamp set are so useful to add to a card for someone who needs a bit of encouragement or positivity.

I will be back next month with more projects to share with you. Don't forget to look out for Lesley and I on Hochanda on Tuesday at 10.00 a.m. and 3.00 p.m. with some brand new stamps. Lesley will also be featuring on the screen on Sunday and Monday, so you will have lots of opportunities to see her in action!

Thanks for stopping by, xx


Sunday, 17 March 2019

Folk Art Garden

Hello everyone, I have two projects to share with you today, featuring The Folk Art Garden stamp set, which we shared on one of last month's TV shows on Hochanda. This beautiful stamp set features a wonderful intricate stamp, along with some delightful smaller images, all hand drawn by our designer Sue Page and some fabulous little sentiments which were added by Lesley.

I created my first project by stamping the main image onto some 160 gsm Luxury Smooth White Paper which is perfect for this kind of project. This paper is the same paper that the colouring pages, and the designer papers are printed on. You can colour with pencils, add inks, or watercolour on the paper, it is very versatile. I used Versafine Clair ink in a dark blue, rather than going for a stronger black colour. I partially masked the image using Masking tissue, and added some of the little worker stamps around the edges, to create the effect of a garden running along the bottom of the page.

I added some Distress Ink along the top of the card, masking off a circle for a sun, and using torn paper to create hills. I used a mixture of blue and pink to create the sky. I added yellow for the sun, and stamped a sentiment. I added two little birds from the Landscape Edges stamp set. I used Polychromos pencils to colour the flowers and butterflies. It may seem like it would take ages, but I sit in front of the TV, and the time passes without me noticing!

For the purposes of a TV demo, I needed to create a quicker version of this card, plus Masking Tissue never reacts well under the studio lights! I used the big acrylic block that we sold with the stamp, and covered it with two different colours of Distress Oxide Ink, one blue, and one green, and spritzed them with water. I smooshed the block across a piece of drawing cartridge, (that had a circle mask already added), covering the background in one go. Once the background was dry, I stamped the large image in a dark colour at the bottom of the page, as before, but towards the middle this time. I used the large image to stamp around the edges, filling in the gaps, so that the image was not floating by itself.

I coloured the image with Koh-I-Noor paints, as these cover the Distress Oxide Ink really well. I stamped a sentiment from the same stamp set to complete the card.

By varying the amount of Distress Ink that you add to the block, you can alter how vibrant your background will be. If you do not want such a strong background, add less ink to the acrylic block.

I will be back later in the month with more projects to share with you. Thanks for stopping by, xx

Monday, 4 March 2019

Make Do and Mend

Hello everyone, and welcome to my first post of the month for March. As you read this post, I will be on my way to Hochanda for the first of our TV shows for this month, with another show tomorrow. I do hope that you can watch or record the shows to see what Lesley and I have in store for you. The Design Team have created more beautiful projects to inspire you once again.

For my post today, I am taking you back to last month's TV shows, when I created some fabric samples, using the fabulous Haberdashery range of stamps, and want to share a couple of those with you. I have used stamps from Haberdashery, The Sewing Room, and Floral Mannequins stamp sets.

I created a card background using a damp tea bag, which I wiped over a piece of drawing cartridge, then sprinkled some sea salt on top, leaving the background to dry. Once I had wiped the sea salt away, I stamped a range of the little worker stamps from the sets over the background using dark  brown Archival ink. I created a tag using scraps of fabric and book paper, then added a mannequin which I had stamped onto kraft card using white embossing powder. I coloured the image with Koh-I-Noor paints, which colour on kraft card so well. The little sentiment was stamped onto a scrap of fabric.


The large tag would make a gift in its own right it is so pretty, I made another one in a softer colour option, it feels more vintage in these colours. If you are like me, you have lots of little scraps, and these tags are perfect for adding all of your little bits and pieces. For my TV demo, I simply used double sided tape to attach everything, and did not sew the pieces as I have done in these photographs.

My second project is a little needle case, using lots of the little worker stamps in the stamp sets. I stamped the images onto plain cream fabric using brown Archival Ink, and coloured them with Inktense pencils and a water brush. I added some pretty floral fabric which matched my colours to create the needle case, plus felt for the inside 'pages'.


This was a faily quick project to make and is a great way of using up little pieces of fabric.

I hope that you have enjoyed my projects today, and will try stamping on fabric. As I said during my TV demo, just hold the stamp on the fabric a bit longer than you would on card or paper, there is no need to press any more firmly.

Thanks for stopping by, xx


Saturday, 23 February 2019

Flowers, Butterflies, and Lots of Colour!

Hello everyone, I have a couple of projects to share with you today, showcasing the lovely Perfumery range of stamps that we aired on last month's TV shows on Hochanda. I am focusing on some of the smaller stamps in the sets this time, rather than the larger perfume bottles.

To create my first project, I stamped the rose image from the Rose Perfumery stamp set five times onto a piece of Drawing Cartridge, masking it each time. I stamped the leafy sprig in the gaps to create a wreath shape.

I added some Turquoise, Sea Green and Ultra Marine Brushos and spritzed the background with water before removing the masks. I coloured the flowers and leaves with the same colours of Brushos that I had used for the background, and added a bit of Stickles for sparkle. I stamped the sentiment in the centre, and picked out the letters with a white gelli roll pen.

To create my second card, I stamped the butterfly image from the Butterfly Perfumery stamp set onto fabric which I had gessoed three times, using Archival Ink. I coloured the butterflies with Colourcraft fabric paint, watered down slightly, and cut them out, leaving a small border.

I found a background in my stash box which matched the butterflies, and stamped a sentiment using Versafine Onyx Black ink and clear embossing powder. I attached the butterflies, and drew some stitched lines using a black permanent fineliner pen. A matching coloured card was used as matting layer.

I will be back next month, with some more fabric based samples to share with you. Thanks for stopping by, xx

Saturday, 16 February 2019

Butterfly Tag

Hello everyone, over on the Chocolate Baroque Design Team blog today, we are sharing our monthly Fifteen Minute blog post, a bumper feature which aims to give lots of tips and ideas for creating quick cards and projects in fifteen minutes or less. I have a project within the blog post, a tag, and am sharing it here as well.

I have made a quick tag, which could be added to a gift, used as a bookmark, or added to a card. I have used a scrap piece of background from my stash to make the tag, which was coloured with blue and purple Distress Inks, (a favourite colour combination), and water, then sprinkled with salt and left to dry.  I stamped and embossed the butterfly border from the Butterfly Perfumery stamp set over the top and coloured it with Inktense pencils and a waterbrush. I chose two sets of contrasting colours for the butterflies, both of which worked well with the background. I added a sentiment, which had been stamped onto a piece of scrap card that I had coloured with the same colours of Distress Ink. I distressed the edges and inked them with Seedless Preserves Distress Ink. I distressed and inked the edges of the tag, and added a complementary ribbon through a hole that I had punched at the top.


The butterfly border is straight, but on my tag, I was going for a more curvy effect, it has worked quite well. I will be back soon with more projects to share with you. Thanks for stopping by, xx


Wednesday, 13 February 2019

Masculine Birthday Card

Hello everyone, I have needed to make a couple of masculine Birthday cards lately, and thought that this great image from France's Kevin and so was just ideal. It reminded me of someone sat in front of the TV in their comfy armchair wearing their favourite slippers.

I created a wrinkle free distress background using shades of blue, yellow and green Distress Ink first of all. I stamped the image using dark brown Archival ink onto a smaller piece of card, edging the background with Fossilized Amber Distress Ink, to take away the whiteness of the card. I coloured the image with Inktense pencils and a waterbrush, adding shading with darker colours afterwards, for more depth. A lttle bit of grey pencil around the chair legs and the foot helps to ground the image.

I added a sentiment using the brown ink as before, straight onto the background. I edged both pieces of card with blue ink before constructing the card.

This is such a fab, quirky image, my Father-in-Law laughed out loud when he opened his card! Thanks for stopping by, xx


Related Posts Plugin for WordPress, Blogger...