Followers

Showing posts with label Echoes of Italy. Show all posts

Sunday, 21 August 2016

Holiday in Italy

Hello everyone, we are creating projects with a Summer theme over on the Design Team this month. When I think of Summer, I immediately think of my favourite holiday destination, Italy. We have recently returned from a week's holiday in Lake Garda, and so it was easy to choose which stamps I should use for my Summer related project.

I started my design by covering my gelli plate with Fossilized Amber Distress Ink, using a brayer, and then laying a piece of smooth card over the top. This is a really quick way of creating a coloured background. I added a crackle finish, using the large crackle stamp from the Echoes of Italy stamp plate, using second generation stamping, and Potting Shed Archival Ink. I used the large decorative design along the bottom of the background to create a border, drawing a faint pencil line to ensure that I got my border nice and straight, and then rubbed the line out afterwards. I edged the background with Wild Honey Distress Ink to add some shading.

I stamped the main image onto a rectangular panel, using Archival Ink as before, and coloured it with Distress Markers and a water brush. I drew a few birds by hand with a permanent fine tipped marker. I stamped the sentiment onto a smaller panel, and added a bit of Fossilized Amber Distress Ink to the background using a blending foam. All of the panels were matted onto dark brown card before I assembled the card.

We had a fabulous holiday in Garda, and I thought that I would share a couple of photos with you.

Thanks for stopping by, xx


Wednesday, 11 May 2016

Gelli Good Fun

Hello everyone, I have some projects to share that are actually part of a brand new TV showing on the Craft Channel, presented by our lovely boss Lesley Wharton. She is going to be one of their regular presenters from now on, which is fabulous news, and will be a regular treat for anyone wanting to learn some great crafting tips and techniques from a very talented lady.

For the gelli plate show, we wanted to create some projects that catered for all abilities, from beginner to advanced, and the first project that is shown is this one.

To create my cards, I made a mask using a piece of acetate, cutting an oval from the centre. This makes a really robust template, much stronger than paper, and the added bonus is that you can see where you are stamping, and it wipes clean for further uses. I was so happy with this idea, and I have developed it further for later projects, as you will see. I'm sure that others have done similar things, but as I do not watch gelli plate tutorials or YouTube demos, etc., I can honestly say, that this was something that I worked out for myself!

I chose a couple of colours of Distress Ink for my background, and loaded up my brayer with the first colour, and rolled it across the middle of the gelli plate. I cleaned off the brayer, by rolling it onto a piece of scrap paper, and loaded up the brayer with the second colour of ink. I then rolled the brayer across either end of the gelli plate, blending the two colours where they met.

I placed the oval mask into the centre of the gelli plate, and then placed a sheet of bubble wrap over the top of the gelli plate, pressing gently. I took the bubble wrap and oval mask away, and placed a sheet of white card over the gelli plate, smoothing over the back of the card, evenly, to ensure that I got a good coverage of ink. I peeled the card away from the plate, and laid it flat on my craft mat, placing the large acetate sheet over the top. Using a black fineline pen, I drew two wobbly borders inside the oval cut out.I chose two co-ordinating images from the Wild Meadow stamp set and using Versafine Olympia Green, I stamped the images onto the background. I removed the acetate sheet, and trimmed the card to size, before adhering to a large card blank.

For my second sample, I repeated the process, but used a scrunched up plastic bag, instead of bubble wrap, to create the background marks. The oval piece of acetate created air bubbles on the cental section, but this looks quite pretty behind the flowers. That's the beauty of gelli plate prints, each one will be different.

I chose to add a faux stitching effect with the fineliner pen on the second sample, I always find this to be very therapeutic!

For my final card, I created another acrylic mask with three apertures. I used two colours of Distress Ink as before to colour the gelli plate, and then added the three circles to the plate. I took the large crackle stamp from the Echoes of Italy stamp plate, and stamped repeatedly across the gelli plate to take away some of the ink. I then removed the circles before taking the print with white card.

I added the piece of acetate, lining up the largest circle first, and stamped a flower from the Autumn Fairy collection using Versafine Ink. I stamped it a couple of times before re-inking, to get a group of flowers. I also spread the flowers up through the circle, heading towards the next circle.

I covered the largest circle with a piece of paper, and lined up the second circle, then stamped the same flower image into the second circle a couple of times. I also added a butterfly from the same stamp set. Finally, I added a sentiment in the smallest circle. I trimmed the card, and added a bit of shading around the edge of the background before adhering it to a white card blank.

Check out the new gelli plate show on the Craft Channel, and look out for Lesley presenting regularly too. Thanks for stopping by, Judith xx


Saturday, 24 January 2015

Valentine Rose


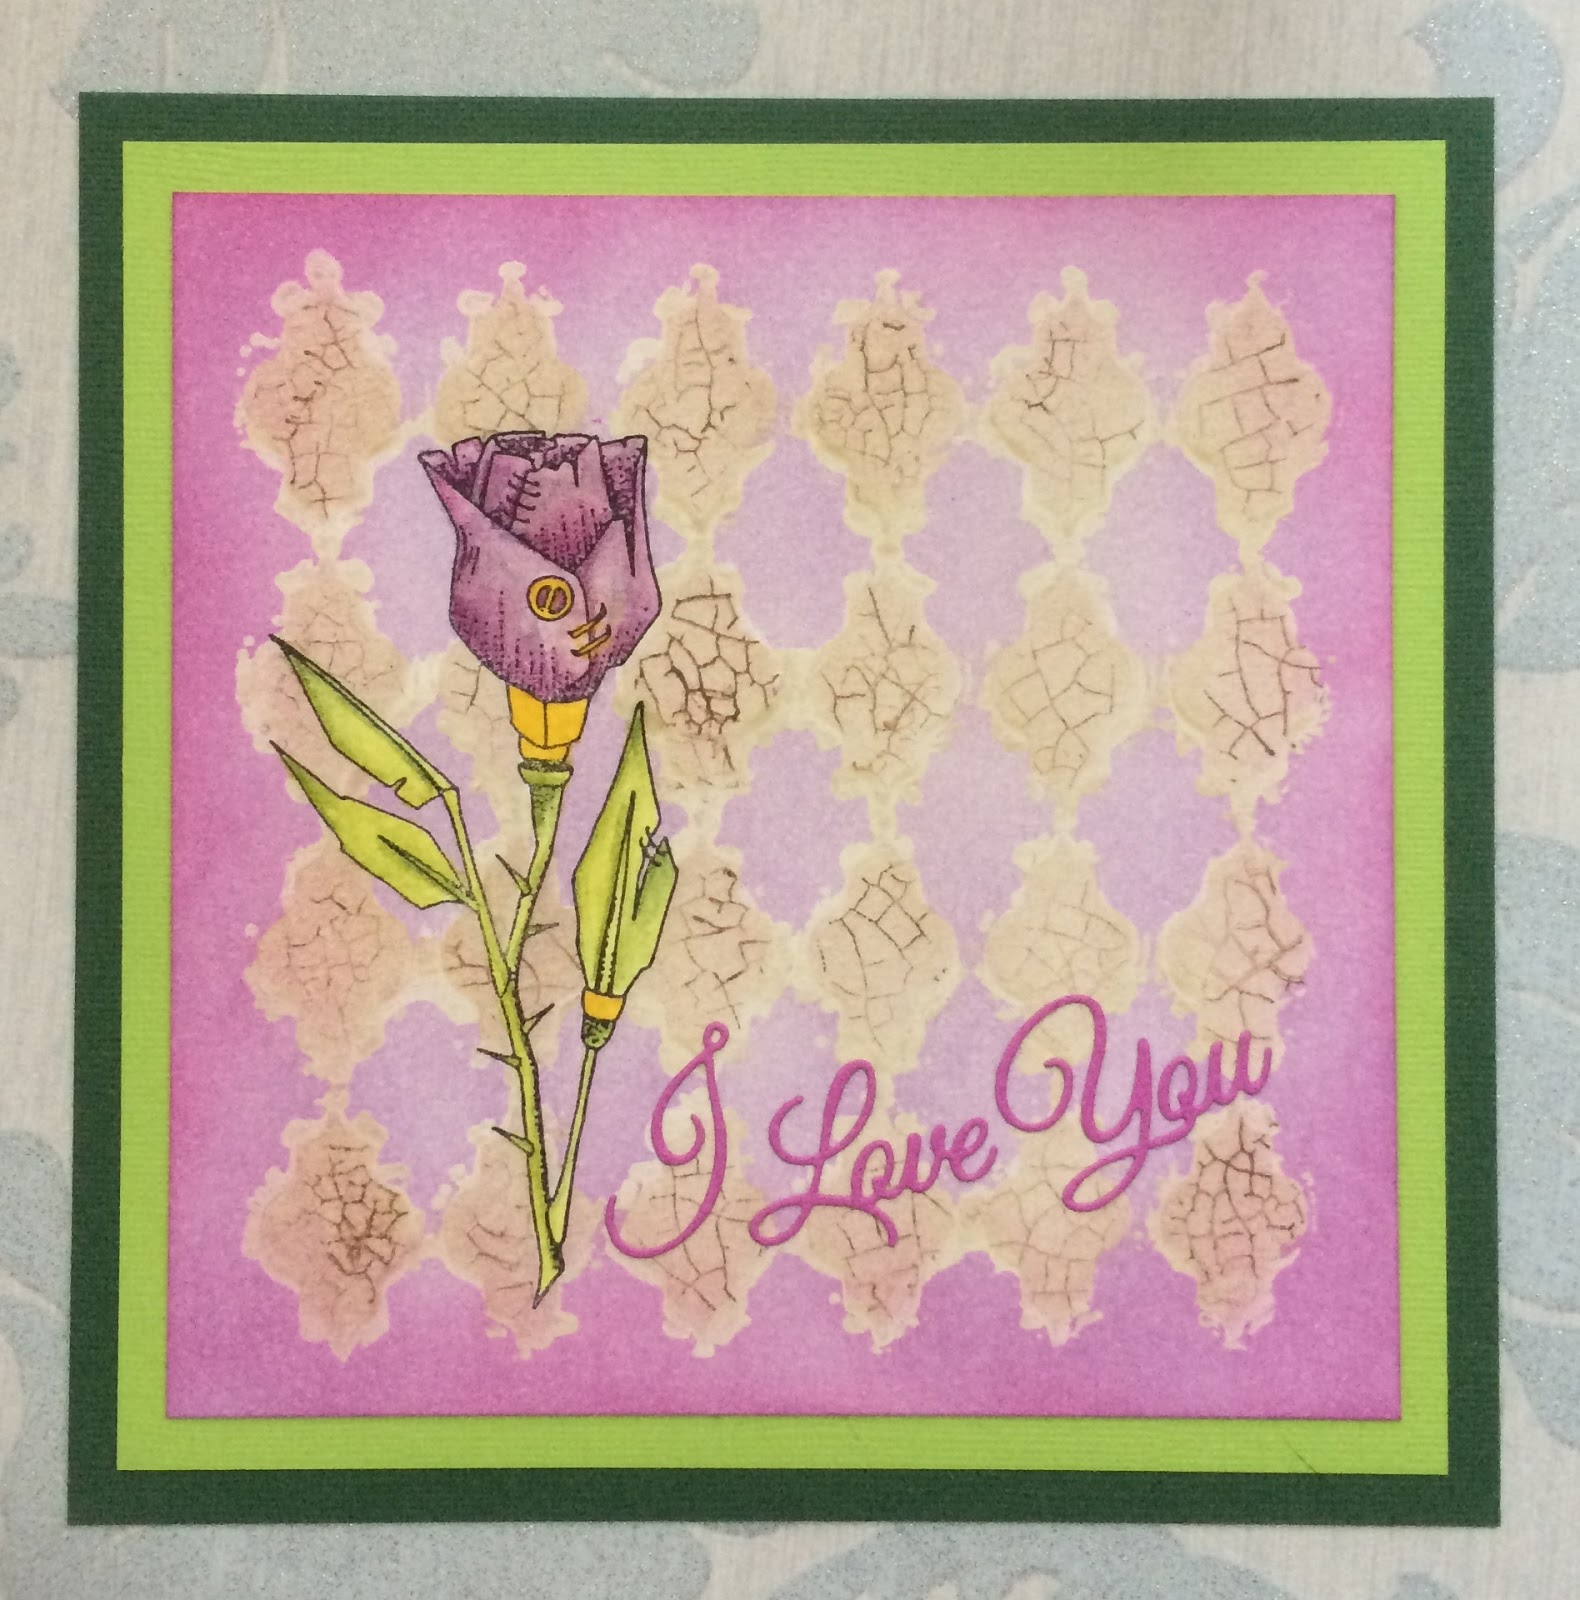
Hello everyone, I have a project to show you today using the Punky Hearts stamp sheet, currently on offer on the Chocolate Baroque website. It's coming up to the time of year when Valentine's cards are needed by ourselves, or requested if we make cards for other people. Here is an idea for the lovely punky rose.

I began my project by stamping and masking the punky rose on a piece of smooth watercolour paper. I then covered the background with a stencil, and using Memento Desert Sand ink, I coloured through the stencil. With the stencil still in place, I stamped the crackle stamp from the Echoes of Italy stamp set all over the background, using Memento Rich Cocoa ink. I stamped the image onto scrap paper each time first, so that I got a lighter image. This is called 'second generation stamping', as I did not want the ink to be too dark. Once the ink was dry, and with the stencil still in place, I brushed a layer of acrylic wax over the top, and allowed this to dry.

I removed the stencil, and covered the rest of the background with Memento Lulu Lavender ink, and then added a darker colour around the edges . The wax acts as a resist, protecting the area that was covered earlier. I buffed the wax areas, to remove any of the lilac ink, and the contrast between the two areas became much sharper.

I removed the mask from the rose, and coloured the image using more Memento inks stamped directly onto an acrylic block, which I picked up with a waterbrush. I picked out the 'metal' areas of the rose using a gold pen. I added a die cut sentiment, and matted the project onto green card.


Thanks for stopping by, Judith xx


Wednesday, 20 August 2014

Time for another challenge!


Hello folks, it's time for another challenge on the Chocolate Baroque Challenge Blog so please pop over to take a look at the inspiration from the Design Team, read the information and make something for the challenge. If you use Chocolate Baroque stamps for your entry, you will be entered in the monthly draw for a £15 prize to spend at Chocolate Baroque so it is really worth entering the challenge.

Here is the inspirational picture for this month's challenge using artwork originally created by one of our Design Team members Doreen:


The colours are so different from last month's challenge, and Doreen's original artwork is beautiful. I was inspired to make a card reflecting a recent holiday to Tuscany, so I fished out the Echoes of Italy stamp plate which is an old favourite of mine. I created two panels of colour at the top and bottom of my background using paper masks to cover the central area. I used various shades of Distress Inks: Scattered Straw, Dried Marigold, Wild Honey and Rusty Hinge. I stamped the large crackle stamp over the top using Sepia Archival Ink.

For the central panel, I stamped the image using Bamboo Leaves Memento Ink, and added some clouds from the Magical Landscapes and Fantasy Castles stamp sets. I coloured the images in with Distress Markers and a waterbrush.


Originally that was it as far as the design was concerned, but I felt that the balance of colours was wrong. So, I added some handmade flowers using scrap paper and some die cut Crealie leaves. Italy is bursting with flowers wherever you go, and so the addition of the flowers feels just right.

Thanks for stopping by,


Tuesday, 29 October 2013

Purple and Gold

Hi Folks, here is another sample using the Fancy Flourish stamp set. I have created a background using glossy card and alcohol inks. Once I had covered the card, I then stamped one of the flourish stamps across the card diagonally with gold embossing powder.

I created two oval shapes with mountboard by die cutting them, and then colouring them with Distress Inks.I stamped the shapes with a crackle stamp and then stamped the large flourish stamp on the bigger oval and a sentiment on the smaller oval. I punched a hole in the ovals at this point. I added three layers of UTEE, to create a tile effect on the ovals. I joined them together with jump rings and stuck them to my background. Finally, I added some gems to the large flourish.


As you can see, the flourishes are great for both backgrounds and focal points on your cards. They really are versatile. Thanks for stopping by, xx


Monday, 23 January 2012

Wisteria Doorway


There are some new stamps recently released over at Chocolate Baroque and as a member of the Design Team, I have been creating some samples with them. There are some great flower stamps in these new sets, dandelion clocks, honeysuckles, rose trees, and some fabulous little insects too.

The first card that I have made to show you combines some of these new stamps with a great door stamp from the 'Echoes of Italy' stamp plate. I stamped this first, and masked it off, sponging Distress Inks over the card. I coloured the image with Polychromos pencils, layering up the colour to create depth and shade on the door.

I used several different colours of Versamagic chalk inks to stamp the flower head in the foreground, starting with the lightest, and moving through to the darkest. I then went back to the lightest colour to fill in the gaps, and add a bit of light to the foreground. I used Versamagic to stamp the wisteria at the top of the card.

Finally, I stamped the butterflies with Versafine Onyx black ink, and coloured these with Polychromos pencils again, before adding them to the picture with some stamens. The picture was matted onto lilac and purple card to tone in with the flowers.


I have used stamps from 'Wisteria Lane' and 'The Rose Tree' to complete this card. Do pop over to the Design Team Blog to see what the other Design Team members have been up to with these stamps over the next few days. Thanks for stopping by, xx

Sunday, 30 October 2011

A Place in the Sun


Hi Folks, here's another sample using the fabulous 'Echoes of Italy' stamp plate recently released over at Chocolate Baroque My OH and I dream of finding a little cottage over in Italy for when we retire, buying a little  Fiat cinquecento and whizzing about the countryside, soaking up the lovely views. I had that idea very much in mind when I created this project.

I created the background by using very thin masking tape, and measuring one and a half inch squares across the background. I used several colours of Distress Inks, and punched a square in a piece of paper to create a reverse mask to colour through, so that I didn't contaminate the other squares as I went along. Once I had finished, I stamped over the whole lot with the large crackle stamp, before peeling off the masking tape. That crackle stamp is such a great stamp.

I coloured the image with Distress Inks, and chose a suitable phrase from the 'Artful Affirmations' stamp set, before adding some Crealie flowers and Marianne leaves. I didn't have any brown brads big enough for the centre of the flowers, so I just glued some buttons over the top of the small ones that I used.


I look at this card and think, 'Oh well, I can dream....' If you get a chance, pop over to the Design Team Blog as I have a card featuring over there today too, also using some of the fabulous stamps from this set.

Thanks for popping by today, and enjoy your weekend, xx


Wednesday, 26 October 2011

A Taste of Italy


Hi folks, it's unusual that I manage a midweek post these days, I know, as life always seems so busy. I've been away so many weekends lately, that I've almost forgotten what home looks like! I met up with two of my lovely Craft Stamping Quartet buddies Lesley and Jo at the Stamp Magic Show at Doncaster. We don't get to see each other very often, so it was great to see them even just for a little while. I was spending the weekend with my parents, so I took my Mum to the Show too, which was nice for her, as she is an avid crafter too. She has only recently got a Big Shot, and it has opened up a whole new world for her. She has had a new lease of life from a crafting point of view, and it is lovely to see.

I made a few modest purchases, as I have been to several shows recently, so not too much to report. I am looking forward to trying out my Vintaj blanks now in my Big Kick, as I have all of the necessary bits and pieces that I need to get on with that now. I found the Vintaj blog yesterday, that is certainly one beautiful blog to look at if you like anything Vintaj related.

This week, my followers reached the one hundred mark, I have had several new followers recently, and I feel very honoured that you have chosen to follow me. I appreciate all of of my followers taking the time to stop by to look at what I am doing, and I know that not everyone chooses to leave comments, but I'd like to say thank you anyway.

Glenda over at Chocolate Baroque has some new stamps that she has released this week. There is free p & p until tomorrow. There are two sets 'Woodland Dreams' a lovely tree based set, and 'Echoes of Italy', an Italian based set. This set is very close to my heart, as I love Italy, and frequently go there on holiday. I have made several samples with this set, some of which you will be able to see over on the Design Team blog this week, and a couple that I will post on here.

My first sample that I have chosen to show you here is very photograph heavy, but please bear with me, as I really enjoyed making this one! Some of you will have seen the start of my Paris journal a couple of weeks ago in my Forgotten Friday post. I had already made this particular little journal as a sample for Glenda, using the fabulous Echoes of Italy stamps, among others in the Chocolate Baroque range.

 
I chose to use the fabulous Echoes of Italy papers as a background for my pages, and they just went perfectly with these stamps. I used chipboard covers, and Kraft card for my pages. I have used the stamps mostly as background accents throughout the book, as you will see, but added them to tags as well, which I will use for journalling later.


Here, I have used a photograph as a pocket, to place tickets and memorabilia behind. There are some useful little scroll stamps, great for adding to the tags, as little edge stamps.


This double page reflects a trip to Venice, and uses the 'Weekend in Venice' stamp plate too, also some of the 'Harlequin Mask' stamps. The crackle stamp on the 'Echoes of Italy stamp plate is a stamp that I am going to use over and over. It is a fabulous stamp, and a great size too. I added a train ticket to Venice, some Euros, as everything is so expensive there, and a little leather tag, as we go to the markets to buy leather goods in Venice.

There is a much softer feel to these pages, as this was our visit to 'Casa Juilietta', or Juliet's house. There is a photograph of the balcony, and a statue of Juliet herself.  I love Verona, it's a beautiful city. I have used a piece of lace for a pocket, to add to the feminine feel.

Gardone is a town on Lake Garda itself. Everywhere is very bright and colourful, the buildings are painted in strong yellows, terracottas, etc. There are bright flowers everywhere, and the colours are an explosion on the eyes. We visited Il Vittoriale, a house and gardens that reminds me very much of Portmerion for its quirkiness. There is even half of a ship in the garden! The lake views are stunning, and there are lots of statues, arches and columns everywhere. The stamps were just perfect to add to the atmosphere of my pages.

For my last two sections, I have two very different pocket options. On the left, for the visit to Malcesine, on a cable car visit, I have used a conventional little diagonal pocket, matching the paper to the background. On the right hand side, for our trip to Milan, I have used a beer mat for the pocket, tucking photographs, receipts, and other memorabilia behind.


My little book only measures 6" x 6", it is a great size to hold in your hand, and look through. It has fold out flaps, and with its pull out tags, is very interactive. I hope you have enjoyed looking at my project, and I'll be back soon with another one. Thanks for stopping by, xx

Wednesday, 13 April 2011

Mosaic Doodles

Hi Folks, I thought that I would share another Design Team card that I made recently with you, using the lovely new designs from Chocolate Baroque. Glenda has a giveaway going on at the moment, all of the details are in my previous post. If you comment on any of my posts, the posts made by the other Design Team members on their blogs, or on the Design Team Blog  itself, you stand a chance of winning one of three fabulous stamp sets.

The card that I am showing you today, uses backing paper from the Echoes of Italy backing paper set, onto which I have stamped a long border, from the Doodle Butterfly stamp plate stamp, four times. I took nine pieces of one inch Stampbord, and taped them together with masking tape on the back, then coloured them with a mixture of Distress Inks and Memento Inks. I then stamped the Doodle Flower Design, from the Doodle Bird stamp plate on the top. I seperated the pieces, and matted them onto black card, before placing them onto the backing paper, which was also matted onto black card.

I wanted this to look like a piece of Italian wall art, and really enjoyed working within my favourite colour group.
Don't forget to see what the other Design Team members have been up to this week, the more you comment, the more chances, you'll have to win those lovely stamps! Judith xx
Related Posts Plugin for WordPress, Blogger...