Followers

Showing posts with label Steampunk Butterfly. Show all posts

Wednesday, 22 February 2023

Making a Mark

Hello everyone, I hope that you are keeping well. I have a few more projects to share with you showcasing the fabulous stamps that were featured during the TV shows this month on Create and Craft.

My first project is a DL card, created using a piece of book paper, which I coloured with some Rusty Hinge Distress Ink around the edges. I added some stamping using images from the Timeless stamp set, the splatter stamps are so useful to create an aged look. 


I stamped the Tagtastic stamp onto a piece of Drawing Cartridge that I had previously stained with tea and sprinkled with salt. I wanted to fill the tag image completely, so I used some of the smaller images from the Timeless stamp set to cover the blank areas; the bar code, the big splat, the mini clock, and the label definition. I used a bit of the Rusty Hinge Distress Ink and some water to colour some of the clocks on the main image.

My other two projects are older cards that I have shared before. I know that lots of our viewers are new to Chocolate Baroque, so I hope that you will not mind me sharing these again. 

The first card was created by stamping the fabulous large butterfly from Patchwork Butterfly onto a Brusho background from my stash. I stamped the image in one corner, and masked off the image with Masking Tissue. I then added images from Numerology, Make Your Mark, and the sentiment from Patchwork Butterfly over the background in colours to co-ordinate with the background colours. 

I coloured the butterfly with pencils, and added some shading around the edge of the butterfly with a grey pencil to create a shadow.


My next card was created using a Distress Ink background, using ones of blue and brown. I added stamps from Make Your Mark, Timeless, and Steampunk Butterfly to the Background. I embossed two Butterflies from the same stamp set using copper embossing powder, and coloured them using Inktense pencils. I added a sentiment from Punky Expressions.

My last two projects for today were made with the A Year of Stamping Issue 2 - February stamp. I wanted to show how different one stamp could look. For the first interpretation, I stamped the image on smooth stamping card, and coloured the mage with blue toned Inktense pencils. I created a matching background with Distress Inks and added some white embossing over the top. I used a circle stencil, and a stamp from Make Your Mark. I stamped the image itself using a deep blue Versafine Ink, instead of black for a change.

The second version was stamped on grey card, and coloured with regular pencils. I added some white shading in the circles behind the flowers.  The background was again made with Distress Inks in zingy colours this time, yellow, green and pink. I added stamping using images from Make Your Mark and Numerology.


I hope that you have enjoyed seeing what I have created. Thanks so much for stopping by, your visits are always appreciated. Take care, xx


Saturday, 17 July 2021

Painted Butterflies

Hello everyone, I have a couple of projects to share with you using stamps that were featured on last month's TV shows.

My first project was created using a stencilled background and three different colours of Distress Ink.  I used a piece of Smooth White Stamping Paper and moved the stencil across the page to cover the entire area. If you look closely, you can see where I have joined the two sections together, but it doesn't really matter, as it is just a background, and the butterflies from the Steampunk Butterfly stamp set mostly cover it up. The stencil I have used is one by Craft Emotions called 'Botanical'.

I chose three words from the Punky Expressions stamp set, and stamped them onto the background using Versafine Black ink, to represent the butterfly bodies. I stamped the butterfly wings onto some Drawing Cartridge using the same ink, and coloured them with Inktense pencils, blending the colours with a waterbrush. Any watercolour pencils would do. I cut the wings out and adhered them either side of the words. Finally, I added the sentiment, also from Punky Expressions.

For my second card, I created a background using a piece of Drawing Cartridge and Distress Inks in shades of brown and green. I added stamps from Make Your Mark, Timeless and Steampunk Butterfly. I stamped and embossed two butterflies from the last set using copper embossing powder, and coloured them with Inktense pencils and a waterbrush, again, you could use any watercolour pencils. I cut the butterflies out and added words from Punky Expressions. I edged the background using a dark brown ink.

I had a lot of fun creating these cards, the stamp sets are so versatile, and as you can see, they all mix and match so well. I hope that I have inspired you to try out some ideas. Thanks for stopping by, take care, xx


Monday, 29 February 2016

Vintage Paper projects


Hello everyone, I have been playing with a great mixed media pack available from Chocolate Baroque called the Vintage Style Play Pack. It is jam-packed full of bits and pieces, and will give you plenty of supplies to create lots of projects, combined with some of your existing stash. There are vintage book papers, pieces of grey board, mini envelopes, ribbons, buttons, and other embellishmebts to complete lots of cards and mixed media projects.

I have three projects to show you today, but hope to make several more projects using this great pack in the coming weeks.

For my first project, I took a piece of the book paper, and trimmed it to size, and then stamped and embossed a large flourish from the Nature Swirls stamp set over the background. I used vanilla white embossing powder, which is a lovely off white colour. I added some Fossilized Amber Distress Ink to the background, cleaning over the white embossing with  piece of kitchen paper afterwards. I die cut a flower in three different sizes from both book paper, and a piece of crinoline, and coloured the die cuts with the same colour Distress Ink. I simply patted the ink pad onto a craft mat and spritzed the ink with water, before swiping the flowers through the ink. I dried the flowers with a heat gun, scrunching them up, as they dried, to get them to stay crinkly. I attached them together using a brad, and then stuck one of the buttons from the pack on the top.

To finish the card, I chose a kraft card blank, and added a couple of toning layers of card to mat the book paper onto. I added some ribbon and a strip of hessian from the paper pack across the background, and then die cut some leaves from some extra kraft card, before finally attaching the flower.

For my second project, I decided to use some of the small greyboard panels, and attach them to a long skinny canvas. I stuck some of the book paper to the panels, using matte medium, and left them to dry. I painted the canvas and the panels with a range of acrylic paints in blue, green and yellow tones, using a baby wipe to blend the colours together. I created several layers of colour, drying each layer with a heat gun, and once I was happy with the blend, I added a touch of deep blue and purple around the edges.

I stamped a script stamp onto tissue paper and adhered this using matte medium. I stuck the panels onto the canvas, and then added some stencilling to the background using some coloured texture paste. I wanted to add a bit of interest to the greyboard panels, and so I embossed a cog texture stamp randomly onto them using Versamark, and some copper embossing powder. I also added a butterfly image from The Rose Tree stamp set, which I coloured with pencils.

To finish, I added touches of gilding wax, and a cog kindly donated by my hubby.


My final project was a happy accident, as I had some paint left on my craft mat after the canvas project. I hate to waste paint, and so I added it to another piece of book paper, and created a washed background. I cut a small piece of the hessian strip, and used it as a stencil, with some white acrylic paint randomly over the background.

There was an ATC sized  piece of Stampbord in the play pack, and I chose a pretty floral stamp from the Harebell Butterfly stamp set to stamp and colour on this piece. I used some ultra thick embossing powder to triple glaze the Stampbord, and created a tile effect over the image.

I cut two large rectangles from kraft card, and created a tag top to them, by chopping off the corners. I scored partway down one of the 'tags', and stuck it to the other one, so that the card would stand up, without collapsing. It has its own stand in effect. I added the book paper background, and some pretty tan ribbon from the play pack, before attaching the Stampbord tile to complete the card.


I hope that I have offered you some inspiration as far as this super pack is concerned. I promise to be back with more ideas in the future, thanks for stopping by, xx

Monday, 18 January 2016

Butterfly Duo


Hello everyone, I have a card to share using the Steampunk Butterfly stamp set featured on the recent Craft Channel TV shows. Followers of my blog will know how much I love to mix and match stamps, and I also love to revisit older stamp sets to use materials that I did not have the first time around.

I created a background using gelatos, and then stamped the cog fragment using Tattered Rose Distress Ink. I used some pretty background papers from the Crafty Individuals range to create a bit of paper weaving, and also stamped and embossed two of the large butterflies onto the same papers, using silver embossing powder. Once I had attached the paper weaving to my background, I covered it with acrylic wax to seal the weaving, and to protect the paper.

I stamped a sentiment from the Awesome Diva clear stamp set onto the background, using Teal Zeal Memento Ink. This particular sentiment makes the card really versatile, and useful for any number of occasions. Finally, I used some co-ordinating card to mat and layer the background.

Thanks for stopping by, xx


Tuesday, 23 December 2014

Set Sail

Hello everyone, this is my final marine themed post for the Design Team this month. I have really enjoyed working with these stamps, and have lots more ideas for them. Hopefully once I get Christmas over, I will have a bit more time to play with them.

My project this time around uses the large ship image, which I wanted to portray sailing through a forest at the bottom of the ocean. I stamped the images and then embossed some cogs from the Punky Flowers stamp sheet. I coloured the background using Distress Inks, mixing lots of blues and greens, and then stamped a cog fragment from the Steampunk Butterfly stamp set over the top.

I coloured the images with Inktense pencils and added some fronds at the bottom of the page using the legs from the octopus taken from the stamp of the month set. Finally, I added a sentiment taken from the Steampunkery stamp set.

 Thanks for stopping by, Judith xx

Friday, 11 July 2014

Diverse Textures from Chocolate Baroque

Hi Folks, I have some cards to show you today using the Harlequin Fragments/Tangled Fragments multibuy from Chocolate Baroque . I wanted to show how versatile these stamps can be and have created three very different looking cards, using these great new stamps.

My first card was created using the watery background stamp, which I stamped onto a strip of white card, using black ink several times. I then created three pieces of decorated stampbord, using three layers of embossing powder and stamping into them while the last layer was still molten. I brushed a little bit of gold Perfect Pearl powder into the crevices to pick up the detail of the stamp. By stamping my background first, I could work out roughly where on the rubber stamp I needed to press to create the UTEE pieces to achieve a pattern running down the card.

I matted the background onto a piece of toning card, and stuck this onto a larger piece of black card. I added a sentiment taken from the Artistic Affirmations stamp set.

My second card was created using a piece of smooth watercolour paper, which I sprayed with diluted Weathered Wood Distress Ink. I then stamped the dotty stamp, and the stone effect stamp using the same colour over the background. I embossed the single stone spine in the centre using platinum embossing powder. I added some ferns around the edges, taken from the Wild Meadow stamp set using Pear Tart and Sweet Plum Memento Inks.

I stamped and embossed a flower from the Tangled Garden stamp set, plus the leaf fragment using platinum embossing powder, which I then painted with Splash inks. I decoupaged the flower, added the larger leaves to the stem, and used the smaller leaves for a grass effect. Finally, I added a sentiment from the Amazing Birthday clear stamp set to the background.


My third card was created again using watercolour paper for my background. I sprayed the paper with turquoise Dylusions spray, rolling off some of the intense colour for a paler effect. I added a touch of Perfect Pearls turquoise spray at this point. I stamped the large bubbles stamp, and the dotty harlequin stamp with forget-me-not archival ink over the background, and then added some Vintage Photo Distress Ink to the edges to age the colour slightly.

I embossed the butterfly from the Steampunk Buterfly stamp set and some flowers from the Punky Flowers stamp set, using copper embossing powder. I coloured them with splash inks. I added a stamped swirl from the Artistic Expressions stamp plate to resemble leafy tendrils behind the flowers. The sentiment was taken from the Amazing Birthday clear stamp set.


If you love our DT blog then keep your eyes open for something new and colourful coming next week. All will be revealed soon, keep visiting the DT blog to make sure you don’t miss it. Getting excited yet?

Thanks for stopping by, Judith xx


Sunday, 5 May 2013

More Punky Flowers


Hi Folks, here's another sample using the new Punky Flowers stamp set from Chocolate Baroque. I've made a background using Distress Inks and a couple of Crafter's Workshop templates. For the first one, I stippled Black Soot Distress Ink through the template, and for the second one, I just used the same background colours to create a shadow effect.

I then cut a large circle and using the same colours of Distress Ink, I made another background, using the wrinkle free distress technique, adding some metallic Distress Stain to the background. I stamped and embossed some cogs and coils around the outside of the circle to create a border.

I stamped and coloured some bulb flowers on shrink plastic, before shrinking them. I cut out a bell jar, using a Tim Holtz die. The clear top was cut from Clearly for Art, so that I could mould the shape slightly. I stamped and coloured two bats from the Steampunk Butterfly stamp set, and added some heart buttons for their bodies.


This is such a versatile stamp set, and it really had the Design Team thinking overtime. Keep popping over to the Design Team blog to see what my team mates have been up to. Thanks for stopping by, xx


Thursday, 13 December 2012

Steampunk Clock

Here's another sample using the Steampunk Butterfly stamp set. This sample is showing over on the Design Team Blog today, but I would like to give you a few more details about it over here.

I started my design by painting two MDF cogs with black gesso, and then cutting out some backing paper from the Prima Firefly 6" x 6" paper pad. I stamped and embossed the cog fragment onto the papers with silver embossing powder, and added some Distress Ink around the embossing for depth. I sanded the edges of each piece to distress them. I then stuck each piece to the cogs. I glued the cogs together, and left them to dry.

I stamped two butterflies onto more of the Prima paper, cut them out, and stuck them onto Clearly for Art. I coloured the back of the paper with Distress Ink before I stuck them down, so that I would not have any white paper showing once I was finished. I heated the butterflies up, and bent them into the shape that I wanted.

I made a flower using silver metal stuck onto black card. I cut the shapes using a Nestability shape, and then coloured them with alcohol inks. I fixed them together with a brad, added a cog over the top, filled the centre with Glossy Accents, and dropped black glass glitter in the centre. I stamped some leaves onto the silver metal using Stazon Ink.

I cut a Tim Holtz clock die from chipboard, which I coloured with Distress Inks. I added embossing powder in various metallic colours, then I added some Stickles for a bit more shimmer. Finally, I added a few metal cogs to finish my design.

The clock has a working mechanism installed, and I made it in colours that I quite like, so I may hang it in my craft room.

This is the last of the Steampunk Butterfly samples for now, I hope that you have enjoyed them. Thanks for stopping by, xx


Sunday, 9 December 2012

Stained Glass Window


I have another sample to show you today using the new Steampunk Butterfly stamp set from Chocolate Baroque

When I saw the circular fragment, it reminded me of a church window, and I wanted to try and create that effect. After a bit of practising on scrap paper, I managed to achieve a reasonable attempt! I made a background using Distress Inks spritzed with water, then stamped the four sections of the fragment. I needed to mask a small portion off each time, using masking tape, as the fragment is too large otherwise. I then added the two spires from the Gothic Fragments stamp set. I needed to mask a tiny portion of these to then stamp the corners so that they appeared to be behind the spires. I coloured the images in tones of brown, using my Polychromos pencils, and added touches of gold Mica ink.

I stamped a flower from the Bold Bloom stamp set onto acetate, using Stazon, and then added some multi-coloured flakes behind the image. Once this was dry, I added this to the centre of the 'window'. I used fine line masking tape coloured with a black Copic pen to represent the leading on the window.

To complete the background, I used a stamp from the Texture Fragment stamp set, using three different colour Distress Inks, and stamped randomly to create a stone effect. I then used a sentiment from the Artistic Affirmations stamp set in the top corner.

This card is showing over on the Design Team Blog today, but if you keep checking back there will be lots more inspiration from my Design Team mates over the coming days. Thanks for stopping by, xx


Wednesday, 5 December 2012

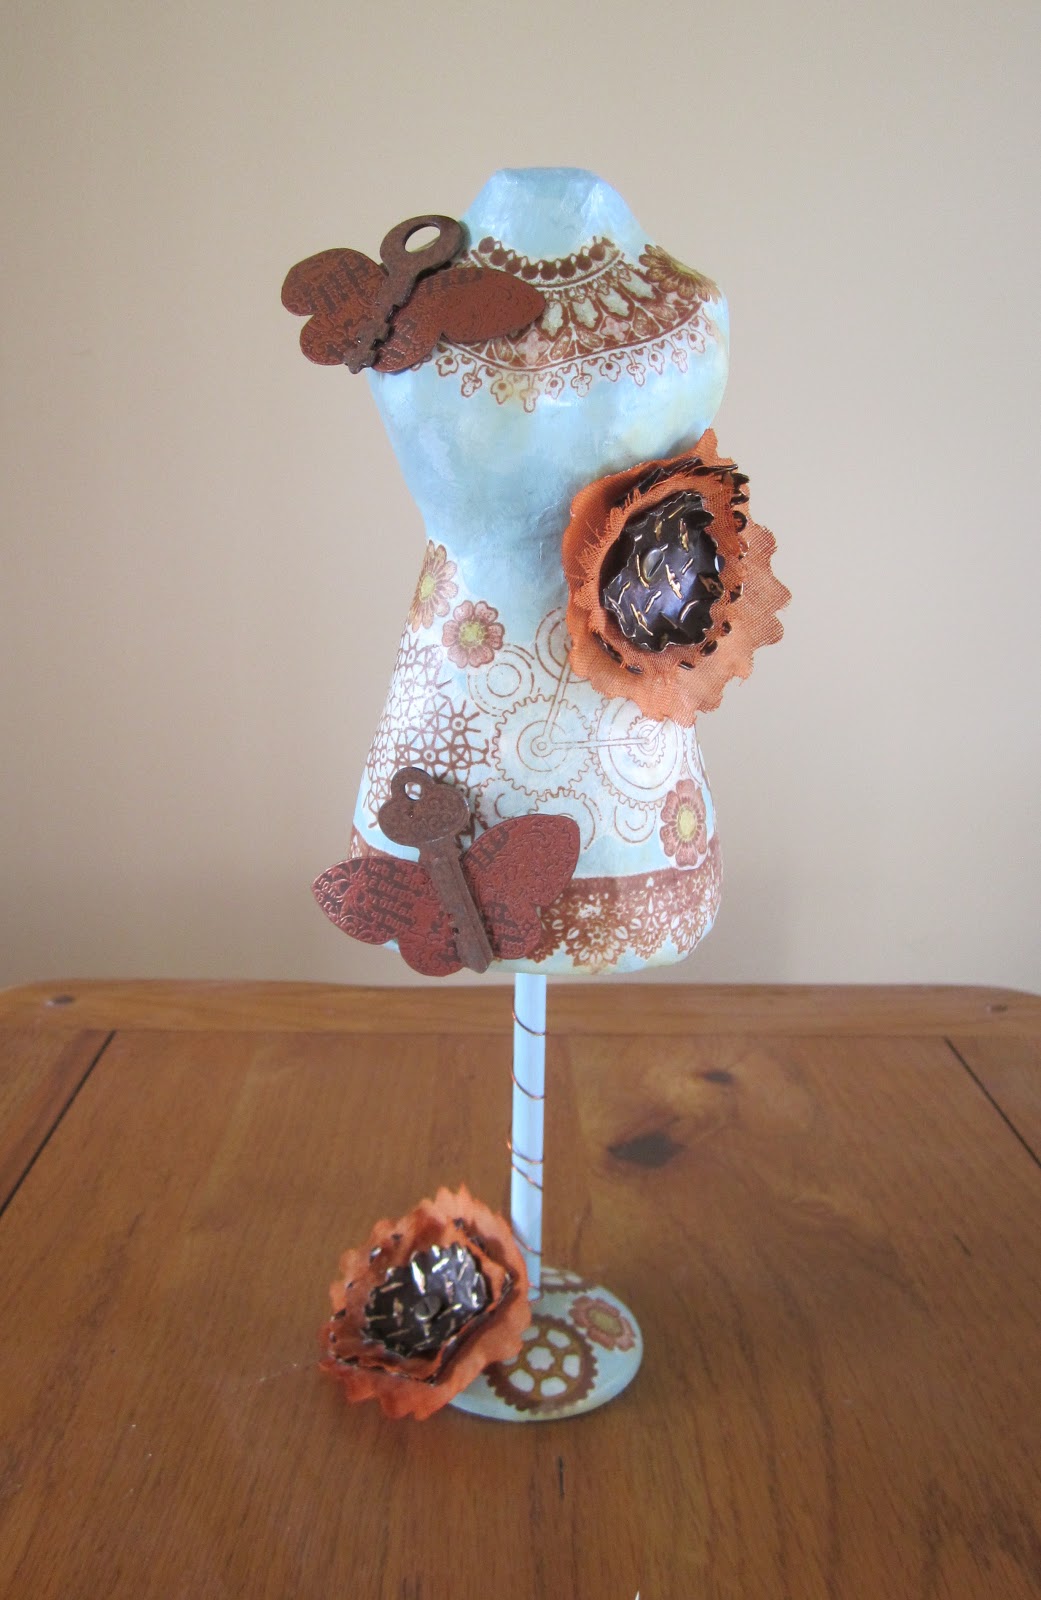
Dressing up in Steampunk Style

Hi Folks, here's a sample showing over on the Chocolate Baroque Design Team Blog today. I'm giving a more detailed description of how I made it over here.

I love using these dress forms, as they are cheap, but look great once they are altered. I painted the base firstly with a coat of gesso, then a coat of acrylic paint and let these dry. I stamped some tissue paper with the images that I wanted to use, and coloured some of the areas with various shades of browns and oranges, using my Polychromos pencils as I know that these do not bleed when using Matte Medium. I cut around the images, and applied them to the dress form and the base, using Matte Medium, covering the top as well. This helps the tissue paper to disappear into the background fairly well.

I then applied a coat of beeswax, using a large brush. I melted this with my heat gun to smooth out any thick areas, and then let it set again. I buffed the whole thing with a duster, to bring up a nice shine.


I stamped a couple of butterflies onto brown card using copper EP, which I cut out and added to the project, using rusty keys for their bodies. I then made some flowers using metal and crinoline. I used the peony die to cut these out, and coloured the crinoline with Rusty Hinge Distress Stain. I embossed the metal shapes with an embossing folder, and then wiped the raised areas with alcohol ink to remove some of the colour. I fixed the layers together with some faux screw brads.


The last touch was to add some copper wire to the stem of the project.


I'll be back in a few days with another explanation. I hope you'll pop back! Thanks for stopping by, xx

Tuesday, 4 December 2012

Steampunk in Flight


There is a new set of stamps out over at Chocolate Baroque which means that luckily, I have been playing again. Well, working very hard, to produce some samples for the Design Team, I should say. Several of them will be showing over on the Design Team Blog over the next week or so, but I have one to show you today that is just for here.

I created a background using Distress Stains, including one of the metallics, in a soft palette, and then stamped the cog fragment, and the arch fragment over the background, using the toning Distress Inks. I then used a Gold paint dabber, and added some embossing powder, mica flakes and glass glitter in two of the corners.

I stamped some of the roses onto gold metal, and cut them out, puffing them up using a large paper stump. I then stamped some of the tattered wings onto card coloured with Distress Inks, and cut these out. I fixed them together using hinges, and added some coiled wire behind for antennae. Once I stuck the 'butterflies' to the card, I added a trail of tiny clock cogs and more glitter glass behind each one, and stuck little cogs to their antennae.


I coloured some seam binding with Distress Stains to match the overall colour scheme.


It was my Wedding Anniversary last week, and I made a slightly more masculine version for my OH, in a different colour scheme, using a computer-generated text. The font was a free one called 'Steampunk'


I'll be back tomorrow with one of my DT cards, as I'm giving in depth explanations over here each time, rather than bogging down the DT blog. I hope you'll pop back, as I've loved working with these stamps, and I've got lots to show you! Thanks for stopping by, xx


Related Posts Plugin for WordPress, Blogger...