Followers

Tuesday 21 August 2018

Non-Traditional Christmas Colours?

Hello everyone, I have some more Christmas projects to share with you today, featuring some of the stamps that we used on last month's TV shows on Hochanda.

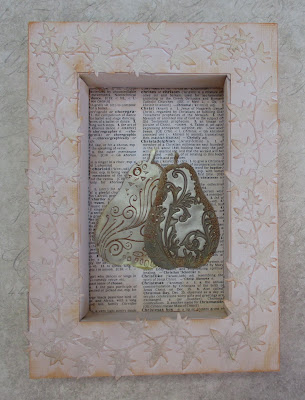
For my first project, I have created a piece of home decor in soft vintage colours. I wanted to use very non-traditional Christmas colours, and this soft pink and green was exactly what I had in mind for my project. I used a flat canvas that folds up into shape from my stash, which I painted with acrylic paint, and added some ivy die cuts all around the edge of the reverse, intending to use the canvas like a box frame of sorts. I painted a piece of dictionary paper with the same acrylic paint, but thinning the paint, so that it allowed the words to remain visible.

I used Pearl Soft Form Relief Paste, coloured with green Brushos to create my focal images, and these were left to dry overnight. I dry brushed some of the same colour of Soft Form Relief Paste over the ivy leaves, which acted as a kind of gilding paste, and it gives a lovely shimmer to the leaves.

Once the two pears were set, I peeled them from the stamps, trimmed the rough edges, and added a tough of gold gilding paste to the surface, before adhering them inside the canvas. I could have added more embellishments, or a sentiment, but quite like this simple look.

My second project is much more colourful, but again using very non-traditional Christmas colours. It must have been the hot weather, creating Christmas cards in a heatwave definitely felt very odd!

I created a background using Distress Inks, and added the large textured background image from the Pears and Baubles stamp set. I stuck to the same coloured inks as I had used to create the original background, building up the feeling of depth.

I stamped and embossed three baubles onto a spare piece of card and cut them out. I attached them to the background, along with some bold purple ribbon.

A sentiment from the Let's Get Festive stamp set completes the card.

Thanks for stopping by, xx


Wednesday 15 August 2018

Quick Christmas Cards


Hello everyone, today sees the monthly Fifteen Minutes blog post over on the Design Team blog. This blog post features quick and easy cards created in fifteen minutes or less by members of the Design Team. The monthly feature is aimed at sharing time saving ideas suitable for beginner crafters, or for those who are looking for ideas suitable for batch making, maybe craft fairs, weddings, or something like Christmas cards. This month, we are focusing mainly on Christmas cards, as we have used stamps featured on last month's TV shows on Hochanda. I have created some quick and easy batch cards for you. The first four are all based on the same layout, using images from the Winter Edges stamp set and using sentiments from the Let's Get Festive stamp set. I took the photo below on a very sunny day, it felt very strange making Christmas cards when it was so warm!

I wanted to create some cards using left over pieces of card that would often be too small for other projects, and that is how this design came about. The look is very CAS in style, and really quick to create. The stamps I have used can be combined in lots of different combinations and colour options, creating a unique feel to the cards that I am giving, even if they are quite similar to each other.

I trimmed some offcuts of scrap card, scrapbook paper, and left over coloured pieces of paper from previous projects, all lurking in my stash box, so that they would fit to one side of a 7" x 7" card blank, leaving room for a sentiment.  The first two cards are exactly the same layout, just different colour options:


You could add white highlights to the kraft card option, giving it a Scandinavian feel. The second background is a gelli plate background, using bubble wrap to create the pattern.

My next card is stamp onto a Brusho background, with Stickles for highlights. I have used a Teal coloured Versafine ink for the stamping, which looks great against the background. I used some of the little individual images placed on an acrylic block together, to quickly build up the background. The sentiment was perfect for this card.

Finally, white embossing onto some scrapbook paper. Again, I used several of the individual snowflakes together on a block to stamp quickly with Versamark, adding the white embossing powder as I went along:

A smaller, simple card with stamping onto ribbon, and clear embossing over red stamping for the tree, you could add a few red gems in the corners if you do not like too much space on the card, or decorate the tree itself.

Do pop over to the Design Team blog to see what my Team mates have created. Thanks for stopping by, xx

Monday 6 August 2018

A Trio of Christmas Projects

Hello everyone, I have several projects to share with you today, showcasing the fabulous Christmas stamps from last month's TV shows on Hochanda.

For my first project, I decided to combine the lovely Serena, with some of the images from the Robin the Spruce stamp set to make a triptych. I used drawing cartridge for the front of all of the sections, and painted the back and sides with an olive green acrylic paint, adding a touch of quinacridone gold for a touch of opulence. I stamped Serena onto the main section, and masked the image, before colouring the background with Fossilized Amber Distress Ink and a blending tool. I coloured the other two sections at the same time.

I added some stamping with the Large Crackle Background around the edges using the same colour Distress Ink, to age the background, and the added the sentiment to one side panel, along with the foliage stamps. On a separate piece of card, I stamped the floral part of the Serena image again three times, and coloured these, along with the main image with Distress markers and a water brush. I cut out and decoupaged the images onto the side panels to complete the project.

For my second project, I used some kraft card to stamp and emboss the Hark the Christmas Rose image, using Versamark and white embossing powder. I painted the image using Koh-i-Noor paints. The white paint was most useful for the roses to create a softly coloured Christmas Rose, as the white shows up so well on darker cardstock. I simply used the white paint first as a base, then added the pink over the top, building up the layers to add depth and shading.

I used a blend of Distress Ink colours for the larger background, and added some deeper plum around the edges. I stamped a foliage stamp from the Robin the Spruce stamp set randomly over the background, using green ink and second generation stamping, for a softer effect.

My final card was created using some left over background from a previous project. I had used Tinting Medium and Turquoise and Ultra Marine Brushos on Textured Art card. I stamped and embossed all of the images from the Robin the Spruce stamp set using Versamark and white embossing powder, choosing to pick out the robin himself  and the berries as the highlighted areas. A simple red bow finished off the card.

Thanks for stopping by, I will be back later in the month to share some more Christmas projects with you. xx

Related Posts Plugin for WordPress, Blogger...