Followers

Friday 25 March 2011

Forgotten Friday 10- Tim Holtz and grunge

Hi folks, well as this post appears, I will be almost landing in Malta! My OH and I are having a long weekend away, as he really needs a break before a very long busy season ahead.
This week I have been rummaging in my Tim Holtz Ideology box for things to put on a special Birthday card. I needed to make a card for my Daughter's Boyfriend, who is in his third year at University, doing a Graphics course. He always has his head over the laptop, or his phone, so I thought that this image from Mo Manning was very apt. I wanted to make his card very shabby and distressed, very like the cool shopping labels that he gets on his clothes, I pinched a couple from Megan's room recently, and I'd love to alter them in some way!
Aren't they fabulous? Anyway, I took inspiration from the colours, and looked through my scrapbook papers that I normally just can't bear to use, and found a great piece from Pink Paislee. I added some Brown card from my Linen Closet Stack by DCWV, and I was nearly there.
I printed off my image, and coloured it with Polychromos pencils, and then scuffed all of the card edges, adding Vintage Photo Distress Ink to highlight the distressing.
Don't forget to have a look through your own stash, play along, and make something with your neglected or forgotten craft goodies. When I'm back from my travels, if you leave a comment, I'll pop along to your blog to take a look at what you have made.
Thanks for stopping by, Judith xx

Bah Humbug- Christmas Trees

Well, it's my last week as a Guest Designer over on the Bah Humbug Blog. The time has absolutely flown by! As you read this, I will be in Malta with my Husband having a weekend break, so thoughts of Christmas probably couldn't be further from my mind!
My first card was made using a couple of Tim Holtz stamps, stamped onto cream card, coloured with Distress Inks. I embossed the piece stamped with the music stamp, using a Tim Holtz tree embossing folder, and picked out the embossing, using Pine Needles Distress Ink. I matted both pieces of card onto dark green card, and used a lovely backing paper from Papermania. I then made a handmade flower from brown parcel paper, using a Nestability die. I added a red button and some paper string. Some leaves cut from a Magnolia die finish the flower off.
My second card was made by stamping an Elusive Images tree onto acetate with white Stazon, and glittering the back. I stamped a sentiment onto watercolour paper, and mounted this onto a green mirri card. I used a lovely Christmas paper from Artylicious, and added some red brads to attach the acetate to my card.


The acetate was so shiny, it was difficult not to get a reflection of myself in the picture!
Don't forget to pop over to the Bah Humbug Blog to see what everyone else is getting up to, and thank you so much for stopping by for the last four weeks. I have really enjoyed my stint as Guest Designer. Judith xx

Friday 18 March 2011

Forgotten Friday 9- Dream

Hi folks, it's Friday again, and time to raid my craft room for some forgotten or neglected stash. This week, I have chosen to use two stamps that I bought a year ago, after seeing a lovely project in the Craft Stamper magazine by Jo Capper-Sandon. I wanted to make something similar as a present for a special person. Time got in the way, and the stamps didn't get used.
Anyway, I decided that this spot was a good excuse to get them out and give them an airing. The stamps are both by Lost Coast, and are lovely, I will use them again, now that I've recovered them! I've used a particular colour scheme, as this card has a destination. It was hard to photograph the Glossy Acents on the decoupaged butterfly, so please forgive the funny camera angle.
I have stamped the image onto Hot Pressed watercolour paper, hence the slight texture of the paper, but I really like to use this medium for stamping. I have used Polychromos pencils to colour the image.
I love the dreamy quality of this image, and the text fits the image perfectly. I chose not to use the other two portions of the definition, which were Magic and Love.
Don't forget to leave a link in your comment if you manage to join in with my Forgotten Friday post, and I'll pop along to your blog to have a look. Don't worry if it's halfway through next week either, as I'm away this weekend, visiting my parents, and going to the GNPE Show at Harrogate, so I won't be back until Monday.
Thanks for stopping by, Judith xx

Bah Humbug Metallics

The theme over on the Bah Humbug blog this week is metallics. I have made two cards using my favourite colours. Years ago, I had my colours analysed, and was described as a 'Winter' person, dark haired with fair skin, able to wear strong colours like Aubergine and Teal, Black and White. I hate the cold, so I am not a natural Winter person, but I love the colour Aubergine, and this is what I have used on my first card. I took a piece of metal that colour, and embossed it through my Big Shot with a Kabuka mould, and then refined it with my tools. After sticking the metal to a tag, I used the 'controlled squish' technique taught by Linda Brown of LB Crafts to create the harlequin pattern, and drew some squiggles on every other diamond. I aged my piece of metal by rubbing black acylic paint over it, and wiping off the excess.
I stamped my Elusive Images bauble onto pearlescent card with Versamark, and then used Moonglow embossing powder to give a lovely metallic sheen. I added two types of Burgundy ribbon through the top of my tag, and a burgundy bow to the top of my bauble. I embossed the sentiment using Versamark and Moonglow embossing powder again straight onto the Artylicious backing paper.
For my second card, I chose to use another Eluse Images stamp, which I stamped onto acetate, using Stazon. I then applied my adhesive, and metal leaf, before matting this onto silver mirri card. I used a backing paper with the matching image totie everything together, then added a ribbon with a metal snowflake charm. 

This is my third week as a Guest Designer on the Bah Humbug blog, only one more week to go, the time is just flying by! Don't forget to pop over there to see what everyone else is getting up tp. Thanks for stopping by, Judith xx

Monday 14 March 2011

Charming!

Just a quick post today, to show you the altered charms that I received back from the Altered Charm swap that I took part in recently. They were waiting for me in my post box when I got home just now. I got two pins from Roni, the organiser, and some charms from different participants. They are all really varied. It is great to see what different people come up with.
Only one participant I received a charm from has a blog to visit as far as I am aware, but they have given me email addresses, so I'm going to email them to say thanks, anyway. Roni is planning to do another swap later in the year, so I'll keep an eye out, as this was a lot of fun. I have some spaces on these two pins, which means that I need to make some more charms of my own to fill them. I'll post some pictures when they are finished.
I'm off to get on with some crafting, as I have a busy week, with lots of deadlines, back later, Judith xx

Friday 11 March 2011

Forgotten Friday Number 8- Tattered Angels

Hello folks, it's Friday, which means that it's time for me to rummage through my vast masses of forgotten stash, and make a project with something forgotten or neglected. This week, I have chosen to use some of my Tattered Angels products. Some of these have never been used, I am ashamed to say!
I decided to decorate a lovely Kraft book from Paperchase that I picked up for about £5, it has Kraft pages inside too, and could be used as a scrapbook, or as an ideas folder, a journal, whatever you like, really.
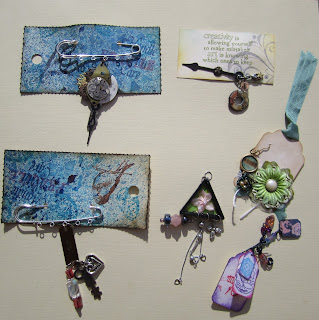
I chose some masks to go with the unused stamps that I was intending to use, and got out a mixture of very neglected Glimmer mists, Crafty Notions sprays, and Adirondack sprays. I sprayed the front and back covers, removed the masks, and dried off both covers. I stamped the areas that had been masked, and unfortunately, my Butterfly is slightly off centre, but there you go, they can't all be perfect!
The back cover is a lovely greeny blue, to echo the dragonfly stamp.
This is so shimmery, and the photo really doesn't do it justice. I have also added a couple of swirls, and picked out parts of the design in pencil. I would like to add some Tim Holtz corners, and one or two other pieces to the book, just to finish it off, and once I've finished faffing, I'll show you the updated version.
If you feel like joining in with my Forgotten Friday challenge, please leave a link in my comments, and I'll pop along to your blog, and have a look. Thanks for stopping by, Judith xx

Bah Humbug Apertures

Hi folks, it's the second week of my stint as a Guest designer over at Bah Humbug. This week the challenge is to make a card or project using apertures.
For my first card, I managed to use three stamps that I haven't used before. I have had them for ages, and they have sat neglected in my box of Christmas stash, gathering dust. They would qualify for my other Friday post, lol! They are a set of bauble stamps from Great Impressions, with the words 'Peace', 'Love' and 'Joy' on the baubles. I chose to stamp these on acetate, and cut three apertures out of my main card. I glittered the baubles, and stuck them into the apertures, and then covered the back with another layer of acetate, to keep the glitter nice and tidy, then added a layer of card, to tidy up the inside of my card.

Apologies for the ornament in the corner of the picture, but I need a nice sunny position to take the photo, and the windowsill was handy!

My second card is a tri-fold card, made using a stamp from Elusive Images, stamped onto watercolour paper, and coloured with Polychromos pencils. I have placed it so that it can be seen through an aperture on the front of the card. I have added some flowers and leaves cut from Crealie dies.

Don't forget to pop over to the Bah Humbug blog to see what everyone else has been up to, and thanks for stopping by, I'll be back later with my Forgotten Friday post, see you then! Judith xx

Friday 4 March 2011

Forgotten Friday Number 7- Vintage Crafty Individuals

Hello Folks, it's Friday so, on my Blog, that means that it's time for my Forgotten Friday post. This week, I've been looking through my neglected Crafty Individuals stamps. I'm an avid collector of these gorgeous stamps, introduced to them by my lovely friend Elaine. However, because I'm so busy, I often don't get to use them, and they get forgotten about. The stamps that I have used on this project are no exception.
I have used CI-173, CI-148 both for the first time, and two old faithfuls, CI-116 the crackle stamp, and CI-085 the letter stamp.
I wanted to create a vintage feel to my piece, so I added cream lace, pearl buttons, and some seam binding. I stamped onto Kraft card, and made my favourite flower at the moment out of brown parcel paper, spritzed with Distress re-inker and water, scrunched, then dried with a heat gun to make it stiff. I added a cute little metal butterfly to tone in with the cream lace.
I painted the main image with Distress Inks to give a washed out feel, and edged the cream card with Distress Inks.
Have a look through your old and neglected stash, make something, and leave a link to your project in my comments. I'll pop along and have a look. I'd love it if more people joined in with my Friday makes, and would be happy to give a spot prize of some of my forgotten stash! Thanks for stopping by today, Judith xx

Bah Humbug Embossing

Hi folks, it's the first week of my stint as a Guest Designer on the Bah Humbug Blog. The subject this week was Embossing. I managed to make two cards this week! The first card is using a lovely embossing folder from Cuttlebug, of a village scene. I embossed this through my Big Shot, using Coordinations card, sanded it back a bit, and glittered the rooftops. I mounted it onto silver card, and backed it with a lovely Artylicious backing paper from the Season's Greetings CD.
I then stamped a pretty Whiff of Joy stamp of a little girl with a muff, which I coloured with Polychromos pencils, and set in front of the village scene. A piece of tartan effect ribbon and a sentiment finish off my card.

My second card uses a lovely Elusive Images lantern stamp, which is stamped onto a piece of Stampbord, and triple embossed to look like a tile, after it has been coloured. I have then embossed a swirly corner design in black onto my backing paper to tie in with the wrought iron feel of the lantern. I was obviously feeling cold as I made these cards, as both sentiments are sending warm wishes!
Don't forget to pop over to the Bah Humbug Blog to see what everyone else has been up to. Thanks for looking, Judith xx

Wednesday 2 March 2011

Bah Humbug things that fly

This week over at Bah Humbug the challenge was to make a card or project incorporating something to do with 'Things that Fly'. I chose to use a lovely stamp from Elusive Images of a bird house and two robins. I coloured my image with Polychromos pencils, and mounted it onto a fabulous backing paper printed onto pearlescent paper. My paper design comes from the Essence of Nature CD, again from Elusive Images. I have used a Martha Stewart branch punch, and a fun sentiment to finish my card off.
Don't forget to go and see what everyone else has been up to this week over on the Bah Humbug blog, and watch out for Friday, as there's an extra treat in store!!!
Thanks for popping by today, Judith xx
Related Posts Plugin for WordPress, Blogger...