Followers

Showing posts with label Essence of Nature. Show all posts

Tuesday, 10 January 2023

Happy New Year to You All

Hello everyone, I hope that you are all keeping well. It's been a while since my last blog post, so firstly I would like to wish you all a very Happy New Year. 2023 looks set to be a very busy year for us on the personal front as our Daughter is getting married. We have lots of planning to look forward to, and no doubt the months will fly by as we head towards the big day.

I have lots to share with you today, as I did not manage to post last month. I will add a few projects from last month's TV shows, as well as some from the shows that we did just last week. I hope that you managed to watch the shows, we were very busy. The shows were our 6th Anniversary shows with the TV studios, it's amazing to think that we have been affiliated with the Company for that long. They have gone through a few name changes in that time, but we have enjoyed a good working relationship with them throughout the changes. I have been with Chocolate Baroque for a lot longer than six years, as those of you who know me will be aware. I have been on the Design Team for about twelve and a half years now, and Design Team Leader for eight and a half years. Goodness, I had to check, as I couldn't believe that it had been so long! 

Unfortunately Lesley was rather unwell last week, and so I needed to do a few more demos than I would do normally. I really enjoyed working with the beautiful stamps and so I had created lots of projects. I was ready to help out and show how to use the stamps in lots of different ways. My first project was created using some Drawing Cartridge, and stamps from the Technical Butterfly stamp set. I stamped and embossed the vacuum flange image using white embossing powder and Versamark over the background, and added Blueprint Sketch Distress Ink over the top. On a piece of scrap card, I stamped and embossed some of the butterflies, using Versafine Clair Nocturne and clear embossing powder, then coloured them in using a variety of Distress Inks and a blending brush. I cut them out and attached them to the background. I used a little strip of card and stamped the sentiment, brushing a bit of Distress Ink around the edge. 


The TV demo sample was a smaller version of my finished card, simply for speed.


 My second demo on the show was a journal page. I used stamps from some of our older stamp sets; Timeless, Make Your Mark, and Floral Parapernalia Elements. I also added colour to the background with a circle stencil and our own Chocolate Baroque Mask - Kaleidoscope of Butterflies. I used Distress Ink and blending brushes for the stencils, and Versafine Clair in toning colours for the stamps. I chose some stamps from Technical Butterfly to add to the page and then added the fabulous Friendship strip from the Mini Slim Words stamp along the edge. I added some coloured pencil accents to the images, sticking to a limited colour palette of blue, pink, yellow and green. 


 I only added the word strip partway along each page, but as I showed on my TV demo, you can easily join the word strip to stamp all the way along the page. I felt it was well balanced having it just along part of the side in my design, but it is really up to you how you use it.


As Lesley and I mentioned in the shows, we discussed the design of these stamps over a cuppa in the Green Room after one of the shows, we often do our brainstorming that way. We live so far apart, and we only meet up at the studios nowadays. Hopefully this year will see a few more new stamps in the pipeline, including some designs that I have had mulling over for a while now....

Anyway, here are one or two projects from last month's shows that I did not get a chance to share with you before. 

The first card is a remake of an old design, but I added some words from Words of Inspiration to the background. I used two of the little trees from Fantasy Woodland to make the flower.

I created an inky background for my next card by adding Distress Ink to an acrylic block and spritzing it with water. I placed it onto textured card. I have added stamps from Essence of Nature and Baroque Meadow, using Versafine Clair Inks.

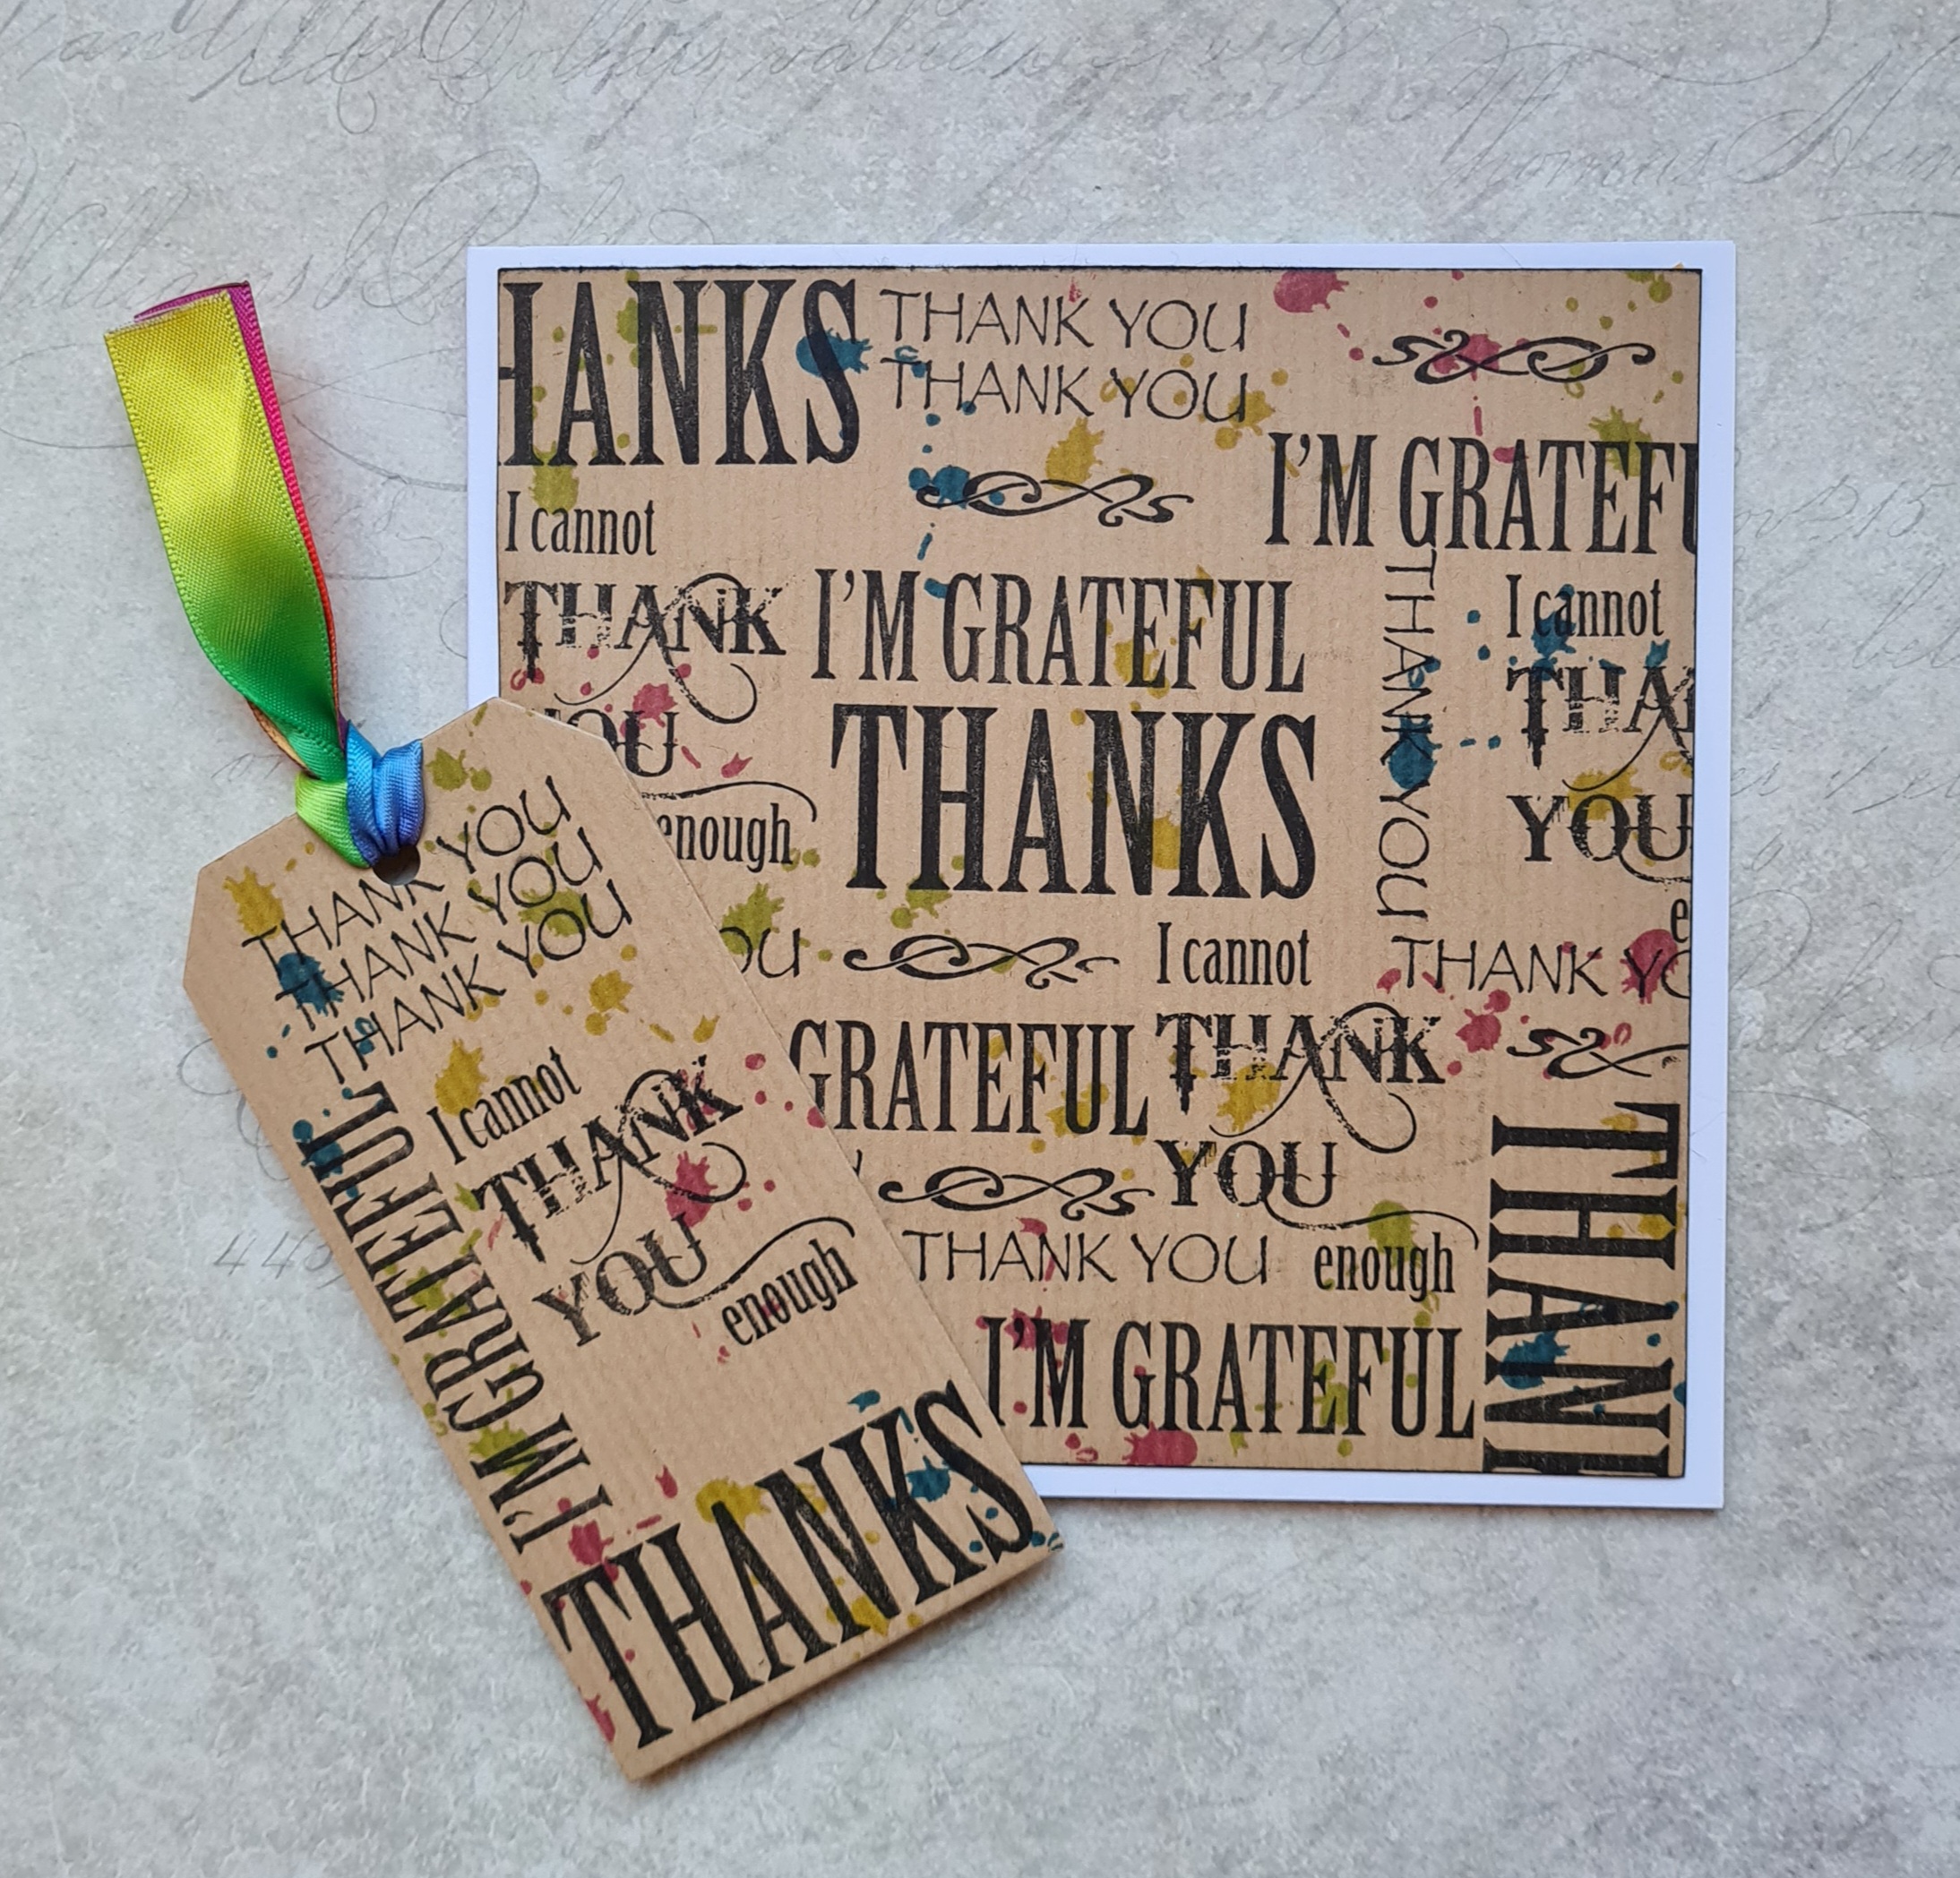
These next two cards were very quick and simple to make. I simply took a piece of white or kraft card, and added the splatter stamp from the Timeless stamp set, using coloured Versafine Clair ink. I then added words from Words of Gratitude over the top. I created a matching tag for a gift.

This was another quick card, using a piece of brown kraft paper for the background, to which I added Brushos and spritzed them with water. I stamped a sentiment from Essence of Nature all over the top, to make the background look like a book page. I coloured some Drawing Cartridge with the same Brushos, and stamped two more images from the Essence of Nature stamp set. I used clear embossing powder over the top.
I reworked an old design once again for this card, using the Patchwork Landscape stamp set. I stamped several of the images onto some Drawing Cartridge upon which I had already created a wrinkle free Distress background, and used a fine liner pen to add lines to create more hills and attach the images to each other. I used a circle mask to add more Distress Ink, to give the appearance of a sun. Using the fine liner pen, I added some birds freehand. I coloured the scene using pencils, choosing a palette of five colours, plus the slightly darker versions for shading.
I created an alternative colour option which is more masculine in grey and terracotta tones. You could use kraft card and add white accents too, or create a black, red and white version. There are so many possibilities, why not create a monochrome version in blues, or greens?

I hope that you have enjoyed my projects. I will be back later in the month to share more of this month's demos with you. Thanks so much for stopping by, your visits are always appreciated.

Take care, xx


Sunday, 20 May 2018

Bees and Butterflies


Hello everyone, I am sharing a few more cards showcasing the beautiful stamps that were featured on last months Hochanda TV shows.

For my first card, I have used one of the very versatile whiteboard shapes made by Tando, exclusively for Chocolate Baroque. These shapes are great, already being white, as they can be inked up straight away without needing any preparation. I added a bit of soft colour in tones of yellow, orange and green, and did the same to a piece of drawing cartridge that was going to become the card background. Using a honeycomb stencil, I added some colour using Distress Ink, repeating this on the background. I stamped a bee on the heart, using Versafine Onyx Black Ink, and masked the image, before stamping a foliage image from the Essence of Nature stamp plate using Versafine Clair Ink. I coloured the bee with pencils, and added a sentiment to the heart.

To complete the background, I stamped the honeycomb image from the Honey Bee stamp set, again colouring the bees with pencils. I added stickles to the bees' wings. To complete the card, I added some green ribbon and green card as a matting layer.

For my next card, I chose an old book page and stamped the pretty foxglove image on to the paper. I added two bees, and coloured the images with pencils. I added some shading around the edge of the page, and then stamped a pretty fern image from the Wild Meadow stamp set around the edge, using two coordinating colours. I used the same foxglove and bee images to stamp over some kraft card to complete a background for the book page focal image. I added Picked Pasberry Distress Ink around the edge of the kraft card to soften the background.  I selected some deep plum card to mat the layers. The background actually looked great on its own, and I have included a photo of that as well so you can see. I quite like this as a quick card in its own right:

Now with the main image added:

My final card was a fairly quick card showcasing the fabulous Textured Art card that is available on the website. I coloured the card very quickly by placing two colours of Distress Oxide Ink on my craft mat, spritzing it with water, and laying the card on top. I stamped the lovely butterfly tree from the Essence of Nature stamp set, and added the small tree either side, to create the appearance of a little woodland. I painted some colour under the trees to 'ground' them, and painted the butterflies.  Adding the main sentiment was all that was needed to complete the card.

Thanks for stopping by, xx


Tuesday, 15 May 2018

Two Quick Cards

Hello everyone, it's time for the monthly Fifteen Minute blog post over on the Chocolate Baroque Design Team blog.  I have two cards featuring in the post, and would like to share them with you.

The first card uses some of the incredibly versatile Drawing Cartridge available from the website. I have coloured the background with Distress Oxide Inks, which I spread over a craft mat and spritzed with water. I placed the drawing cartridge over the ink, and patted it down to pick up the colour. I dried the paper, and then patted it onto the mat again to pick up some of the left over droplets of ink for another layer of colour. I then stamped a variety of foliage stamps over the top using Versafine Clair inks in first and second and third generation stamping, to create lots of depth. I have added two bees, and given their wings some sparkle with Stickles glue. A great sentiment finishes off the card. I used black Versafine for the bees and the sentiment. The stamps are from the Essence of Nature, Honey Bee, Fragrant Honeysuckle, and The Rose Tree stamp sets.

To create my second card, I used some of the fabulous Textured Art card, which has a linen like texture to the surface. I added some Decoart Media Tinting Medium, which I had coloured with Ultramarine and Turquoise Brushos to the surface, almost dry brushing the colour over the background. I stamped the words from the Essence of Nature stamp set all over the large background using Jet Black Archival Ink. I then stamped the tree panel onto a smaller piece of card, and mounted both pieces onto black card. The finish created by the medium and Brushos is chalky, which I could not have achieved with the Brushos by themselves. It is a technique that I will definitely use again.

Do hop over to the Design Team blog to see the cards that my Team mates have contributed to the post. They have come up with some great ideas, as always. Thanks for stopping by, xx

Sunday, 6 May 2018

A Bit of Drama!

Hello everyone, I have two cards to share with you today, that I demonstrated on last month's TV shows on Hochanda. I used dark card to create my projects, and stamped the images with white Brilliance Ink, before colouring them with coloured pencils. The finished effect is very dramatic against the dark card, and I have shown how you can use the technique to create both backgrounds and a focal image.

For my first card, I used some dark brown card to create the background, and stamped a leaf image from the Essence of Nature stamp set repeatedly using the white ink. I then chose a selection of Koh-i-Noor pencils; yellow, green, orange and red, to colour the leaves. I created a central panel by colouring a scrap piece of drawing cartridge with Brushos. I chose Orange, Yellow and Lime Green as my colours. I sprinkled the Brushos onto a large acrylic block, spritzed the block with water, and then pressed the block onto the drawing cartridge. Once the background was dry, I stamped the image, again from the Essence of Nature stamp set, using Potting Shed Archival Ink. The sentiment was stamped onto a piece of the same background, and I inked around the edge of the panel with the ink that I had used for stamping.

For my second card, I stamped the image from the Fragrant Honeysuckle stamp set onto burgundy card. Again, I used a selection of coloured pencils, this time I chose blue, lilac, pink and green. I added some Stickles for a bit of sparkle to the flower centres, and around the edges of the layers. I chose a toning piece of Crafty Individuals paper as a main background, which worked really well with the image. It just shows how well Chocolate Baroque stamps mix with other brands.

I hope that you will give this technique a try, as the Brilliance ink gives you the option of using those dark surfaces to add a bit of drama to your projects if you wish. Combining them with lighter, brighter elements keeps the whole piece balanced.

Thanks for stopping by, xx


Monday, 31 October 2016

Using up those Scraps

Hello everyone, I am sharing a couple of cards that form part of the Fifteen Minute Blog post found on the Design Team Blog today. Our aim is to create cards that can be made in fifteen minutes or less, using a variety of Chocolate Baroque stamps. The cards may be clean and simple in design, or simply quick and easy to make. You can find a whole host of inspiration in the blog posts, and the Design Team contribute as a group, so you will see a real mix of styles and techniques.

For my cards today, I am using some fabric scraps left over from my recent journal pages. The fabric had been coloured with Distress re-inkers, and then dried completely. I used Fossilized Amber for one piece, and Shabby Shutters for the other piece. I stamped a simple floral image from the Essence of Nature and Autumn Fairy Collection stamp sets on the scraps, using Black Archival Ink, and then frayed the edges of the fabric.

I used iron on interfacing on the reverse of the fabric to attach it to the card blank, and then attached a little pearl button to the panel. I stamped a greeting from the Mackintosh Sentiments stamp set on each card to finish.

Thanks for stopping by, xx

Saturday, 29 October 2016

Autumn Journal Pages

Hello everyone, I have a final Autumn project to share with you this month, and decided to mix up some of my old favourite stamps to create a couple of pages in my Pink Pig journal. I created these pages using lightweight cotton fabric and used iron on interfacing to attach the pieces to my journal pages.

I coloured the fabric with Distress re-inkers, I chose Ripe Persimmon, Shabby Shutters and Fossilized Amber. I created lots of fabric, and then worked out which images I wanted to use as my main focal images, stamping these in Black Archival Ink. When stamping on fabric, you do not need to press extra hard, just allow a bit more time for the ink to settle onto the fabric.

Once I had stamped all of the main images, I added some background stamping to the larger pieces of fabric, using Sepia, Plum, Olive and Potting Soil Archival Ink. Although some of the background images are different, I used some co-ordinating images to tie the pages together. I frayed the edges of the fabric before adding the interfacing, as it is much harder to do this afterwards.
I love the texture of fabric and when I am working with it, I often wonder why I don't create more projects in this way! Here are some close ups of each page:

 
I  have chosen lots of Autumnal stamps from my favourite sets: Autumn Poppy, Essence of Nature, Nature's Peace, Autumn Fairy Collection, Words of Wisdom, Woodland Design a Tree, and used rich, warm colours that remind me of the season. Although I have created journal pages here, you could easily use the general design that I have created to make cards, and they would suit both men and women, with these rustic colours.

Thanks for stopping by, xx


Friday, 15 April 2016

Fifteen Minutes or Less


Hello everyone, we are launching a new bi-monthly blog post over on the Design Team Blog, starting today, and the theme will be cards created in fifteen minutes or less. We always try to provide inspiration on the Design Team Blog, using the stamps in imaginitive and innovative ways, and try to create a balance of styles and projects for all abilities. We do feel that sometimes the beginner stampers, or those looking for quick card ideas can get overlooked. The cards may be clean and simple in style, or simply quick to make. Hopefully, they will stretch the use of stamps that are already in your stash, giving you lots of new ideas as we work our way through some of our own stamps, and revisit some of our favourites. You will see samples created by both the Design Team and the Guest Design Team, who are joining us along the way.

I have made a quick card for the first blog post using a really pretty tree stamp from the Essence of Nature stamp set. I have not used this stamp enough, as it is such a lovely image. I created a mask using cheap copy paper, die cutting an oval shape from the centre. I sprayed some lime green Dylusion spray through the mask onto some card, and then carefully removed the mask. I dried the spritzed area with a heat gun, and stamped the tree image with Versafine Onyx Black Ink. I also stamped the image again onto spare card, as I wanted a few extra butterflies.

I spritzed some orange, yellow and pink Dylusion spray onto my craft mat, just a little bit, and using a brush, painted the butterflies with the spray. I cut out a few of the larger ones from the secon image, and stuck them to the original for dimension. I added a sentiment from the Birthday Words stamp set, and matted the background onto a black card blank.


Look out for lots of inspiration on the Design Team blog, it is a jam-packed issue, full of beautiful artwork from my Team Mates. Thanks for stopping by, xx

Wednesday, 11 February 2015

So much to show you!


Hello everyone, apologies for such a long post today, but I am multi-tasking, posting both on behalf of the Chocolate Baroque Design Team and the Chocolate Baroque Challenge Blog. I have several projects to share with you, and I hope that you will enjoy what I have to show you.

I have really been enjoying working with the current stamps of the month, Sketchy Doodle Landscape/Flowers Multibuy, and my samples today are no exception. I wanted to show you the versatility of these stamps, how they can be used in a variety of different ways. I chose to make a set of pastel cards for my first project, and began by masking the top and bottom of the cards, leaving a large strip of the card exposed across the centre. I poured a bit of Acrylic Wax onto a craft mat, and using a piece of cut 'n' dry, I applied the wax onto my stamp. I stamped the image randomly across the card, reapplying the wax to the stamp each time. I cleaned the stamp immediately I had finished stamping the images. Once the wax was dry, I covered the area with Memento ink, choosing soft pastel shades on each card, (New Sprout, Summer Sky and Lulu Lavender). The wax acted as resist, so that the images were visible through the ink. I removed the masks, and stamped a sentiment onto each card from the Amazing Birthday stamp set using Memento Tuxedo Black ink. I stamped some of the butterfly and dragonfly images using Versamark and white embossing powder onto vellum and cut these out, before attaching them to the cards.


My next project was created using a piece of MDF as a base, which I painted with gesso. I added a honeycomb diecut and some lace, which I also painted with gesso.

I embossed several of the sketchy flowers using Versamark and white embossing powder onto a textured card, and cut them out. I added some dark brown die cut pieces, the flowers, and some gessoed metal flowers and butterflies to the board. I layered several of the sketchy flowers up, and added jewellery findings to them, which had been gessoed as well. I sprayed the whole piece with a mixture of blue and lime Dylusion sprays, which I had decanted into mini misters. I wanted a finer spray, without the big droplets that you sometimes get from the normal spray bottles. Finally, I added a bit of gilding wax here and there for a bit of metallic sheen.

I had lots of spray left on my craft mat after this project, so I decided to create a 'mop up' project using some of the left over flowers that I had. So, I dipped a tag through the inks, and also some of the white flowers. I stamped a sentiment from the Rose stem script stamp set over the background using Memento ink. I die cut some leaves from the scrap white card, and added some sari material to the top of the tag. The white embossing powder really pops against the vibrant ink:
 I hope that I have given you lots of ideas with these stamps, and that you will have as much fun as I have had.

This week on the Challenge Blog there is a free digital download from Lesley. It is so useful and I'm sure that you will find a use for it time and time again. I have so many ideas for cards using this download! If you pop over to the blog, you can collect the download following the instructions on the blog post, it's really easy.
I have made two cards this week using the download, as I had two special men celebrating Birthdays that needed a card. The first card incorporates a lovely tree stamp from the Essence of Nature stamp set, which I embossed using Memento Espresso Truffle ink and clear embossing powder onto a Brusho background. I used a spare piece of the background to stamp a sentiment taken from the Birthday Words stamp set.
My second card uses a mixture of stamps including a lovely swirly leaf from the Essence of Nature set to create a branch, which I embossed with Memento Espresso Truffle and clear embossing powder as before. I stamped and embossed an owl image from the Wise Owl stamp set, using copper embossing powder onto a Brusho background. I used another piece of this background to stamp a leafy image from  the SketchyDoodle Flowers stamp set, and a sentiment from the Amazing Birthday stamp set. I cut the leaves out and arranged them around and behind the owl. Both cards were finished using dark brown card as a matting layer.
Some of the other girls on the Design Team have made some beautiful designs with the download, so be sure to take a look on the challenge blog. If you make anything yourself using the download, please upload it to the Facebook page, as we would love to see it.


Thanks for stopping by, Judith xx

Wednesday, 2 March 2011

Bah Humbug things that fly

This week over at Bah Humbug the challenge was to make a card or project incorporating something to do with 'Things that Fly'. I chose to use a lovely stamp from Elusive Images of a bird house and two robins. I coloured my image with Polychromos pencils, and mounted it onto a fabulous backing paper printed onto pearlescent paper. My paper design comes from the Essence of Nature CD, again from Elusive Images. I have used a Martha Stewart branch punch, and a fun sentiment to finish my card off.
Don't forget to go and see what everyone else has been up to this week over on the Bah Humbug blog, and watch out for Friday, as there's an extra treat in store!!!
Thanks for popping by today, Judith xx
Related Posts Plugin for WordPress, Blogger...