Followers

Showing posts with label Autumn Fairies. Show all posts

Monday, 31 October 2016

Using up those Scraps

Hello everyone, I am sharing a couple of cards that form part of the Fifteen Minute Blog post found on the Design Team Blog today. Our aim is to create cards that can be made in fifteen minutes or less, using a variety of Chocolate Baroque stamps. The cards may be clean and simple in design, or simply quick and easy to make. You can find a whole host of inspiration in the blog posts, and the Design Team contribute as a group, so you will see a real mix of styles and techniques.

For my cards today, I am using some fabric scraps left over from my recent journal pages. The fabric had been coloured with Distress re-inkers, and then dried completely. I used Fossilized Amber for one piece, and Shabby Shutters for the other piece. I stamped a simple floral image from the Essence of Nature and Autumn Fairy Collection stamp sets on the scraps, using Black Archival Ink, and then frayed the edges of the fabric.

I used iron on interfacing on the reverse of the fabric to attach it to the card blank, and then attached a little pearl button to the panel. I stamped a greeting from the Mackintosh Sentiments stamp set on each card to finish.

Thanks for stopping by, xx

Saturday, 29 October 2016

Autumn Journal Pages

Hello everyone, I have a final Autumn project to share with you this month, and decided to mix up some of my old favourite stamps to create a couple of pages in my Pink Pig journal. I created these pages using lightweight cotton fabric and used iron on interfacing to attach the pieces to my journal pages.

I coloured the fabric with Distress re-inkers, I chose Ripe Persimmon, Shabby Shutters and Fossilized Amber. I created lots of fabric, and then worked out which images I wanted to use as my main focal images, stamping these in Black Archival Ink. When stamping on fabric, you do not need to press extra hard, just allow a bit more time for the ink to settle onto the fabric.

Once I had stamped all of the main images, I added some background stamping to the larger pieces of fabric, using Sepia, Plum, Olive and Potting Soil Archival Ink. Although some of the background images are different, I used some co-ordinating images to tie the pages together. I frayed the edges of the fabric before adding the interfacing, as it is much harder to do this afterwards.
I love the texture of fabric and when I am working with it, I often wonder why I don't create more projects in this way! Here are some close ups of each page:

 
I  have chosen lots of Autumnal stamps from my favourite sets: Autumn Poppy, Essence of Nature, Nature's Peace, Autumn Fairy Collection, Words of Wisdom, Woodland Design a Tree, and used rich, warm colours that remind me of the season. Although I have created journal pages here, you could easily use the general design that I have created to make cards, and they would suit both men and women, with these rustic colours.

Thanks for stopping by, xx


Wednesday, 18 May 2016

Dabbling with Colour

Hello everyone, it's time for a brand new challenge over on the Chocolate Baroque Challenge Blog, and I am helping to provide a bit of inspiration as part of the Design Team this week.

Following on from my recent kraft notelets, I decided to create a coloured version, using the new challenge colours. I created some notelets using linen card, using the same dimensions as in my previous post, and then cut some strips of watercolour paper 5.5 cms wide. I sprinkled some Brushos onto the dry paper, and then spritzed the paper with water. I used a second strip to blot the first one. This way, I only needed to colour three of the strips to create six strips of card. I dried each strip with a heat gun, and then using Versamark, and white embossing powder, used the same flower images, as I had used on my kraft cards.

I used a small amount of Mermaid Lagoon and Wilted Violet Distress Ink to add shading around the edges of the coloured strips. I then added a sentiment using Versafine Onyx Black Ink to each panel. Finally, I atteched them to the linen cards.


These notelets were so quick to make, and I am thinking of trying a Christmas version out next! Please pop over to the Challenge Blog, to check out the details of the new challenge, and to see the fabulous inspiration from my other team mates.

Thanks for stopping by, xx

Wednesday, 11 May 2016

Gelli Good Fun

Hello everyone, I have some projects to share that are actually part of a brand new TV showing on the Craft Channel, presented by our lovely boss Lesley Wharton. She is going to be one of their regular presenters from now on, which is fabulous news, and will be a regular treat for anyone wanting to learn some great crafting tips and techniques from a very talented lady.

For the gelli plate show, we wanted to create some projects that catered for all abilities, from beginner to advanced, and the first project that is shown is this one.

To create my cards, I made a mask using a piece of acetate, cutting an oval from the centre. This makes a really robust template, much stronger than paper, and the added bonus is that you can see where you are stamping, and it wipes clean for further uses. I was so happy with this idea, and I have developed it further for later projects, as you will see. I'm sure that others have done similar things, but as I do not watch gelli plate tutorials or YouTube demos, etc., I can honestly say, that this was something that I worked out for myself!

I chose a couple of colours of Distress Ink for my background, and loaded up my brayer with the first colour, and rolled it across the middle of the gelli plate. I cleaned off the brayer, by rolling it onto a piece of scrap paper, and loaded up the brayer with the second colour of ink. I then rolled the brayer across either end of the gelli plate, blending the two colours where they met.

I placed the oval mask into the centre of the gelli plate, and then placed a sheet of bubble wrap over the top of the gelli plate, pressing gently. I took the bubble wrap and oval mask away, and placed a sheet of white card over the gelli plate, smoothing over the back of the card, evenly, to ensure that I got a good coverage of ink. I peeled the card away from the plate, and laid it flat on my craft mat, placing the large acetate sheet over the top. Using a black fineline pen, I drew two wobbly borders inside the oval cut out.I chose two co-ordinating images from the Wild Meadow stamp set and using Versafine Olympia Green, I stamped the images onto the background. I removed the acetate sheet, and trimmed the card to size, before adhering to a large card blank.

For my second sample, I repeated the process, but used a scrunched up plastic bag, instead of bubble wrap, to create the background marks. The oval piece of acetate created air bubbles on the cental section, but this looks quite pretty behind the flowers. That's the beauty of gelli plate prints, each one will be different.

I chose to add a faux stitching effect with the fineliner pen on the second sample, I always find this to be very therapeutic!

For my final card, I created another acrylic mask with three apertures. I used two colours of Distress Ink as before to colour the gelli plate, and then added the three circles to the plate. I took the large crackle stamp from the Echoes of Italy stamp plate, and stamped repeatedly across the gelli plate to take away some of the ink. I then removed the circles before taking the print with white card.

I added the piece of acetate, lining up the largest circle first, and stamped a flower from the Autumn Fairy collection using Versafine Ink. I stamped it a couple of times before re-inking, to get a group of flowers. I also spread the flowers up through the circle, heading towards the next circle.

I covered the largest circle with a piece of paper, and lined up the second circle, then stamped the same flower image into the second circle a couple of times. I also added a butterfly from the same stamp set. Finally, I added a sentiment in the smallest circle. I trimmed the card, and added a bit of shading around the edge of the background before adhering it to a white card blank.

Check out the new gelli plate show on the Craft Channel, and look out for Lesley presenting regularly too. Thanks for stopping by, Judith xx



Wednesday, 3 June 2015

Batik Florals

Hello everyone, it's my turn to post a tutorial on the Chocolate Baroque Challenge Blog this week. I have made a card with a batik style background, and thought that I would share it here with you as well.

I stamped and embossed my background using a floral fragment stamp and Versamark ink with clear embossing powder. I then coloured the background using Distress Inks: Salty Ocean, Picked Raspberry and Cracked Pistachio, adding a bit of Memento Grape Jelly ink around the edges. Once I had added my colour, I ironed the baclground, covering it with scrap paper first! This left the background lovely and smooth, and showed off the lovely floral pattern.

I stamped the fantasy flower onto a smaller rectangle, and coloured it with watercolour pencils, before shading around the edges with Distress Inks. I added a couple of butterflies and a sentiment. A pretty organza bow was all that was needed to finish the card. These challenge colours are right up my street, so pretty.


I hope that you will pop over to the challenge blog to take a look at the other DT inspiration on offer. Don't forget, there is a monthly prize on offer if you enter the challenge using current CB stamps.

Thanks for stopping by, xx

Wednesday, 6 August 2014

Challenge Blog Freebie

Hi Folks, it's time for another post over on the Chocolate Baroque Challenge Blog and this time it's a post with a difference, as we have a free digital download for you! Lesley has created a beautiful download that you can collect, simply by visiting the blog, so please pop over to take a look.

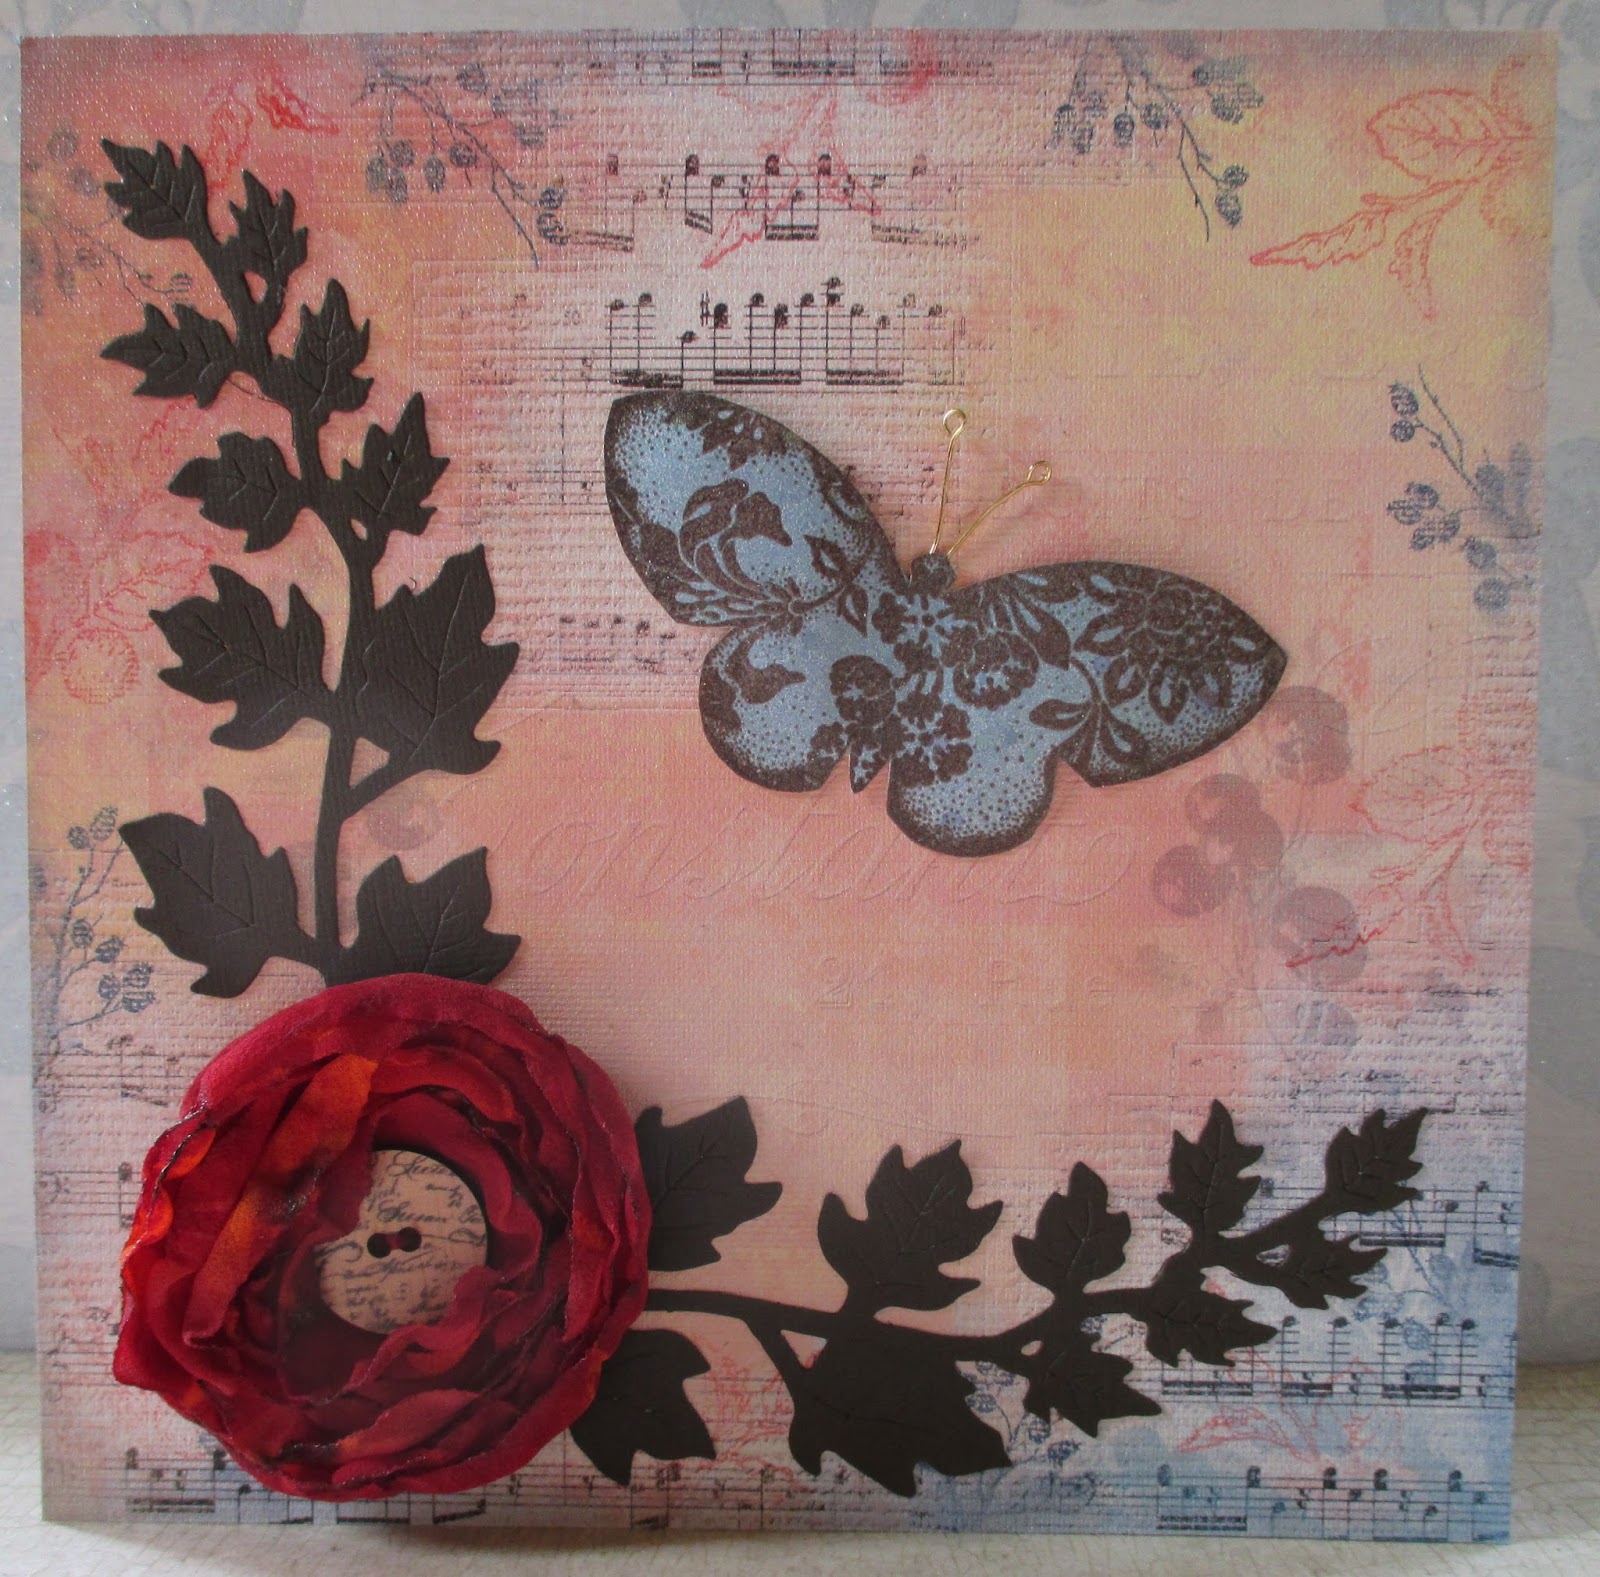
I have created a card using the download for a very special friend, who is celebrating her Birthday today. I printed the download onto canvas, and stamped around the edges, using stamps from the Autumn Fairies stamp set from Chocolate Baroque. I added a chiffon flower that I had lurking in my stash; I have lots of these cut out ready to add to projects whenever I need them. I found a piece of sprayed background paper left over from another project, and stamped a butterfly onto this, using Coffee Archival Ink, and embossed it with clear embossing powder. I added a couple of earring findings for antennae. Finally, I die cut some leaves to place behind the flower.


There is still plenty of time to enter the challenge, so take a look at all of the information while you are there. You can find the link here

Thanks for stopping by, xx


Saturday, 31 May 2014

Summer Fairies

Hi Folks, there is now a fourth set of fairy stamps which has been recently released at Chocolate Baroque completing the seasonal collection. This one is the Summer Collection. This set is full of lovely fairy images, and some great floral images as well.
My first card uses one of the large silhouette fairies, which I have placed on an inked background, made using Distress Inks. I chose several colours which I blended across the page, and then placed a leafy stencil over the top, and used the same colours again to stipple colour through the stencil. I added some deeper colour around the edges of the background to create a frame, and then stamped the trailing ivy across the top of the page, using Paris Dusk Memento Ink. I added a border around the bottom half of the card, using a tree stamp taken from the Fantasy Woodland stamp set. The two trees are a stamp from the same stamp set. I added some shading underneath the trees using a paper mask, and Old Paper Distress Ink. I stamped the silhouette fairy, and the little butterfly, which comes from the Autumn Fairy stamp set, using Versafine Onyx Black Ink.

I added some glitter glue to the fairy and butterfly wings for a little bit of sparkle.


My second card uses a couple of the flower stamps from the collection to create a fairly clean and simple card. I cut a rectangle of smooth watercolour paper, and stamped the freesia stamp at the bottom of the card. I covered the image with a mask so that I could stamp the image again on either side of the original image.

I coloured the silhouette freesia stamp with Distress Markers, blending several colours, and stamped the background with the mask in place. I placed the mask on top of each freesia image in turn, so that I did not stamp over them. I then coloured the three freesia images with Distress Markers and a waterbrush.

I matted the picture onto a piece of dark green card, and then placed this onto a larger square of light green card, adding some orange and green ribbon to my main image. I added three Crealie butterflies to the large background. These Crealie butterflies are great, they co-ordinate to create dimensional butterflies. You can use them individually, or layer them together as I have done for my sample.


My last card was created using lots of masking again, and a hand cut stencil. It is very easy to cut your own stencils using blank stencil sheets.

I used one of the large fairies from the collection, which I stamped and masked off, before stamping poppies from the Poppy Meadow stamp set. I then masked these flowers and stamped the little silhouette flower from the same set. I love this little stamp and it is going to be a favourite from now on. That's the beauty of revisiting older stamp sets, you often discover stamps that you have never used before! I added the stencil and coloured the sun rays using Distress Inks, before inking the remaining sky with blue. I have added a shimmer spray over the top.

I have coloured the fairy and flowers with Distress Markers. The two tiny butterflies are half of a butterfly stamped twice, taken from the Spring Fairy stamp collection. I simply covered half of the stamp with masking tape before I inked it up, then removed the masking tape before I stamped it onto the page. I have decoupaged them, and added glitter glue to their wings. The sentiment is taken from the Fairyland Words clear stamp set.

Anyone who knows me, knows how much I love poppies, and I had great fun creating this card. I hope that it has given you a few ideas as well. Thanks for stopping by, xx


Tuesday, 11 March 2014

Have a Fairy Happy Birthday!

Hi Folks, here's a project for you using stamps from the new Spring Fairy Collection stamp set combined with some older favourites. I wanted to create a gift set that comprised of a card, gift tag and matching wrapping paper, using soft pastel tones. I picked five shades of Memento Ink, and created a background on my tag, and a large piece of white card. I used brushes dabbing off the excess ink to avoid brush marks and blending the colours together where they met. I stamped the fairies and butterflies using Versafine Onyx Black Ink for a nice crisp impression. The extra fairies and buterflies are from the Winter Fairy and Autumn Fairy stamp sets.

To make the tag, I added a sprinkling of glitter on the butterfly wings and the trail of stars. The sentiment comes from the Fairyland Words clear stamp set. To make the card, I added some clouds from the Magical Landscapes/Fantasy Castles Multibuy stamp set and a flower from the Decadent Brocade stamp set, which has been decoupaged. I have added some die cut leaves, and a sentiment as before.


The wrapping paper was created using the same stamps as the tag, stamped with each of the ink colours, graduating across the paper.


Thanks for stopping by, xx


Wednesday, 20 November 2013

Blue Fairy

Hi Folks, here is a Wintery sample for you using the Winter Fairy stamp collection from Chocolate Baroque. I stamped the main fairy onto a piece of white card, and then created a mask which I placed over the image. I stamped some mushrooms from the Autumn Fairy collection and then created masks for those as well. I made some paper masks for the hills, by tearing some scrap paper, and sponged various shades of green Memento Ink across the background. Fnally, I used some blue Memento Ink to create a sky, adding a circle mask to create a sun.

I added some yellow Memento Ink in the circle area for the sun, and embossed some trees using white embossing powder. I then removed the masks and coloured the stamped images using Graph it markers. To finish, I added some glitter glue along the edges of the hills and to highlight the mushrooms.

To create the background, I embossed some snowflakes from the Reindeer Landscape stamp set using white embossing powder, and then covered the background with blue Memento Ink. I used a sentiment from the Winter Fairies stamp set, and added some blue organza ribbon and some gems to finish.


Thanks for stopping by, xx

Friday, 15 November 2013

Thank you cards

Hi Folks, I have a project to show you using the gorgeous new Winter Fairy stamp set from Chocolate Baroque. Around this time of year, we have lots of thank yous to send, and so I decided to make a gift wallet containing some thank you cards, using lots of the fairy images from both this stamp set and the Autumn Fairy stamp set.

I started my project by cutting some paper masks from scrap paper and inking through the masks with a variety of Memento inks onto plain white card cut to size.


I blended the colours as I graduated down the area that I was shading to get a soft blend. I removed the mask and stamped one of the fairies from the stamp plate over the shaded area. On each card, I added a sentiment taken from Words of Gratitude or Pretty Poppies stamp sheets. I added black matting to the cards to tie in with the stamping.


I cut two pieces of black card 21cms x 19.5cms.  I then scored 1.5cms at one end of each piece, and overlapped them, sticking them together at this point. I scored 2.5cms at each outer edge, and 2.5cms along the bottom, cutting out a gap where the overlap occurred along the bottom. I trimmed the bottom edges slightly at each of the four ends. I folded the sides and the bottoms inwards, and secured the outer corners with glue or double sided tape.


I placed a piece of ribbon across the middle of the front of the folder before sticking on the front design. I actually used two pieces of ribbon, a shorter piece on the right, and a longer piece on the left to wrap right around the back.


I'll be back in a few days with another sample using these lovely stamps, but in the mean time, keep checking the Design Team blog for more inspiration from my team mates. If you leave a comment over there this month, you could be entered into a draw, so leave some love for them. Thanks for stopping by.

EDIT: I was asked by a commenter what sort of brushes I use to make my backgrounds on these cards. For these particular cards, I just used some cheap little shaving brushes from a supermarket, and have one for each colour group that I store in a plastic basket. I dab off the excess ink onto scrap paper, see my photos for reference, as this avoids brush marks in the shading. You can get a lovely smooth background with brushes. Any good stencilling brushes work as well.

I hope that this helps, xx


Thursday, 19 September 2013

Autumn foliage

Hi Folks, I have a card to show you today, using some stamps from the Autumn Fairy unmounted stamp collection from Chocolate Baroque

I made a background using Seedless Preserves, Wild Honey, Mustard Seed, and Forest Moss Distress Inks, blending them with brushes to get a soft finish. I then placed a mask in two opposite corners of the background, and used the same colours again, to deepen the colour and create an abstract pattern.

I stamped the foliage stamp onto a piece of card cut with a Nestie, and added a couple of butterflies as well. This foliage stamp has a very Art Nouveau feel, which I really love. I coloured the image with Distress Markers. I stamped the large 'Autumn' onto a tag shape, and matted it onto a piece of olive ribbon, using large black brads, which echo the black bubbles in the main image.


These new fairy stamps are a lovely mixture of stamps and will be great to use all year round. They are so versatile and I look forward to showing you lots more ideas with these over the coming months mixing and matching them with other Chocolate Baroque stamp sets. I love to mix my stamp sets together, and these can be used for so many occasions. The foliage stamps are so useful, and girls of all ages will love the fairies.

Thanks for stopping by, xx

Sunday, 15 September 2013

New Fairy Stamps at Chocolate Baroque

Hi Folks, I have a few samples to show you introducing the new Autumn Fairy stamp plate and new clear Fairy word stamps from Chocolate Baroque.

My first card is a Halloween card, using a cat taken from the Autumn fairy stamp plate, combined with a little mouse from the Bewitched Moonlight stamp set. I have created a background using Distress Inks, and added the two main images. I then used a white gel pen to add highlights to the mushrooms and wings.


My second sample uses another lovely silhouette stamp from the Autumn fairy collection, stamped onto a background made with alcohol inks. I have added a black frame, and a co-ordinating backing paper. The sentiment is one of the new clear Fairyland  words stamps, which go with the other fairy stamps so well.


My last sample sample uses the same fairy stamp, showing how different the stamp can look depending on how it is used. I have stamped and embossed the image using white embossing powder. I used alcohol inks to colour the background.


Thanks for stopping by. xx

Related Posts Plugin for WordPress, Blogger...