Followers

Showing posts with label Birthday Words. Show all posts

Monday, 19 February 2024

It's been a while...

Hello everyone, I hope that you are keeping well. Goodness it's been a long time since I last posted. Life has been busy, and before you know it the weeks and months have rolled past. My Husband and I have both celebrated a significant birthday since I posted last, and we are starting to feel a few creaks in our bones! However, I am determined to keep fit and healthy for my granddaughter, who seems to think that I should be able to keep up with her as she runs around and expects me to join in with all of her crazy games. 

I have been keeping busy with my knitting and crochet, and managed to finish a couple of knitted jumpers for myself, as well as continuing to crochet lots of blankets and other projects, including toys and gifts for Ruby, my granddaughter. 

I have several projects to share with you today from our recent TV shows on Create and Craft, along with several older projects, which some of our more recent viewers may not have seen before.

My first project was created using the February Fairy stamp set, and several of the images from the Wild Meadow stamp set. This is such a useful stamp set for creating fields of flowers. I have used several different colours of Versafine Clair, and first and second generation stamping to create depth in the foliage. I have coloured the images with pencils, and added a tiny bit of glitter glue to the fairy dust.


Sticking with the Wild Meadow stamp set, I decided to create a journal page for my next project. This idea could easily be turned into a card. I took a small piece of polyester, and inked it up with some Distress Ink. I used Fossilized Amber first, and spritzed it with water, then randomly placed it over the journal page. I dried the page, then repeated the process with Salty Ocean Distress Ink. Using Nocturne Versafine Clair Ink, I stamped images from Wild Meadow onto the page to create a scene, and then added a sentiment from Artistic Expressions.

I created an optional panel using a stamp from the Eastern Grasses stamp set. This could be placed here on this page, or on the facing page, which could have the same background colour, and some journaling to complete your double page spread.

I created a super quick card using an oval mask and two different colours of Distress Ink for a background. I then stamped the silhouette fairy from this month's stamp set, a thistle from Wild Meadow and a sentiment from Birthday Words, all using Versafine Clair black ink. You may have seen the gift card set that I shared on the TV shows with lots of the fairy images throughout the year. They were all made the same way as this card.

I made a couple of little 4" x 4" cards using Eastern Grasses and some of the little worker stamps from Tranquility and Serenity. These stamps work so well together. I used an acrylic block to add colour very quickly to the background. I simply coloured the block with Distress Ink, spritzed it with water, and pressed it onto a piece of Drawing Cartridge. Once the Drawing Cartridge was dry, I stamped the images, and coloured them with pencils.

Coming full circle back to Wild Meadow, I made a pretty bookmark using some of the beautiful patterned papers that Lesley designed especially for February. I added some extra colour with Distress Inks, and used coloured Versafine inks once more. I added some script in the background from Words of Gratitude. The little bird from Serenity looks right at home amogst the foliage.

I have a couple of older cards to share, a card using Butterfly Dress and Floral Edges. I have cut out some of the butterflies from the dress to create a flurry of extra butterflies.

The following card was created using the lovely Birdcage Collage stamp:


Well, thanks so much for stopping by, I hope not to leave it so long befoe I post next time. Take care, xx


Sunday, 23 January 2022

Colours of Nature

Hello everyone, I hope that you are keeping well. I have a couple of projects to share with you today featuring stamps that were showcased on last month's TV shows on The Craft Store.


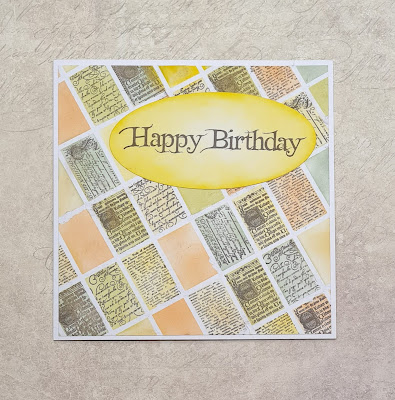
My first card features stamps from the Mini Scripts stamp set. I created a grid using very fine masking tape, and coloured each segment using Distress Ink in natural colours. I stamped some of the script stamps randomly in the segments using black ink.I chose to leave a few segments plain, as I felt it would be too dark if I stamped in every segment. I carefully peeled the tape away to reveal the tiled effect. I added a large sentiment from Birthday Words stamped onto a die cut which I had also coloured with Distress Ink.

TIP: The masking tape was a little bit too tacky, and I would ensure that I had placed it on something first before using it, so that it had lost a little bit of its stickiness. You can see where a couple of pieces of the design have been pulled if you look carefully. However, I want you to learn from my experiences, which is why I am pointing this out 😉

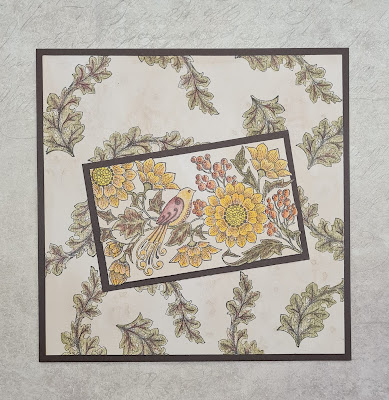
My second project is a remake of another project, using the Song Thrush stamp and a lovely leaf from Brocade Backgrounds. I coloured some Drawing Cartridge with some tea, and left it to dry. I stamped the main image, and then used a larger piece to stamp the leafy image randomly to create a background. I coloured all of the image with Inktense pencils, and blended them with a waterbrush.

I matted both pieces with dark brown card before adhering them to the base card. I hope that you have enjoyed seeing my projects this month. I will be back next month with more projects to share with you. Thanks for stopping by, xx


Tuesday, 11 January 2022

Teeny Weeny Flowers

Hello everyone, I hope you are keeping well. I have a couple of projects to share with you today featuring stamps that were showcased on The Craft Store last month.

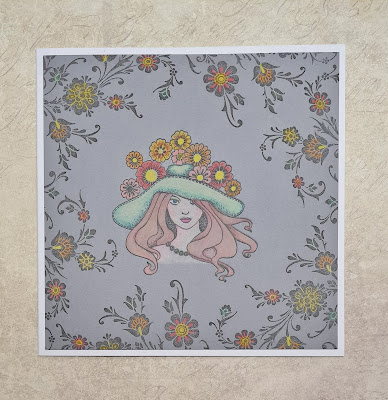
My first project uses the Lady in Hat stamp stamped on grey card, and I stamped a border using an image from Brocade Backgrounds. I coloured these images with Faber Castell Black Edition pencils.

Using a coloured background like this gives a completely different effect to the images, and the colours really pop.

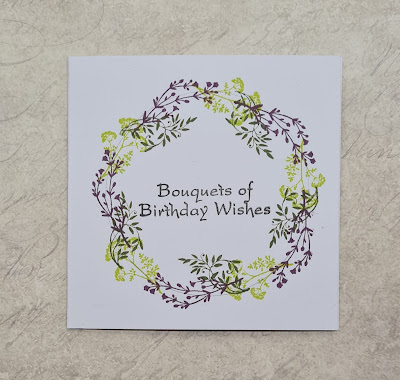
My second card is a really quick project; a little 4" x 4" card. I stamped a sentiment from Birthday Words in the centre of the card, and drew a pencil circle on the card. Using Versafine Clair ink, I stamped some of the images from Teeny Weeny Meadow around the circle to create a wreath.

I will be back later in the month with more projects to share with you, thanks for stopping by, xx


Thursday, 1 July 2021

From The Deep

Hello everyone, I have a few projects to share using stamps that were featured on last month's TV shows on The Craft Store.

My first card was created on a piece of glossy card, and I used an inky plate to create the background. I brayered a selection of Distress Inks onto the plate, and then pressed the card onto the plate to get a print. I trimmed the card to size, and then placed a square of Masking Tissue in the centre. I stamped the images from Mermaid Queen and Seashell Collage around the edges using Archival Ink. I added some shading using grey Archival Ink before removing the Masking Tissue. I stamped the bird and sentiment from the Seashell Collage stamp set within the faux frame, amd added a touch of pencil colouring to the image.

To create my second card, I used a piece of Smooth White Stamping Paper and stamped the Ammonite image in the foreground using black ink. I masked the image using Masking Tissue, and proceeded to stamp the image again in grey ink, masking as I went along, until I had filled the page. I only needed three masks in total to achieve this effect, and as they are reusable, I will be able to put them to good use in future projects. I used colouring pencils to complete the project, choosing a rainbow palette, and using three different colours on each shell to give a good variation of shading. I started with the lightest colour each time. I added a sentiment from Birthday Words. I added grey pencil around the shells to give even more definition to the shells and make the card feel more 3D.

My third card was created using Drawing Cartridge and Distress Inks. I added salt to the background while it was still wet to create an underwater effect, like bubbles in the sea. Once the background was dry I added some foliage along the bottom from Something Fishy, and completed the sea bed by drawing in some lines and dots with a fineliner pen. I added lots of the fish, and stamped a few extra fish and shells onto to some sticker sheets which I coloured separately, all with pencils. I added a few fronds of colour to represent seaweed using my Koh-I-Noor plalette and a waterbrush. 

This last project is a golden oldie which I am sharing again for those readers who have not seen it before. I used Ink and mica powder on the bckground covered up with scrunched up cling film. Once the background was dry, I stamped all of my images from Mermaid Queen with Archival Ink and coloured them with pencils. I have joined the images up with dots to make them appear to be part of one big scene using a fineliner pen, and used toning colours throughout.

Thanks for stopping by, I will be back later in the month with more projects to share with you. Take care, and stay safe, xx


Tuesday, 16 March 2021

Beautiful Bold Butterflies

Hello everyone, I am sharing more butterfly cards with you, following on from my last post. Butterflies are such a universally popular image, and I hope that you will enjoy what I have to share with you today.

I created my first card using the Just Butterflies and Butterfly Blush stamp sets. I coloured a piece of drawing cartridge using Distress Oxides and then stamped some of the butterflies from Butterfly Blush using Versafine Clair. I added some white dots using charcoal through a stencil, however, you could achieve a very similar look by using white paint and one of the dotty stamps from Make Your Mark.

I added some texture paste to a piece of MDF, and once it was dry added some paint and gilding wax. I stamped and embossed the butterflies onto vellum, cut them out and layered them up onto the panel. The sentiment from Butterfly Mind was stamped onto a spare piece of background.

The following two cards are older projects, but once again, I hope that you do not mind me sharing them with you. I masked off  the edges of the cards, and added Distress Ink in the centre of the cards. I was aiming for aurora borealis effect, and hopefully achieved that feeling in these cards. I added water splatters, and then stamped the foliage from Briar Rose Butterfly along the bottom using black ink. The butterflies were stamped onto sparkly acetate using Archival Ink and I added coloured vellum to the back, but you could just stamp them onto card, colour them as normal and use a sparkly pen over the top to achieve a similar look. The sentiments come from the Birthday Words stamp set.
 

By changing the colours and foliage, you can create a completely different look, these are really pretty and would make a nice set to give as a gift as well.


Thanks for stopping by, stay safe and take care, xx


Friday, 5 March 2021

All About the Butterflies

Hello everyone, I have some projects to share with you today created with some beautiful butterfly images that we brought to Hochanda last month. My first card was created fairly quickly using a piece of drawing cartridge, onto which I drew a circle with a pencil. I chose several colours of Versafine Clair in shades of blue and green and stamped an image from the Thistle Butterfly stamp set around the circle. I stamped each colour five times, to ensure an even coverage, varying the direction that I stamped to make the foliage appear more natural. Although these colours are not necessarily true to nature, I love how they turned out.


Once I had finished the wreath shape, I added some splotches with an image from Just Useful, using some of the same colours that I had used in the wreath. I added a touch of shading around the edge of the background with Distress Ink. I added a sentiment in the centre of the wreath from Birthday Words.


I stamped and embossed three butterflies from across the four sets, I just chose whichever butterflies appealed to me most, to be honest. I used some of Lesley's A5 Doubled Sided Designer Papers, they are so useful for this sort of thing, and will last for ages. I used white embossing powder for a delicate touch.

I am sharing two older projects with you today using the Honeysuckle Butterfly stamp set. These two projects were really fun to create, so I hope that you don't mind seeing them again. The first was a canvas that I made using a sheet of old music paper. I painted over the top using a zingy green colour, and decoupaged the image which I had coloured using pencils. I stamped around the edge using Archival Ink. I added lettering to create a collage effect, you could use book paper, die cuts, whatever you have in your stash to create this effect.


This next project is more subtle, but again, I loved creating this one too. I used a Brusho background, and added stamping using an image from the Elegant Edges stamp set around the edge of the background. The butterflies are decoupaged, leaving one wing free for real dimension. This card is just waiting for a sentiment for the right occasion. It would make a lovely Mother's Day card, don't you think?


Thanks for stopping by, take care and stay safe, xx


Thursday, 21 November 2019

A Burst of Colour

Hello everyone, as the nights are pulling in, and the days are often a bit grey and gloomy, I thought I would share a few colourful projects that I made for last month's TV shows on Hochanda. I hope that these projects will brighten up your day and inspire you to get your inkpads out and have some colourful creative fun yourselves.

My first project was created using drawing cartridge and Brushos. I wanted a zingy background, and chose yellow, red and orange to create the first layer. I sprinkled the Brushos first, and added water to get the lovely mixture of colours. I blotted another piece of drawing cartridge over the top, and saved that piece for another day's project. I added some stencilling using red and yellow ink, and stamped randomly over the background using the Klimt Panel cling mounted rubber stamp. I held the stamp in my hand rather than on a block to get just bits of the image here and there.

I stamped and embossed some chess pieces from The Art of Chess stamp set onto black card using gold embossing powder, and cut them out. I also stamped the sentiment onto a spare piece of my background card. I mounted the backgrounds before adding them to a tag shaped card.

The backgrounds for the next three cards were all created in the same way, I simply finished them off in different ways. The colours are so pretty, and I really enjoyed making the backgrounds. I made a lot, and still have some left for another creative session. I used Distress Oxide Ink spread onto a craft mat, which I spritzed with water. I placed my drawing cartridge over the top, and then added some gold mica spray, giving it a generous spritz. I put some crinkled cling film over the background and left it to dry completely. When the cling film is removed, you are left with some beautiful patterns, highlighted by the mica spray. There are lots of variations for this technique out there on the Internet, so do give it a try.

For the first of the three cards, I stamped the heart from Music Fanfare five times on a pink background, and once on green. I cut the green heart in half, and edged the cut side with black ink. I stamped the large music segment twice using a toning ink, and added a piece of velvet ribbon to the background. I scrunched, then arranged the hearts into a flower, tucking the green segments behind to resemble leaves. I wanted the flower to look more 'crumpled', and by scrunching the petals first, it gives them far more texture. I added a big black button in the centre. To finish, I added a sentiment from the Loving Sentiments stamp set and matted the background onto black card.

For the next two cards, I used the beautiful Floral Grunge stamp. I used patterned papers for the first card, paper piecing the image, and adding a butterfly cut from the papers themselves. I added one of the ephemera stamps using toning coloured ink, matching the background colours. You can really see the shimmer of the mica spray in this photo.

Finally, I added a bit of pencil colouring to the image on this last card, adding some grey pencil around the flower to give some shading and to give a feeling of dimension. I chose toning colours once again, and although this was a very quick card, it would make a lovely Birthday card. I used a sentiment from the Birthday Words stamp set.

I hope that I have given you a few ideas, and that you will try out some of the projects that I have shared with you today. Thanks for stopping by, xx


Monday, 3 September 2018

Faux Batik Paisleys

Hello everyone, I have several projects to share with you today, featuring a range of stamps from last month's TV shows on Hochanda.
 
I wanted to use the faux batik technique on my first batch of projects, and show how this could be adapted for a range of uses. I created a masterboard, using an A4 piece of drawing cartridge, stamping a leafy image from the Nature's Paisleys stamp set, using Versamark and clear embossing powder all over the page. Once completed, I blended Picked Raspberry, Fossilized Amber and Salty Ocean Distress Inks over the page until I had covered the background. The clear embossing powder acted as a resist for the inks. I placed some copy paper over the top of the page, and used an iron on a medium setting, to iron off the embossing powder, leaving a flat surface.

For my first project, I trimmed a piece of the masterboard into a tag shape using a large die. Using the same die, I folded some black card, and drew around the die to create a card base. I added an elephant image that had been stamped onto a spare piece of card and coloured with Distress Ink and a water brush. The sentiment had been stamped onto card coloured with Shabby Shutters Distress Ink and edged with toning ink. All of these images were from the Paisley Elephant stamp set.

I used another piece of the masterboard, trimmed to fit a square card blank, for my next project. I stamped a sentiment from the Birthday Words stamp set over the top. Because the surface is flat minus the embossing powder, you can stamp over the top. I created a flower as an embellishment by stamping and clear embossing one of the smaller paisley images from the Nature's Paisleys stamp set onto card that I had coloured with Picked Raspberry Distress Ink, and cutting them out. I added a large gem in the middle.

I decided to create a card in a similar style using kraft card. I stamped and embossed a paisley design using clear embossing powder onto the kraft card, and thought how fabulous the embossing looked against the kraft card, just by itself. I decided to make a card in this monochrome colour scheme there and then, it was a discovery by happy accident. Sometimes you just need to experiment, and you find extra ideas as you go along, this was one of those times for me. I added some cream flowers from the Little Birdie range, and a sentiment, using clear embossing as before, and my card was finished. Without the flowers, this card could have been more masculine.

On to the card that I was intending to make now! I embossed the kraft card with clear embossing powder, and added Salty Ocean Distress Ink before ironing off the embossing powder as in my first projects. The background looks like an old faded bandana, and I love this effect. It would look great with red or plum ink as well. I spritzed some cream Little Birdie flowers with Turquoise Brushos and a bit of gold shimmer, also adding some gold leaves from my stash. I added a sentiment stamped onto kraft card, and used a layer of kraft card to mat the background.

I thoroughly enjoyed making these projects, and hope that I have given you lots of ideas. Most of all, I hope you will experiment, because you never know where it might lead you! Thanks for stopping by, xx

Saturday, 9 December 2017

Birthday Flowers

Hello everyone, I am sharing two cards today that were featured on one of last month's floral TV shows on Hochanda. Although both cards are similar in style, I have used very different methods to create them.

For my first card, I chose to concentrate on the Fuchsia stamp plate, and masked an oval area in the centre of a piece of smooth watercolour paper first of all. I stamped and embossed the small fuchsia silhouette stamp, using Versafine Onyx Black Ink and clear embossing powder, and then covered the background with Picked Raspberry Distress Ink. I added a touch of shading around the oval using a grey pencil to add the impression that the oval was layered on top of the background.

I removed the mask, and stamped the large fuchsia and sentiment from the Birthday Words stamp set inside. I coloured the image with Distress Inks and a water brush. I decided to go for very traditional fuchsia colours, using pinks and purples for the flowers themselves. Finally, I attached the background to a large black card blank.

For my second card, I coloured a piece of drawing cartridge with Fossilized Amber Distress Ink, and then spritzed it with water, to achieve a mottled effect. Using the same colour ink, I stamped a tiny flower sprig from the Hyacinth stamp set randomly over the background. I attached a scrap of book page, some cream lace and brown ribbon across the centre, before moving on to the focal point of the card.

I coloured the edge of a die cut oval with the same colour ink as I had used on the background. Using Potting Shed Archival Ink, I then stamped the daisy head from the Lily stamp set three times, masking the images with masking tissue. I stamped the grass image from the Hyacinth stamp set, filling in the gaps between the daisies, and using second generation stamping at the back, for depth.

I removed the masks, and using a brown fineliner pen, I extended the stalks of the daisies, to complete the image. I coloured the images with Distress Inks and a water brush, before attaching the oval to my card. Finally, I added a sentiment from the Birthday Words stamp set onto the background, using Archival Ink, as before.

I just wanted to share some Birthday flowers of my own that I received last week from my lovely Daughter. The colours are absolutely beautiful, and just my absolute favourites. The bouquet is very Wintery in design, with twigs, and lots of texture. There are deep plum calla lilies and lovely blousy deep pink roses plus the light grey eucalyptus to add a lighter touch to the overall effect.


I will be back later in the month with some more floral projects for you. I hope that my projects have given you some ideas for using these pretty stamps. Thanks for stopping by, xxx


Thursday, 16 November 2017

A Wheelie Quick Card!!!

I am sharing a card today as part of the Fifteen Minute blog post which is airing on the Design Team Blog. Regular followers will know that this blog post features cards and projects made in fifteen minutes or less, and we aim to show that you can create designs that are both stylish and have that wow factor, but do not need to spend hours to achieve the end result.

My card was made as a Birthday card for my lovely Husband, who celebrated his Birthday a couple of weeks ago. He likes plain and simple cards, and even though his Birthday falls on a particular day, he definitely does not want anything Hallowe'en related! He is a cycling enthusiast, and so I felt that this design would fit the bill perfectly.

I started my card by cutting a strip of smooth cartridge paper, and masking off the central area with a piece of masking tissue. I stamped the front wheel of the penny farthing from the Steampunkery stamp set in various colours across the top and bottom of the background. I simply used masking tape to cover up the rest of the stamp before I inked the stamp, and removed the tape before I stamped it each time. Once I had stamped the wheels, I removed the msking tissue, and stamped the sentiment from the Birthday Words stamp set across the middle, using black ink. To finish, I simply added the background to a large black card blank.

Do head over to the Design Team blog to see what my Team Mates have created in the post today, it is a jam-packed post, and you will definitely be inspired! Thanks for stopping by, xx

Tuesday, 15 August 2017

Butterfly Wreath

Hello everyone, I am sharing a card that I have created as part of the monthly Fifteen MInute blog post over on the Design Team blog today. This card was made as a Birthday card for a special friend, but it doubled up as a quick card for this blog post as well.


I created a wreath by using the leafy sprays from the Take It or Leaf It stamp set. I stamped the images around a pencil drawn circle, using first and second generation stamping, and Memento Pistachio ink. Once the ink was dry, I rubbed out the pencil line. I then die cut several butterflies from book paper which had been stuck onto card, which I found  in my box of scraps. The dies are a set from Crealies, and are a firm favourite of mine. I inked around the edges of the butterflies with Abandoned Coral Distress Ink and stuck them around the circle.This is not a colour that I use much, but it goes so well with the Pistachio. Finally I added a sentiment from the Birthday Words stamp set.

After looking at several options, I decided that kraft suited this card best, and so I matted the background onto a large kraft card blank.

Pop over to the Design Team Blog to see the rest of the creations in this month's Fifteen Minute blog post.

Thanks for stopping by, xx


Thursday, 15 June 2017

Vellum Butterflies

Hello everyone, we are sharing our monthly bumper post filled with quick and inspirational tips and ideas over on the Design Team Blog today. All of the cards made by the Design Team have taken fifteen minutes or less to make, and using fabulous stamps from Chocolate Baroque show that great cards can be made in next to no time.

I have made a card as part of the post, and would like to share a few more details with you.

I used purple and green Distress Oxide ink, and covered a circular gelli plate, blending the inks where they met. I used a large flourish from the Patchwork Butterfly stamp set to stamp onto the gelli plate, not cleaning it in between each stamping. This meant that the colour from each stamping transferred to the gelli plate, adding colour or taking colour away, depending on how much ink was picked up on the stamp each time. It creates a very random effect, but I love how it turns out. I pressed the gelli plate onto a large white card blank to take a print.

I stamped and embossed two butterflies from the same stamp set onto coloured vellum, using Versamark and Wow white embossing powder, before cutting them out. I adhered the butterflies onto the background, and then stamped a sentiment from the Birthday Words stamp set.


Thanks for stopping by, xx

Sunday, 15 January 2017

Time Saving Cards

Hello everyone, I have a couple of speedy cards for you today. They form part of a regular feature over on the Chocolate Baroque Design Team Blog- Fifteen Minute Cards. We aim to create cards made in fifteen minutes or less and they can be clean and simple in style, or simply cards that are quick to make. These can be cards aimed at beginner stampers, or for someone who needs to make a card in a hurry, or maybe a batch of cards. We try to show that speedy can still be elegant and stylish, inspirational and have a wow factor. You do not always need to spend all day making a card. I cannot promise that these two cards deliver on everything that I have just written about, but they might give you some ideas to go off and try something quick for yourself.

To create the first card, I used some kraft card, and a stamp that I have not inked up before, which I was surprised about, considering how long I had owned these stamps. I used Versamark and white embossing powder to stamp the image from the Pretty Poppies stamp set, before colouring it with Zig clean colour markers. I chose earthy tones to tie in with the kraft background, and they happen to be my favourite colour palette. I added a sentiment from the same stamp set, using Plum Archival Ink. Finally, I added a plummy coloured card to mat the background, before adding it to a kraft card blank. This will be a handy store cupboard card, as there is always an occasion to send a card like this to someone who needs cheering up.

To create my second card, I found a Brusho background in my scrap box, and stamped the Big Bold Background Leafy Brocade stamp over part of it, using a Versafine Deep Lagoon Ink. I cut another strip of the background, and stamped the large sentiment from the Birthday Words stamp set using the same ink. I edged both pieces of card with Memento Teal Zeal Ink, before attaching them to a white card blank. This card was so quick to make, these Big Bold Backgrounds cover the card so quickly, and the large sentiment finishes the card in an instant. I always have spare Brusho backgrounds left over from previous sessions, but this could just as easily have been created with a gelli plate background.

I hope that I have given you some ideas for some quick cards. I am certainly going to make a few of these to have on hand just in case I need a card in a hurry. There will be another Fifteen Minute blog post at the end of the month, but do pop over to the Design Team Blog, to see what the rest of my team mates have made today.

Thanks for stopping by, xx

Related Posts Plugin for WordPress, Blogger...