Followers

Showing posts with label Floral Edges. Show all posts

Monday, 19 February 2024

It's been a while...

Hello everyone, I hope that you are keeping well. Goodness it's been a long time since I last posted. Life has been busy, and before you know it the weeks and months have rolled past. My Husband and I have both celebrated a significant birthday since I posted last, and we are starting to feel a few creaks in our bones! However, I am determined to keep fit and healthy for my granddaughter, who seems to think that I should be able to keep up with her as she runs around and expects me to join in with all of her crazy games. 

I have been keeping busy with my knitting and crochet, and managed to finish a couple of knitted jumpers for myself, as well as continuing to crochet lots of blankets and other projects, including toys and gifts for Ruby, my granddaughter. 

I have several projects to share with you today from our recent TV shows on Create and Craft, along with several older projects, which some of our more recent viewers may not have seen before.

My first project was created using the February Fairy stamp set, and several of the images from the Wild Meadow stamp set. This is such a useful stamp set for creating fields of flowers. I have used several different colours of Versafine Clair, and first and second generation stamping to create depth in the foliage. I have coloured the images with pencils, and added a tiny bit of glitter glue to the fairy dust.


Sticking with the Wild Meadow stamp set, I decided to create a journal page for my next project. This idea could easily be turned into a card. I took a small piece of polyester, and inked it up with some Distress Ink. I used Fossilized Amber first, and spritzed it with water, then randomly placed it over the journal page. I dried the page, then repeated the process with Salty Ocean Distress Ink. Using Nocturne Versafine Clair Ink, I stamped images from Wild Meadow onto the page to create a scene, and then added a sentiment from Artistic Expressions.

I created an optional panel using a stamp from the Eastern Grasses stamp set. This could be placed here on this page, or on the facing page, which could have the same background colour, and some journaling to complete your double page spread.

I created a super quick card using an oval mask and two different colours of Distress Ink for a background. I then stamped the silhouette fairy from this month's stamp set, a thistle from Wild Meadow and a sentiment from Birthday Words, all using Versafine Clair black ink. You may have seen the gift card set that I shared on the TV shows with lots of the fairy images throughout the year. They were all made the same way as this card.

I made a couple of little 4" x 4" cards using Eastern Grasses and some of the little worker stamps from Tranquility and Serenity. These stamps work so well together. I used an acrylic block to add colour very quickly to the background. I simply coloured the block with Distress Ink, spritzed it with water, and pressed it onto a piece of Drawing Cartridge. Once the Drawing Cartridge was dry, I stamped the images, and coloured them with pencils.

Coming full circle back to Wild Meadow, I made a pretty bookmark using some of the beautiful patterned papers that Lesley designed especially for February. I added some extra colour with Distress Inks, and used coloured Versafine inks once more. I added some script in the background from Words of Gratitude. The little bird from Serenity looks right at home amogst the foliage.

I have a couple of older cards to share, a card using Butterfly Dress and Floral Edges. I have cut out some of the butterflies from the dress to create a flurry of extra butterflies.

The following card was created using the lovely Birdcage Collage stamp:


Well, thanks so much for stopping by, I hope not to leave it so long befoe I post next time. Take care, xx


Saturday, 1 October 2022

A Big Post Today!

Hello everyone, I hope that you are keeping well. In a change from usual procedure, I am only posting on my own blog this month, as the Design Team blog at Chocolate Baroque is closing down. We have decided, due to decreasing visits from viewers, and ever increasing popularity on other forms of social media, like Facebook and Instagram, that we will discintinue the blog. It is still there, if you wish to visit the archives, but we will not add anything new.

I have a bumper packed issue today, with projects from last month's TV shows, plus some older projects using stamps from the TV shows that some of you may have seen before. I hope you will enjoy what I have to share with you.

My first set of projects were made using a stamp from the Shaded Baubles stamp set, and I wanted to show that you could use this stamp all year round, it is such a versatile stamp. The stamp set is essentially a Christmas stamp set, but you can make cards for any occasion using this stamp.

My first two cards started out in the same way, I made a Distress Ink background in shades of blue and purple. For the first card, I kept the background plain, but added a sentiment from the Kings of the Orient stamp set, stamped in dark blue. I coloured a piece of Drawing Cartridge with Distress Oxide in blue and purple inks, and stamped the circle from Shaded Baubles with the dark blue ink, adding an image from the Following Yonder Star stamp set. I added highlights with a white gel pen, and cut the circle out. I adhered the circle to the background, and edged the background with the dark blue ink, before attaching it to a card blank.

The second card was made in pretty much the same way. I stamped the text from the Gold, Frankincense, Myrrh stamp set all over the background using a purple ink and added some shading around the edges of the background using purple Distress Oxide. I masked a section of the image from Kings of the Orient before I inked it up using masking tape, as it was slightly too long. I only wanted the tree and part of the building. I added a star and again used a white gel pen for highlights. 


To create my alternative season cards, I sprayed a piece of Drawing Cartridge with some green ink and left this to dry. I added some colour around the edges with Seedless Preserves Distress Ink, and stamped a little leaf from the Hyacinth stamp set all over the background using green ink. I used the same green ink to stamp the circle from Shaded Baubles onto a piece of card which I had lightly shaded with green Distress Ink. I added the cone flower from the Fuchsia stamp set, and more of the little leaf to create a fuller effect. I coloured the image with pencils. I edged both pieces of card with the green ink before attaching them to my card blank.


I am sharing an older example at this point that I had also made with the circle from the Shaded Baubles stamp set, using a butterfly and sentiment from Butterfly Perfumery. The background is once again sprayed with ink, and I stamped a splatter stamp from the Timeless stamp set using brown ink. I coloured the butterfly with Inktense pencils, and added a touch of brown shading to the circle background.I used a fineliner pen to draw a frame on the background.


A final Christmas sample that I made for last month was this brightly coloured tag card. I used a DL card base, and cut off the two top corners. I did the same for the piece of Drawing Cartridge. I coloured the background in shades of yellow, orange and purple, and added stamps from the Gold, Frankincense, Myrrh stamp set over the top. I stamped and embossed the main image from Kings of the Orient using gold embossing powder. I coloured the image using Zig clean colour markers.


This next card is a remake of an old favourite, but I found a much quicker, easier way to create the card. The first time around, it took me ages to make the card! I had decided to make the card as a TV demo, and needed to make the card quite quickly, so a bit of lateral thinking helped me devise a better way of making the design. I used some masking tissue to create the wavy hills, and these held the top spotlight piece of the card in place as I inked both pieces of the card, much easier than last time. I inked the main card in tones of grey, and the spotlight portion of the card in greens, and heather for the hills, adding blue for the sky, and a sun, using a circle mask. I used the folige from Floral Edges on both pieces of card, using grey ink for the main card, and green ink for the spotlight card. I added a sentiment from Amazing Mackintosh Words.


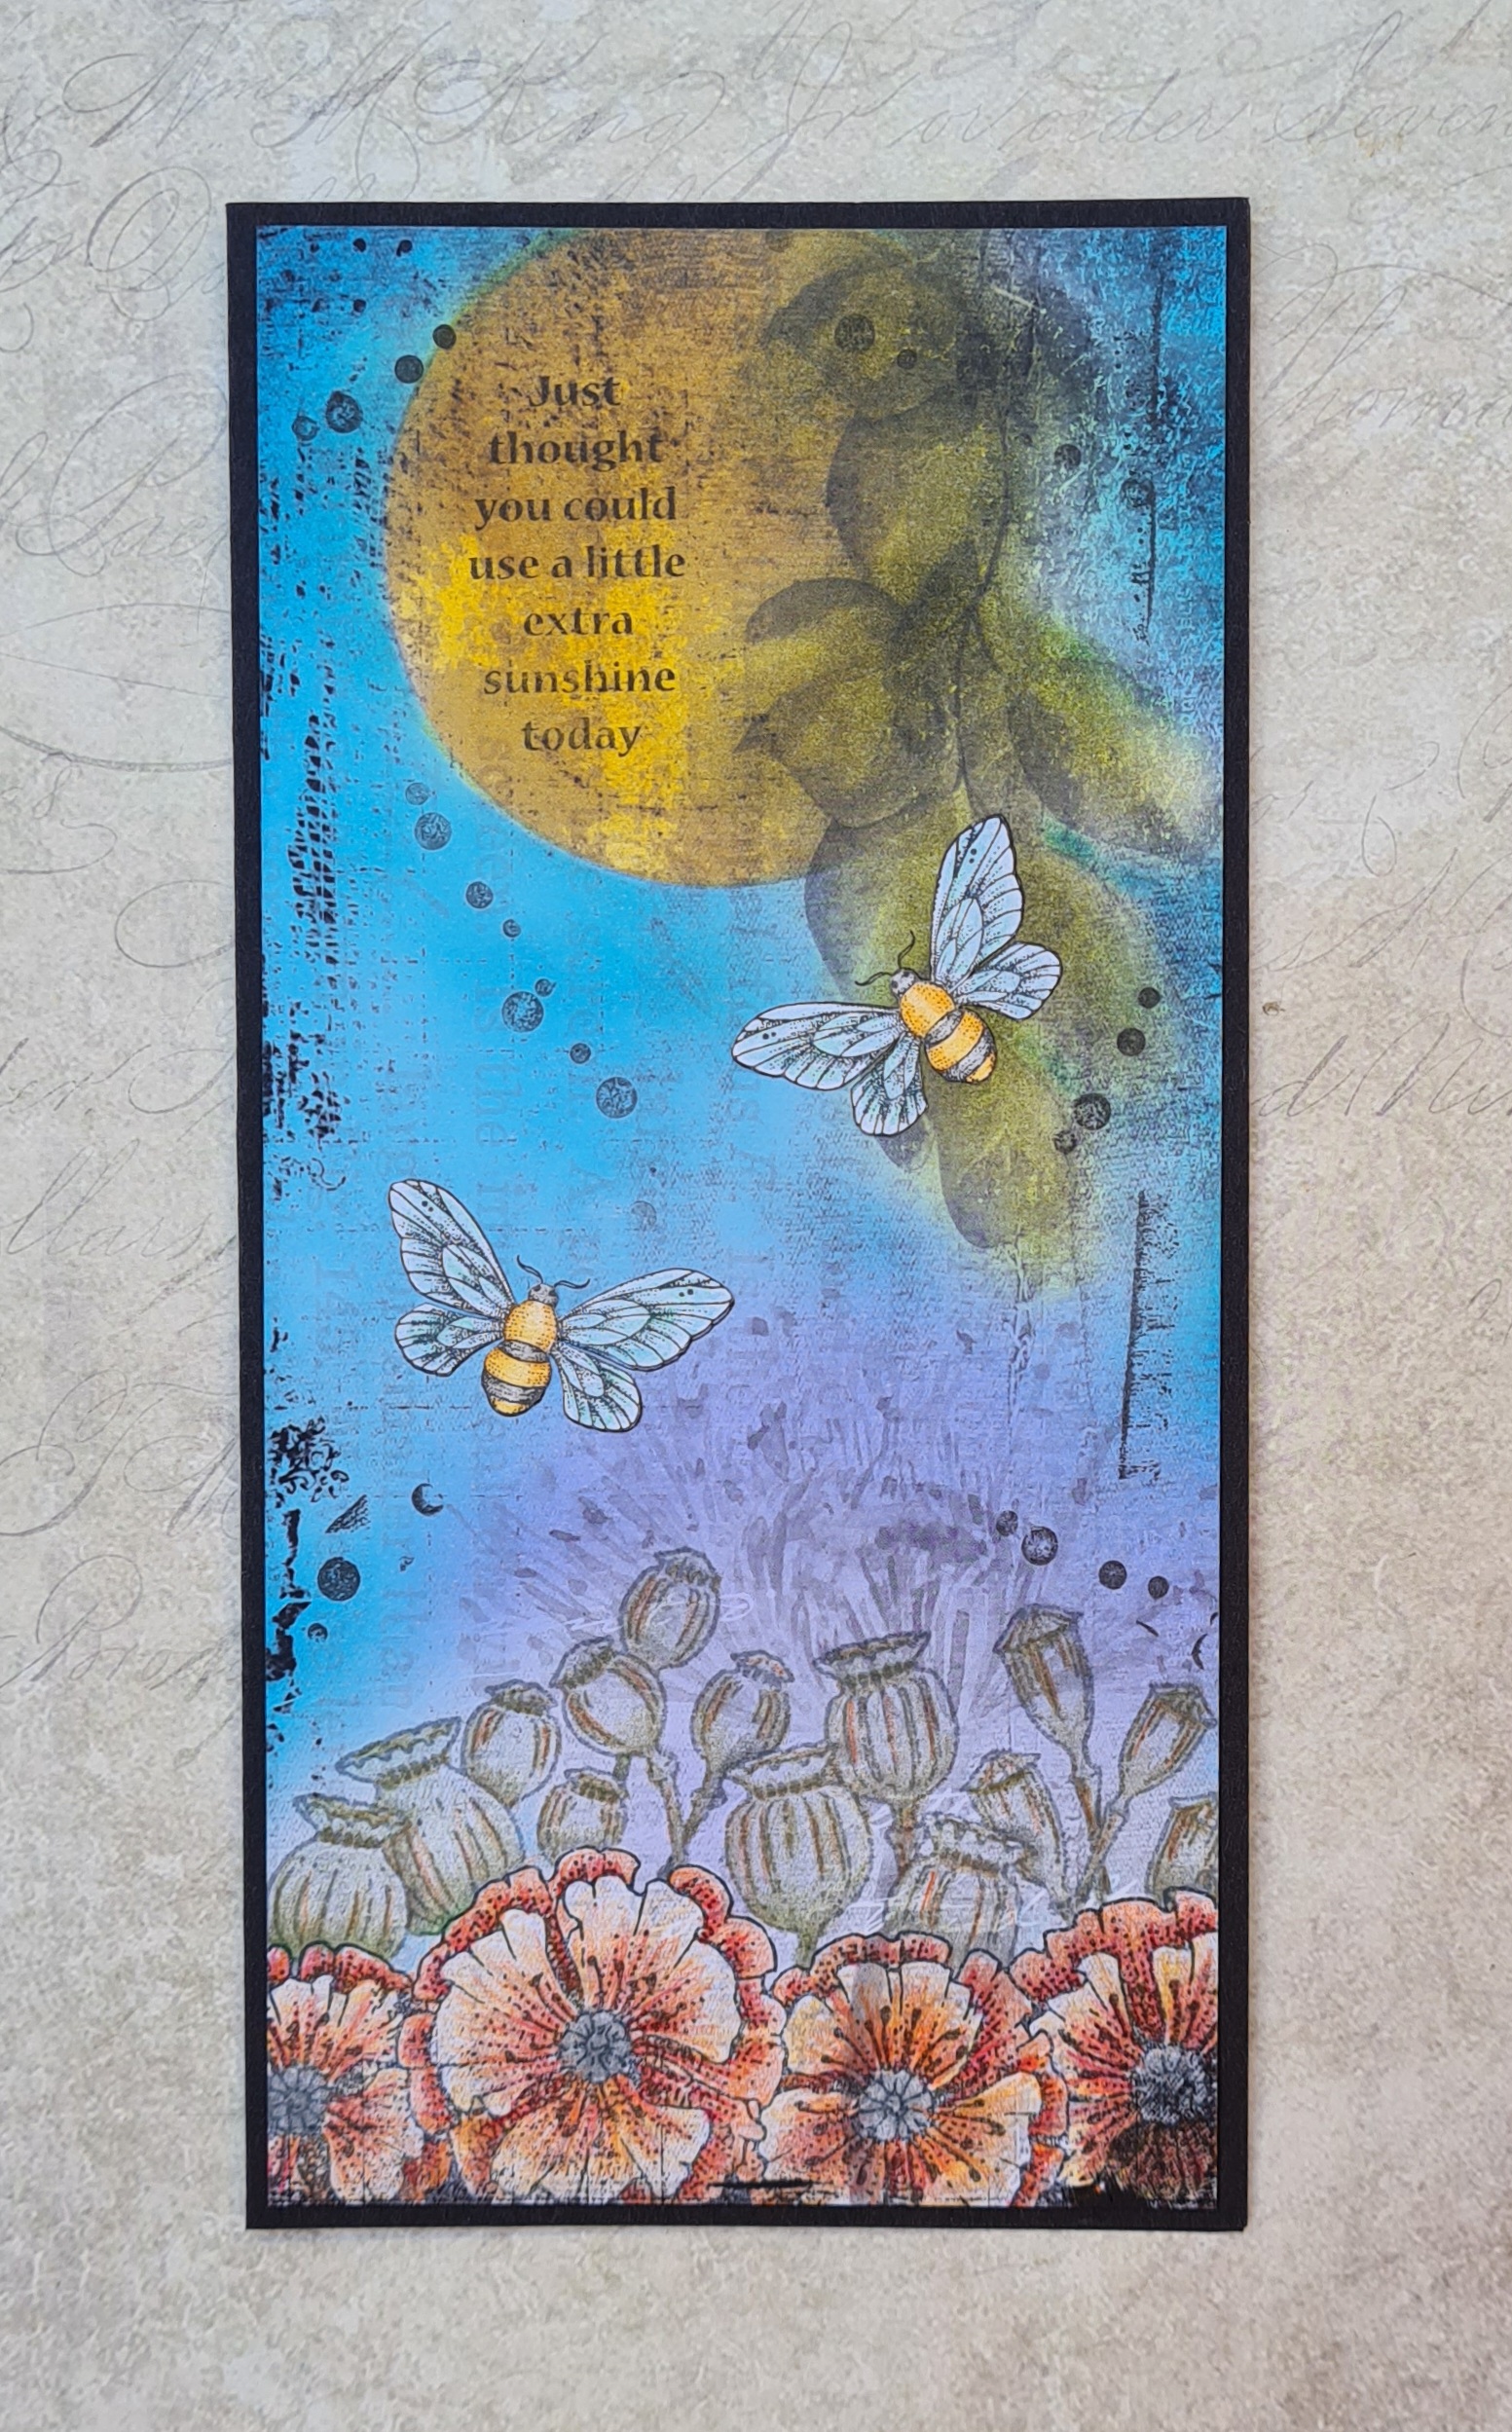
Another one of the edge stamp sets that we had on the TV shows was Poppy Edges, a beautiful stamp set, and I decided to combine this set with some of Lesley's black and white papers that we had on the TV show. I inked up the paper using Distress Ink and blending brushes. I stamped the big poppies at the bottom and masked them off, adding the poppy seed heads afterwards. I coloured these with pencils, and added a couple of bees, which I stamped on a separate piece of card and decoupaged. The sentiment comes from Loving Sentiments.


Now for a few golden oldies, this one uses the Decorative Edges stamp set, and the image is hand drawn by me.


These two are from Landscape Edges:


 This one is from Autumn Edges:


 Finally this one combines Floral Edges and Butterfly Dress:


Thanks for stopping by, I will be back very soon to share some projects from this month's TV shows. Take care, xx


Tuesday, 23 October 2018

A Collage of Colour

Hello everyone, I have a mixture of projects to share with you today, showcasing the stamps featured on last month's TV shows from Hochanda.

My first project uses the lovely Birdcage Collage stamp as my focal point. I created a colourful background using Turquoise and Lime Green Brushos spritzed with water, and pressed a piece of crumpled cling film over the top, to add a bit of texture to the background. Once the Brushos had dried, I removed the cling film, and stamped some of the words from the Amazing Mackintosh Words stamp plate over the top, using Archival black ink.

I stamped the Birdcage Collage onto a spare piece of Drawing Cartridge, and coloured the image using water Distress markers and a water brush. Finally, I cut out the image, and attached it to the background.

For my second card, I created a piece of background using Seedless Preserves and Fossilized Amber Distress Inks, which I had added to my craft mat and spritzed with water. I picked these up on the Drawing Cartridge a couple of times, drying each layer in between. I coloured a piece of Stampbord with the same colour of inks, and the stamped the deco edge from the Decorative Edges stamp set on both the Stampbord and the background, using a plum coloured ink. To finish, I added a piece of ribbon, and some Little Birdie flowers.

My final sample is a reproduction of one I made a long time ago, however I liked the design, so why not? I stamped the Butterfly Dress image onto a piece of smooth card, and masked the image. I stamped the Floral Edges image across the bottom twice. I added clouds using a stencil and Memento Summer Skies ink, but you could use torn paper or a frilly die cut to achieve a similar look.

I stamped the Butterfly Dress image twice again onto spare card, and then coloured the flowers and butterflies, plus the main images all with Polychromos pencils. I added the extra butterflies to the background flying around the lady, and along the floral border.

Thanks for stopping by, xx


Tuesday, 9 October 2018

A Little Piece of Tranquility (by Judith)


Hello everyone, I am sharing two projects today using stamps that featured on last month's TV shows on Hochanda.  Both projects have a very tranquil feel about them, although they are very different. I find that crafting helps me feel quite calm and relaxed, and these two pieces really reflect that feeling. 

My first project is a piece of home decor featuring a Buddha image. I am very drawn to this type of image, even though I do not practise any kind of leaning towards Buddhism itself. Most of you know that I am a keen yoga enthusiast, and it is maybe that which has drawn me to these images so much.

I created the project by colouring two pieces of drawing cartridge with Distress Ink in tones of blue and green, Salty Ocean and Twisted Citron, blending the colours where they met. To the larger piece, I added background stamping, adding the harlequin edge from the Decorative Edges stamp set, and the bubbles image as well.

On the smaller piece, I created a mask from masking tissue in the shape of the headdress, and placed it on the the background, and stamped the bubbles image through the mask. I painted the little top knot by hand. I then used some blue Koh-i-Noor paint to paint the rest of the image freehand, adding some blue, green and orange shading to complete the image. I stamped the bubbles image along the top and bottom of the panel to create a bit of a frame, and painted some of the bubbles in the headdress using the same colours as before. I added some orange shading around both panels before attaching them to a piece of grey mountboard.

Finally, I stamped the Butterfly Dress image onto a spare piece of card, and coloured the butterflies using green and orange tones, before cutting them out and attaching them to the panel. Some words from the Amazing Mackintosh Words stamp set complete this project.

For my second project, I wanted to create a tranquil scene with a coloured panel spotlighted in the centre. I used torn paper to create the hills and ensured that they lined up on the background and extra panel. I used grey/lilac tones for the larger panel, and greens and blues, with a hint of lilac for the foreground panel. I then added the foliage from the Floral Edges stamp set to complete the project, with a sentiment from the Amazing Mackintosh Words stamp set, as before. I added a piece of black card to frame the coloured panel, as I liked the definition that this gave the coloured panel.

I hope that you have enjoyed my projects today, I will be back later in the month, with more ideas to share with you. Thanks for stopping by, xx

Saturday, 29 September 2018

Eastern Skies

Hello everyone, I am sharing more cards using stamps featured on last month's TV shows on Hochanda.

My first two cards came about when I made the backgrounds, which were a mixture of Red, Yellow and Orange Brushos sprinkled onto drawing cartridge and spritzed with water. I also added some Gold shimmer for some added bling. I like to create one piece, and use a second piece of the drawing cartridge to blot the excess liquid off the first, creating a second background for later. Both pieces end up a bit less vibrant, but I do not mind this effect, especially as I am creating the second background for free as such.

When I looked at the backgrounds, they looked as if they had a sandy foreground, and a sunset sky, which made me think about creating some sort of scene with the backgrounds. Every background turns out differently when you are using Brushos, and it was just luck that these two made me think of making this sort of card.

I cut a square of copy paper, and placed it in the middle of the background, then stamped the paisley image from the Paisley Elephant stamp set all around the edge, using purple Versafine Clair ink, to create a border. I used the same colour ink to add the sentiment from the same stamp set. On my first card, I used the Chocolate Baroque Mask- Silhouette Palace 1, with Seedless Preserves Distress Ink.

On the second version, the card that I demoed for the TV shows, I simply stamped an image from the Indian Textiles stamp set, using a deep plum ink.


These one layered cards will be cheap to send through the post, even though they are a bit larger in size. If you vary the colours, they would be great masculine cards. I have kept them fairly monochrome, if you made them in blues or greens, or brown tones for example, they would look equally effective.

I am sharing a much older card with you as well, which uses this same image. Long time followers will have seen this card, but I thought that newer viewers would like to see the card as well. I stamped and embossed the building using white embossing powder, and then created the background with inks. I used masks for one side of the background and then the other. I stamped a tree image from the Landscape Edges stamp set along the horizon, and a flower stamp from the Floral Edges stamp in the foreground.

The elephants were stamped onto a spare piece of card, coloured with Distress markers, and then decoupaged onto the background.


Thanks for stopping by, xx


Saturday, 15 April 2017

Speedy Distress Ink Cards

Hello everyone, I have a couple of quick cards to share with you today. These form part of a much bigger blog post over on the Chocolate Baroque Design Team Blog, that is a regular monthly feature, entitled Fifteen Minute Cards. The aim is to create cards in fifteen minutes or less, and we aim to share our tips and techniques for both beginner and more advanced stampers, to create both stylish and speedy cards.

For my first card, I created a wrinkle free distress background, using Fossilized Amber Distress Ink on my craft mat, spritzing it with water, and then patting a piece of smooth watercolour card onto the ink to pick up the colour. I dried the card, and then gently picked some of the droplets of ink left on the craft mat, to create a second layer of colour over the first, before dying the card again.

I used a stencil on two corners of the card, inking through the stencil with both Fossilized Amber and Tea Dye Distress Ink, to add a deeper colour. I stamped three bees from the Honey Bee stamp set, and coloured these with pencils. Finally, I added a sentiment from the Words of Wisdom stamp set.

I used a strip of left over card that had already been coloured in the same way as the first background, left over from another project, this time in shades of blue and green. I used the Silhoutte Palace 1 and Silhouette Palace 2 masks, joining them together, as I wanted a longer line to fill the card, and inked two shades of green through the masks. I also stamped the Large Crackle Background through the masks, using Versafine Onyx Black Ink. I used an image from the Floral Edges stamp set to stamp along the bottom of the background, without an acrylic block, so that I could use small portions of the image here and there, exactly where I wanted it. I used first and second generation stamping for more depth. I added some birds from the Landscape Edges stamp set, and a sentiment from the Words to Dazzle and Sparkle stamp set. I adhered the background to a large black card blank for added drama.

Head over to the Design Team Blog to see the rest of the cards designed by my Team mates. Thanks for stopping by, xx


Tuesday, 31 March 2015

Butterfly Dress


Hello everyone, I have been working with one of the new individual cling mounted stamps currently available on the Chocolate Baroque website, Butterfly Dress. The image is full of my favourite things, flowers and butterflies, and I had great fun creating this card.

I stamped the flower edge from the Floral Edges clear stamp set across the bottom of the piece of smooth white card. I needed to stamp the image twice to fill the space. I stamped the image again onto a piece of spare card a couple of times, so that I could colour some extra flowers to decoupage onto the original image. I stamped the Butterfly Dress image above the flower border, and cut a mask of the image and covered it over. I used a cloud stencil and Memento Summer Sky to create clouds across the background, however you could use a frilly edged die cut to achieve a similar effect. I stamped the Butterfly Dress image twice more onto a piece of spare card so that I could decoupage the butterflies.

I coloured all of the images with Inktense pencils, and cut out the extra flowers and butterflies before adding them to the card. Finally, I added a layer of green card to correspond with the grassy green of the lady's skirt and the grass of the border.


Thanks for stopping by, xx

Monday, 1 April 2013

An Indian Sunrise

Hi Folks, I have a card to show you today using the new Indian stamps from Chocolate Baroque

I stamped and embossed the building using white embossing powder, and then created the background using a mixture of Distress and Memento inks. I used Post it notes to create a mask first for one half of the background, and then the other. I used a tree stamp from the 'Landscape Edges' clear stamp set along the horizon, and then a flower stamp from the 'Floral Edges' clear stamp set in the foreground.

The elephants were coloured with water based markers and I then decoupaged them.


These new stamps are so much fun to work with, and are currently on special offer. I will be showing you several samples during the month, but you can also find some beautiful creations over at the Design Team Blog from my Team mates as well.

Thanks for stopping by, xx


Related Posts Plugin for WordPress, Blogger...