Followers

Showing posts with label Words to Dazzle and Sparkle. Show all posts

Monday, 6 February 2023

Colourful Fabric Projects

Hello everyone, I hope that you are keeping well. Hopefully you managed to catch our latest TV shows on Create and Craft on Friday, we always appreciate your support. The Design Team and I had a lot of fun creating projects with the stamps that featured on the shows, and you will see lots of our designs popping up on social media over the coming month. Be sure to check out our Facebook Group where we share lots of our projects.

I am sharing projects from one of my demos with you today; a quick, medium length, and a longer lenth project. They are all based on the same technique, depending on what time you have to spare, and which project you fancy creating. Initially, I used a square piece of fabric, which I painted with acrylic paints, (Paper Artsy). I spritzed the paints with water to loosen them up a bit, and blended them where they met on the fabric, just like I would if I were using inks on card or paper. Once I had covered the fabric, I dried it with a heat gun.

I chose stamps from Make Your Mark and Numerology and, using Archival Ink, I stamped the images onto the fabric. I chose colours of ink to co-ordinate with the background, Manganese Blue and Plum with a bit of Jet Black. I added a sentiment from Words to Dazzle and Sparkle on my original card, but during the demo, I used the phrase 'Make Your Mark' in the large circle. I added the fabric piece to a black card blank using strong double sided tape.


I decided to create a canvas using the same method of decorating fabric strips using acrylic paint and the stamps. I cut thick and thin strips, and used stamps from Make Your Mark, Numerology, Timeless and Just Useful. I used coloured Archival Ink as before, adding Olive as an extra colour. I painted the canvas background in the same colours and added some stamping to the canvas as well, using the splatter stamp and the very useful equation stamp, both from the Numerology stamp set. I worked out where I wanted to place the fabric strips, and glued them to the canvas using Matte Medium.

Finally, I used a tutorial that I had seen from Altered States Studio and I am adding a link to the video that I watched for my last project, here. I created a fabulous fabric basket using more decorated strips of fabric and used pva glue, (the tutorial recommends Elmer's Glue which is really easy to get hold of, and I got a clear version which works really well). You need a base to create your project around, so I used the bottom portion of a milk carton, but you could use a balloon for a more rounded basket. You then wrap cling film around the pot, and paint a layer of the glue on first before adding your fabric strips. Place your patterned inner strips on first, and plain layer next for rigidity, then finally, your decorated strips. I put my basket in the airing cupboard overnight. I put it inside a plastic crate, so that it wasn't touching any of my towels! 


My photos show the basket before I trimmed the top, it looks much neater now!

This would be a great project to create with your children in the holidays if you don't mind getting a bit messy. You could create several pots and use them for your paint brushes, pens, pencils etc. You could use the fabric strips for covering journals or boxes, the possibilities are numerous. I hope you will be inspired by my suggestions.


I will be back soon with more projects to share with you, your visits are always appreciated.


Take care xx



Wednesday, 17 August 2022

Launching Fifteen Minute Cards Again!

Hello everyone, I hope that you are keeping well. I am sharing a few projects to launch an old favourite on the Chocolate Baroque Facebook Group and also on Instagram today. I used to run the Chocolate Baroque Colour Challenge Blog, and a regular monthly feature was the Fifteen Minute Card feature. Myself and the Design Team used to create cards in fifteen minutes or less using stamps from Chocolate Baroque. We used up scraps from our stash, or made clean and simple cards, any style of card was achievable really, but this style of card was great for batch cards, craft fairs, Christmas cards, Wedding Invitations, etc. If you needed a card in a hurry, or wanted to make a quick card or two for your collection, being able to make a card in fifteen minutes is such a good idea. It's great for beginners too, as you do not need to make anything complicated, and can try out lots of ideas quickly.

I am sharing lots of familiar ideas in this post, and I will be creating a post once a month, roughly around the middle of the month. I won't post on exactly the same day, life gets in the way; holidays, and other commitments, but I will always share what I have made, and let you know where you can post your projects if you would like to create along with me and the Chocolate Baroque family. I hope that you will enjoy yourselves, just playing with your stamps and materials for fun. After all, hopefully we can all spare fifteen mintes every now and then!

For my first two cards, I created backgrounds using an acrylic block. I added Distress Ink to the block for my card, and spritzed it with water. I placed the block onto a square piece of Drawing Cartridge, pressing down all over the block. I peeled the block away and left the background to dry. (I created several backgrounds all at the same time while I was doing this background, and so I timed myself for four cards in an hour). I could have dried the background of with a heat gun, but it would have faded the background colours a bit.

Once the background was dry, I stamped the tree from Fantasy Woodland onto the background. I added foliage from Silhouette Grasses along the bottom, and a sentiment from the From Nature 2 stamp set randomly over the background. I coloured the tree with Koh-I-Noor pencils, just using two colours for the fruit, and two colours for the leaves. It was really quick, and took me just a couple of minutes. I trimmed the panel and edged it with green ink before attaching to to a piece of linen card.

For the second card, I used Distress Oxides on the acrylic block, creating a background as before. I chose a selection of stamps from the Silhouette Grasses stamp set, and using Versafine Clair Ink, I created a meadow scene. I added a sentiment from Words to Dazzle and Sparkle.

My third card was stamped directly onto a card blank, and was so quick to make. I used a circular gelli plate, and added Distress Ink to the plate before 'stamping' this onto the card blank. I stamped two dragonflies from The Phenomenal Butterfly Elements stamp set onto the card, and masked them, before adding a couple of script rings from the same stamp set. I masked these as well, and then added a couple more stamps to complete the collage effect. I removed the masks and coloured in the dragonflies and script rings with pencils. The coloured circles are from the Floral Paraphernalia Elements stamp set.


My final card was created by using a piece of patterned paper. Lots of the work is already done for you when using patterned papers, but you can add so much detail over the top. We all have bits and pieces lurking in our stash, don't we? I stamped the beautiful dandelion clock from Not More Flowers! and added elements from Making More Marks, all using Archival Ink.


I hope you have enjoyed my selection of cards this month, and that you will join in making a few quick cards yourself. Head over to the Chocolate Baroque Facebook Group, where I have created an album, look for Media at the top of the page and search for the August 2022 Fifteen Minute Cards Album. Alternatively, head over to Instagram, and upload your cards with the hashtag #chocolatebaroquefifteenminutecards

Take care, and thanks so much for stopping by,


xx


Tuesday, 10 May 2022

Two Projects, Two Ways

Hello everyone, I hope that you are keeping well. I have some projects to share with you today featuring stamps that we brought to you on last month's TV shows on Create and Craft. Both sets of projects feature the ideas in two different ways, showing how you can vary the project depending on what sort of look you would like to create.

My first project is a little plaque using the Canary Bird Rose stamp and some of the Black and White papers available on the website. I chose to use a blank piece of the papers to create my own patterned piece of paper and stamped the main image using black Archival ink. I added a sentiment from the stamp set, plus elements from Gerbera and Friends using grey Archival ink. I coloured the flower with pencils before adhering the paper to a painted panel using matte medium. 

Once the glue was dry, I sanded the edges, and added a bit of ink with a blending brush around the edges.


An alternative version was created by stamping the same flower image onto a patterned piece of the papers, and simply colouring it with pencils. I added the sentiment with black ink this time. I attached the paper to a panel as before and once the glue was dry I sanded the edges. I dry brushed some paint around the edges and added some stencilling for added interest.


I wanted to create a couple of masculine cards using the Sunny Sunflowers stamp set, and picked a selection of the leaves. They are really lovely designs and make a beautiful card by themselves, without the addition of the flowers. For my first card, I picked a selection of green inks, some VersafineClair, some Archival, and some Distress Oxide, whatever colours seemed to go together well. I stamped the images in first, second and third generation, and finally added a sentiment from the Words to Dazzle and Sparkle stamp set, using black ink. I stamped everything straight onto the card blank for a really quick card, and you could easily make a whole batch of these in an afternoon.

My variation was stamped onto a piece of kraft paper using Autumnal coloured inks, and I chose to stamp and emboss the sentiment to make it stand out a bit more.

I hope that you have enjoyed my projects as much as I enjoyed creating them. Thanks for stopping by, xx


Monday, 1 July 2019

A Bunch of Roses

Hello everyone, I have two projects to share with you today using little worker stamps. These small stamps are often overlooked on a stamp set in favour of the bigger images. You can quickly create a lovely card using the small images by creating a bckground, and adding a sentiment or topper.

My first card uses some images from the Rose Set, with a Rennie Mackintosh feel to them. I love this style, and chose soft colours to create a vintage look for the card. I placed a circle mask onto a piece of drawing cartridge, then added colour to the background by placing some chalk ink onto a large acrylic block, spritzing it with water, and dragging it across the drawing cartridge. Once the background was dry, I stamped the two small rose images with burgundy and green ink, and stamped them in first, second and third generation stamping randomly over the background.


I removed the mask and embossed the sentiment in the middle using gold embossing powder. Using gold embossing powder again, I stamped the larger circle image nine times onto a spare piece of card. I coloured the image using the same colours of ink that I had used on the background, adding the colour with a water brush. I cut the circles out and attached them using 3D foam.


For my next card, I stamped the little rose sprigs from the Rose and Thistle stamp set randomly over the background. I added a topper stamped with an image from the Rose Stem Script stamp set. In my fabric sample, I added a sentiment from the Words to Dazzle and Sparkle stamp set. The images were coloured with Inktense pencils.


In the second sample, I stamped onto Textured Art Card to give a feeling of fabric, and coloured the images with Koh-I-Noor paints. The sentiment comes from the Rose Stem Script stamp set.

Thanks for stopping by, xx


Tuesday, 15 January 2019

Speedy Anniversary Card

Hello everyone I have a quick card to share with you today, which forms part of our larger monthly Fifteen Minute blog post on the Chocolate Baroque Design Team blog.
 
I have used a Brusho background from my stash, created with red, yellow and orange Brushos, plus a bit of Gold Sprinkle It for added shimmer. I then added a mixture of images from Sing Your Song, Wise Owl, and Let Your Heart Sing, simply using Versafine Onyx Black ink. I added a sentiment to create a quick and easy Anniversary card.


Do head over to the Design Team blog to see what my Team mates have created. Thanks for stopping by, xx


Saturday, 3 November 2018

Masking Butterflies

Hello everyone, I am sharing two cards with you today created for last month TV shows on Hochanda. If you caught the shows, you will have seen me demoing the first card, and showing the second card as an alternative option for the technique that I used.

To create my card, I drew a circle with a pencil onto a piece of smooth white card using a circle die, but anything the right size will do. I then stamped three butterflies into the card using Versafine Onyx Black Ink, and masked the images using masking tissue. I stamped six daisies from the Butterfly Daisy Collage stamp set around the circle, three close to the butterflies, and masked those as well. I used a foliage stamp from the Thistle Butterfly stamp set to create the background leaves for the wreath, using Shady Lane Versafine Clair ink. Once I had finished, I removed the masks, and coloured the images with pencils. I added a sentiment from the Words to Dazzle and Sparkle stamp set.

My second card was created in much the same way, but I based the colours on my background, which I had found in my stash box. This was simply a wrinkle free Distress Ink background, using Seedless Preserves and Salty Ocean Distress Ink. I stamped the butterflies first, masking them as before, then adding the daisies behind. Finally, I added the same foliage stamp to fill in the background, using Purple Delight Versafine Clair ink. I coloured the images with pencils as before. I added a bit of shading around the edges of both pieces of card with Seedless Preserves Distress Ink, and used a purple card to mat both layers. The sentiment comes from Amazing Mackintosh Words.

To help me plan both cards, I placed my masking tissue images onto my pieces of card first, moving them around to see how they would fit, this helps to visualise what the card will look like. I also stamped my wreath onto a piece of copy paper first, trying out the design, and various colour options for the flowers. I would always advise you to do this if you are unsure about a design, copy paper is very cheap, and you can have several attempts at something, without worrying about your mistakes, before moving onto card.

Another top tip regards colouring in your images. I have used quite a limited colour palette, and have used orange and red in both the flowers and the butterflies in my first example as you can see in the photograph below, to keep some continuity to the images. In the photograph above, although it is not obvious, I have added blue to both the flowers and the butterflies, (along the outer edges of the wings), to again pull everything together. I always choose a toning card to mat the layers in my project, or use ink to edge the panels of card that will coordinate the colours I have used. I hope that this helps you in your own creative process.


I will be back later in the month with more designs to share with you. Thanks for stopping by, xx


Sunday, 17 June 2018

Mostly Masking

Hello everyone, I have several projects to share with you today showcasing the lovely stamps featured on the May TV shows on Hochanda. We also took Masking Tissue onto the show, and a lot of my projects reflected the use of this product.

For my first card,  I created a Pan Pastel background, tearing strips of paper to create hills, and adding a green colour at the bottom half of the card, toning in some grey as I moved up the card, to represent hills in the distance. I created a sky using blue and pink pastel coloured tones. I hardly ever use Pan Pastels these days, and this background was so easy to create. I always wonder why I do not use Pan Pastels more often!

I stamped the floral spray from the Lords and Ladies stamp set repeatedly across the lower half of the card, varying the height of the stamp. I added a stamp from the Silhouette Grasses stamp set using second and third generation stamping for this stamp, to create some depth, as if there were a meadow of flowers. Two little butterflies from the Baroque Meadow stamp plate, and a sentiment from the Words to Dazzle and Sparkle stamp set completed the card. All of the stamping was done with Olympia Green Versafine ink, and the images were coloured with Faber Castell watercolour pencils. This little card will make a great store cupboard card and I might make a few more of these.


I wanted to create a one layer card that would be cheap to send in the post, but still have the look of a multi layered card. Using a piece of masking tissue, I cut out a hexagon shape using a die. I used both the inner and outer pieces of the masking tissue on my project. I coloured a piece of drawing cartridge with Peacock Feathers Distress Ink, first around the outside of a masked central panel, adding shading with Blueprint Sketch Distress Ink, and then stamped over the background using the Square Bubbles stamp and Danube Blue Memento Ink. I then removed the mask, and added the corresponding reverse mask, leaving the central panel uncovered, and inked the edges of that area with the same background colour as before.

I stamped the foliage stamp from the Rose Duo stamp set using first and second generation stamping in Danube Blue and Cottage Ivy Memento Inks, then ensured that all of the ink was completely dry. I stamped and embossed the foliage image with Versamark Ink and copper embossing powder. An optional extra at this point was to edge the background with Versamark and tip copper embossing powder over the edges, before embossing the foliage.

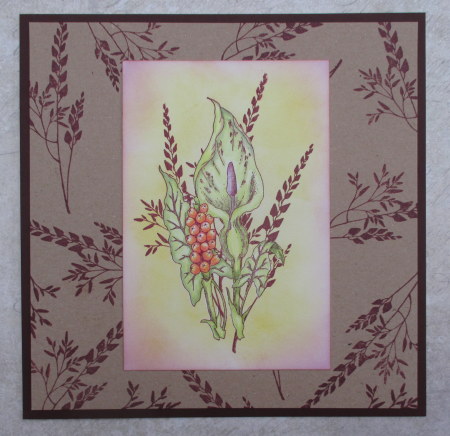
My next two cards are based on a very similar colour scheme to each other, and use the lovely Cuckoo Pint image from the Lords and Ladies stamp set. For the first card, I created a background using the foliage stamp from the previous card, stamping onto kraft card with Plum Archival ink. I created the main image by stamping the Cuckoo Pint, masking the image, and again stamping the foliage, again using plum coloured ink for stamping. I coloured the flower with Polychromos pencils. adding Distress Ink to the background for a soft finish.

The next card was created by adding Brushos to kraft card and spritzing them with water. I added some toning hessian, a button and ribbon to the background. To create the focal piece, I stamped the Cuckoo Pint, and masked the image before stamping the On The Tiles image. I coloured the image with Distress Inks and a water brush. The two images have been coloured in similar colours, but the different mediums give a very different effect.

Thanks for stopping by, xx


Thursday, 12 April 2018

Stamping on Fabric

Hello everyone, I have some projects to share with you today incorporating fabric. I really like to add some texture into my projects whenever I can, as it adds a bit of interest and makes the project look and feel quite expensive, for very little cost. I demoed these three projects on last month's TV shows on Hochanda, and I hope that you managed to watch Lesley and I in action.

To create the first card, I cut some small pieces of cotton fabric, and put some Distress Ink onto a craft mat, which I spritzed with water. I chose relatively earthy colours, Fossilized Amber, Ripe Persimmon and Shabby Shutters. The colours are quite muted, and you could go for much bolder colours if you like, it depends on what sort of look you want, I just wanted a subtle backgrop for the stamps on this occasion. I patted the fabric into the ink, moving it around to blot up the ink. I added more ink and water if necessary to get a good coverage of the fabric, but was happy to leave some areas uncoloured. I left the pieces of fabric to dry by themselves, so that the colour did not fade too much, drying the fabric with a heat gun would cause the colour to be much lighter in the end.

I frayed the edges of each piece of fabric, and stamped a silhouette image from one of the stamp sets: Tranquility, Serenity, Wisteria Lane or Eastern Grasses, and added a sentiment as well. I chose words from Artistic Affirmations, Amazing Mackintosh Words, and Words to Dazzle and Sparkle. I used Archival black ink to stamp all of the images onto the fabric, leaving the stamp on the fabric slightly longer than I would on card or paper, to allow the ink to grab onto the fabric. You do not need to press any harder.


I attached the fabric pieces to a piece of black card before matting them onto a card blank. A little button with paper string tied through was a finishing touch to each card.

For my next card, I created a paint swatch effect by masking sections of a piece of cartridge paper, and inking three toning colours of  Distress Ink. I chose Peacock Feathers, Salty Ocean and Shaded Lilac. I stamped the silhouette image from the Eastern Grasses stamp set onto the piece of card. I matted the panel onto black card before adding the panel to a piece of linen card.

I coloured a piece of cream ribbon with Peacock Feathers Distress Ink and stamped it with Archival Ink as before, using a sentiment from the Amazing Mackintosh Words stamp set. I attached the ribbon to the background and then placed the background on a square card blank. I like to colour my ribbons to match projects, it is so quick and easy, check back to this project for another example.

For my final project, I used a Crafty Individuals tag, and stamped the main image from the Tranquility stamp set across the bottom of the tag. I coloured the image with pencils. I added the wisteria image using water based markers across the top, using first and second generation stamping for a fuller effect. The ribbon was made in exactly the same way as before, picking up colour from the craft mat, and then once dry, stamping with Archival Ink. I used a word from the Serenity stamp plate.

I hope that my projects will inspire you to try some stamping on fabric, I will be back later in the month with more projects to share. Thanks for stopping by, xx

Monday, 30 October 2017

Distress Inks and Flowers

Hello everyone, I have a couple of bonus projects to share with you this month, not featuring on the Design Team blog. I have created a large tag using some favourite stamps from the Pretty Poppies and Poppy Meadow stamp sets.

I started to make my tag by stamping the main image, and then adding a mask. I coloured the background using Fossilized Amber and Peeled Paint Distress Ink, spritzing the background with water, and allowing it to dry completely. I stamped around the edges using the Large Crackle Background stamp, and Peeled Paint Distress Ink. While the mask was still in place, I stamped the small silhouette flower around the poppy image, using first and second generation stamping. I used red and green ink on the image for a more realistic effect.

I removed the mask, and coloured the image with Distress Ink and a waterbrush. I used Ripe Persimmon and Festive Berries for the flowers, and Peeled Paint for the foliage, adding a touch of red to the leaves and stems for depth. I used the same colours on the butterfly.

I coloured the seam binding ribbon with the same inks, blotting off the excess ink onto a piece of cartridge paper, then scrunching the ribbon, and drying it with a heat gun.

I spritzed the piece of cartridge paper that I had mopped my ribbons onto with some water, and stamped some images from the Silhouette Grasses stamp set over the top using various different colours of Versafine Clair Ink. I used first and second generation stamping. The butterflies are from the Baroque Meadow stamp set, and the sentiment comes from the Words to Dazzle and Sparkle stamp set.


This was a really quick card to make, and was just using a scrap piece of card. Thanks for stopping by, xx

Friday, 23 June 2017

Butterfly Canvas

Hello everyone, I have a canvas to share with you today, using some of the products from last month's Kaleidoscope of Butterflies TV Shows on Hochanda.

I took a small canvas, and added a couple of die cut corners from Tim Holtz. Using the Kaleidoscope of Butterflies Mask, I scraped some texture paste through one of the butterfly shapes several times, creating a flurry of butterflies up the canvas. Once the paste was dry, I painted the canvas with blue and purple acrylic paint, and added some highlights to the textured butterflies and die cut corners with silver gilding wax.

I stamped and embossed two butterflies from the Just Butterflies stamp set onto a piece of Crafty Individuals paper, using silver embossing powder and Versamark Ink, and cut them out, before adhering them to the canvas. I added a sentiment from the Words to Dazzle and Sparkle stamp set.

Thanks for stopping by, xx


Friday, 9 June 2017

Patchwork Butterflies

Hello everyone, I have some projects to share with you today that featured on the One Day Special shows on Hochanda last month. I always love working with butterflies, they are amongst my favourite images. The large Patchwork Butterfly is such a beautiful image. You may have heard Lesley say on the show that I had suggested that we have a stencil to match the stamps, and it has been great fun using the stencil with the stamps, creating some of these projects, and the ones that I will share with you later in the month.

For my first project, I stamped the large butterfly from the Patchwork Butterfly stamp set onto a piece of smooth watercolour paper, and masked the image with Masking Tissue, before moving onto creating the background. I drew one of the butterflies onto the Masking Tissue, using the stencil, six or seven times, and cut these out. I then inked through the stencil, using a Dried Marigold Distress Ink randomly over the background, keeping to the same butterfly shape each time. Ensuring that the ink was dry, I then used the sentiment from the stamp plate, and stamped through the same shape over the previously inked areas. Once the ink was dry, I covered each image with a mask.

I added background colour, choosing warm reds and yellows, blending the colours where they met, and spritzing the background with water once I had finished. I blotted the background with some kitchen tissue to take away some of the ink. I added some swirls using brown ink. Finally, I removed the masks and coloured the large butterfly with Distress Inks, (keeping to the same tones as the background), and a water brush.

For my second project, I created a wrinkle free distress background using Distress Oxide Inks. I stamped a swirl around the edge of the background to create a frame, and added the sentiment. I stamped the butterfly antennae onto the card directly, and stamped the entire image again onto a separate piece of card. I coloured the image with Zig Clean Colour markers, before adhering it to the background.

Finally, a remake of an old card that I made several years ago. It has had a bit of an update, so I hope you will forgive me for showing it in my post.

I created a background using paper masks and inked the sky and hills. I added a sentiment from the Words to Dazzle and Sparkle stamp set. The foliage is from the Spring Foliage and Spring is in the Air stamp sets, and I used a mixture of greens and purples to tone in with the colours that I had used for the background. I added a bit of colour to the flowers with pencil. I stamped the antennae from the large butterfly directly onto the card, and then stamped the butterfly and a fairy from the Spring Fairy Collection onto a spare piece of card. I coloured them using Distress markers.

Thanks for stopping by, xx

Wednesday, 24 May 2017

Purple and Green

I have a card to share as part of the Chocolate Baroque Colour Challenge Blog inspiration today. It's the final month that we are running a challenge, and we hope that you can find time to come and visit before we finish for good.

I have made a card using an image from the Mellow Fruitfulness stamp set, embossed with gold embossing powder. I also added two butterflies from the Spring Fairy collection. I masked the images, and added a background coloured with Distress Inks. Once the background was dry, I added the Large Crackle Background around the edge, and some extra shading, with more Distress Inks.

I coloured the images with water based markers, and added a sentiment from the Words to Dazzle and Sparkle stamp set.


Thanks for stopping by, xx

Thursday, 18 May 2017

Little Flowers

Hello everyone,  I have created a couple of floral projects for your inspiration, using stamps from the Spring Fairy Collection stamp set. I like to use the often overlooked smaller stamps from a stamp plate to create all occasion cards, and these cards are no exception.

For my first card, I used the same stamp to create both the background, and main image for the card. I stamped the image using Versamark and white embossing powder randomly over a kraft background, and then heat set the images with a heat gun. I coloured the images with Zig Clean Colour markers and a water brush.

I stamped the main image onto a piece of die cut smooth watercolour paper, inking the egdes of the background with Distress Ink whilst the die was still in place, so that there would be a white border around the oval. I coloured the image with Zig Clean Colour markers. I punched two holes through the oval, and threaded the ribbn through the holes from the back, so that I could tie a bow at the front. I left two longer pieces behind the card, which I adhered to the kraft background, as I stuck the main image down. I coloured the ribbon with Squeezed Lemonade Distress Ink and water, so that I had a good match to the colours that I had used in my project.

 You might have seen this card on the April TV shows on Hochanda:


For my second card, I cut a strip of smooth watercolour card, and coloured it using Seedless Preserves, Picked Raspberry and Spiced Marmalade Distress Inks, blending them where they met. I stamped the flower image, using Versafine Onyx Black Ink, graduating the height of the flower across the background. I added a couple of butterflies from the same stamp set, and a sentiment from the Words to Dazzle and Sparkle stamp set. Finally, I mounted the background onto a black card blank.

This was a really quick card to make, but just great when you need a colourful card in a hurry.

Thanks for stopping by, xx


Related Posts Plugin for WordPress, Blogger...