Followers

Showing posts with label Lords and Ladies. Show all posts

Sunday, 17 June 2018

Mostly Masking

Hello everyone, I have several projects to share with you today showcasing the lovely stamps featured on the May TV shows on Hochanda. We also took Masking Tissue onto the show, and a lot of my projects reflected the use of this product.

For my first card,  I created a Pan Pastel background, tearing strips of paper to create hills, and adding a green colour at the bottom half of the card, toning in some grey as I moved up the card, to represent hills in the distance. I created a sky using blue and pink pastel coloured tones. I hardly ever use Pan Pastels these days, and this background was so easy to create. I always wonder why I do not use Pan Pastels more often!

I stamped the floral spray from the Lords and Ladies stamp set repeatedly across the lower half of the card, varying the height of the stamp. I added a stamp from the Silhouette Grasses stamp set using second and third generation stamping for this stamp, to create some depth, as if there were a meadow of flowers. Two little butterflies from the Baroque Meadow stamp plate, and a sentiment from the Words to Dazzle and Sparkle stamp set completed the card. All of the stamping was done with Olympia Green Versafine ink, and the images were coloured with Faber Castell watercolour pencils. This little card will make a great store cupboard card and I might make a few more of these.


I wanted to create a one layer card that would be cheap to send in the post, but still have the look of a multi layered card. Using a piece of masking tissue, I cut out a hexagon shape using a die. I used both the inner and outer pieces of the masking tissue on my project. I coloured a piece of drawing cartridge with Peacock Feathers Distress Ink, first around the outside of a masked central panel, adding shading with Blueprint Sketch Distress Ink, and then stamped over the background using the Square Bubbles stamp and Danube Blue Memento Ink. I then removed the mask, and added the corresponding reverse mask, leaving the central panel uncovered, and inked the edges of that area with the same background colour as before.

I stamped the foliage stamp from the Rose Duo stamp set using first and second generation stamping in Danube Blue and Cottage Ivy Memento Inks, then ensured that all of the ink was completely dry. I stamped and embossed the foliage image with Versamark Ink and copper embossing powder. An optional extra at this point was to edge the background with Versamark and tip copper embossing powder over the edges, before embossing the foliage.

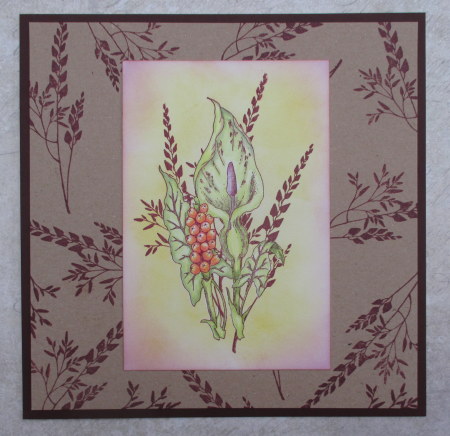
My next two cards are based on a very similar colour scheme to each other, and use the lovely Cuckoo Pint image from the Lords and Ladies stamp set. For the first card, I created a background using the foliage stamp from the previous card, stamping onto kraft card with Plum Archival ink. I created the main image by stamping the Cuckoo Pint, masking the image, and again stamping the foliage, again using plum coloured ink for stamping. I coloured the flower with Polychromos pencils. adding Distress Ink to the background for a soft finish.

The next card was created by adding Brushos to kraft card and spritzing them with water. I added some toning hessian, a button and ribbon to the background. To create the focal piece, I stamped the Cuckoo Pint, and masked the image before stamping the On The Tiles image. I coloured the image with Distress Inks and a water brush. The two images have been coloured in similar colours, but the different mediums give a very different effect.

Thanks for stopping by, xx


Sunday, 3 June 2018

Feather Projects Part One

Hello everyone, I have two projects to share with you today, showcasing the beautiful I Shall Be Your Wings stamp set that we featured on last month's TV shows on Hochanda.

For my first project, I decided to make a dreamcatcher. I chose a large flower from the Diamante Delights stamp set, as it reminded me of the centre of a dreamcatcher, and stamped that onto a piece of drawing cartridge. I drew two circles around the outside, using a circular die, and drew some lines inside using a fineliner pen to complete the design. I added three feathers underneath the circle, and again, hand drew some beads on 'strings', to add to the design, using the fineliner pen.

I wanted to create a very soft, dreamy background, and used a combination of soft colours on the background, blending Distress Ink, and splattering it with water. I painted the images with watercolour pencils and a water brush. Finally, I stamped the sentiment onto a spare piece of drawing cartridge, and cut it into sections and edged it with a fineliner pen, before adding it to the background.

My second project was a TV demo, which you may have seen. When I saw these stamps, I knew instantly that I wanted to make both of these projects, and they turned out just as I imagined them. I drew a large circle onto a piece of drawing cartridge, then stamped two of the feathers before adding a mask. I stamped the other two feathers, and masked them as well. I added foliage using one of the images from the Lords and Ladies stamp set, and I used first, second and third generation stamping to build up depth.

I painted some twigs using a medium and small brush with Distress Ink and water. I wanted the twigs to look rather rustic, so I added some little wispy bits with the finer brush. I added the rose from the Rose Duo stamp set, which I had coloured with pencils and fussy cut. A sentiment in the centre finished the project before I matted the background onto dark green card.

I hope that my projects have inspired you to use these lovely stamps. Thanks for stopping by, xx


Related Posts Plugin for WordPress, Blogger...
