Followers

Showing posts with label Harebell Butterfly. Show all posts

Friday, 12 August 2022

Scaling Up Those Little Projects

Hello everyone, I hope that you are keeping well. I have a few projects to share with you from last month's TV show on Create and Craft, showcasing some of the beautiful floral butterfly stamps that we had on the show. 

I like to make a few quick cards when I can, they are so handy to have in my stash when I need a card in a hurry. I also like to make a batch of them, several at a time, so that I can give them as a gift, or just to build up a store of cards to use later. I love to make little 4" x 4" cards, they are a lovely size to create and to give as gifts. I created two different types as demos on the show last month, and here is how I created them:

The first card was created using a piece of Drawing Cartridge just slightly smaller than 4" x 4". I swiped some Distress Oxide Ink onto an acrylic block, (green and blue), and spritzed it with water. I placed the Drawing Cartridge onto the block, and then peeled it away, to get a watercoloured background. I left the background to dry naturally. I stamped the daisy image from Honeysuckle Butterfly twice onto the background, using black ink, and added a butterfly. I also added some foliage from the same stamp set using green ink in first and second generation stamping, to give the impression of a field of flowers. I varied the height of the foliage. I coloured the flowers and butterfly with Koh-I-Noor pencils, using a simple palette of pink, yellow and green. I edged the background with turquoise ink.

To create my second quick card, I selected a piece of black and white paper created by Lesley, which I cut down to size. I added sponging with green and purple inks to create hills, and pink or orange ink around a circle mask to create the impression of a sun, (a technique that was inspired by the lovely Jean Hardy). I used Versafine Clair ink in various colours to stamp foliage from the stamp sets, and added a butterfly which I coloured in co-ordinating colours.

These little cards are lovely in their own right, but I wanted to show you that they could also be used as larger cards too. I created backgrounds for both of these cards very quickly using the butterfly on the card to pull everything together. For the first card, I used the blue and green ink as before to create a Distress Oxide Ink background, as you have seen me create so many times before, and then I simply stamped the butterfly randomly over the top in turquoise and green ink. I edged the background in the turquoise ink as I had done with the smaller card. It makes a really pretty large card suitable for any occasion, just add a suitable sentiment, or leave it blank and add a sentiment inside.


 For the second card, I used a piece of grey card, and added the butterfly stamped with pink and orange Versafine Clair, it's an unusual colour combination, but really pretty, just the same.


 I hope that I have given you lots of ideas for these lovely stamps, thanks so much for stopping by,


Take care, xx


Friday, 5 March 2021

All About the Butterflies

Hello everyone, I have some projects to share with you today created with some beautiful butterfly images that we brought to Hochanda last month. My first card was created fairly quickly using a piece of drawing cartridge, onto which I drew a circle with a pencil. I chose several colours of Versafine Clair in shades of blue and green and stamped an image from the Thistle Butterfly stamp set around the circle. I stamped each colour five times, to ensure an even coverage, varying the direction that I stamped to make the foliage appear more natural. Although these colours are not necessarily true to nature, I love how they turned out.


Once I had finished the wreath shape, I added some splotches with an image from Just Useful, using some of the same colours that I had used in the wreath. I added a touch of shading around the edge of the background with Distress Ink. I added a sentiment in the centre of the wreath from Birthday Words.


I stamped and embossed three butterflies from across the four sets, I just chose whichever butterflies appealed to me most, to be honest. I used some of Lesley's A5 Doubled Sided Designer Papers, they are so useful for this sort of thing, and will last for ages. I used white embossing powder for a delicate touch.

I am sharing two older projects with you today using the Honeysuckle Butterfly stamp set. These two projects were really fun to create, so I hope that you don't mind seeing them again. The first was a canvas that I made using a sheet of old music paper. I painted over the top using a zingy green colour, and decoupaged the image which I had coloured using pencils. I stamped around the edge using Archival Ink. I added lettering to create a collage effect, you could use book paper, die cuts, whatever you have in your stash to create this effect.


This next project is more subtle, but again, I loved creating this one too. I used a Brusho background, and added stamping using an image from the Elegant Edges stamp set around the edge of the background. The butterflies are decoupaged, leaving one wing free for real dimension. This card is just waiting for a sentiment for the right occasion. It would make a lovely Mother's Day card, don't you think?


Thanks for stopping by, take care and stay safe, xx


Wednesday, 28 November 2018

Stamping on Fabric


Hello everyone, I am sharing two projects today using the stamps that we showcased on last month's TV shows on Hochanda. This time, I have created my projects using fabric, showing how you can create a quick card, and a decorative panel.

For my first project, I painted a piece of spotty fabric with yellow and green Hybrid paint, blending the two where they met. I used coloured Archival inks in green and brown tones to stamp all of the images, creating a meadow scene in first and second generation stamping, just as I would when creating a card. I added a couple of Butterflies, and then painted the images with Koh-I-Noor paints and a waterbrush. The Koh-I-Noor paints worked really well on the fabric, and because I am not planning to wash the piece, it does not matter that they are not waterproof.

For the larger panel, I used the large corner stamp from the Butterfly Daisy Collage stamp set, and stamped around the edge of a piece of patterned fabric, overlapping the image as I went along. Again, I used coloured Archival Ink. I used iron on interfacing on the back of both pieces of fabric, fraying the edges of the top panel, and adding rust coloured Archival Ink to the bottom panel. I used a thick piece of greyboard as a base.

I had a piece of the spotty material left over from my first project, and stamped two of the large butterflies from the Butterfly Daisy Collage stamp set onto the fabric, adding shading with the Koh-I-Noor paints. I also stamped some words from the Amazing Mackintosh Words stamp set, and frayed the edges of the little panels.

I created a wrinkle free distress panel using tones of green and yellow Distress Ink on a piece of watercolour card for a background. I stamped a leafy sprig in second generation stamping randomly over the background. To complete the card, I used a small piece of eco printed fabric, with a lovely leaf printed in the centre. 

Thanks for stopping by, xx

Monday, 23 May 2016

Fritillary Flowers

Hello everyone, I have a card to share with you today using a selection of some stamps that I have had in my stash for a little while. Sometimes it is great to look at your stamps with a fresh viewpoint, and try using them in different ways. I have always used the Snake's Head Fritillary stamped individually as a focal point on a card, but wanted to create a meadow effect with the flowers for this particular card.

I started to create the card by stamping a few of the flower heads in Onyx Black Versafine Ink, and masking them as I went along. If they were higher up the card, I ensured that I did not stamp the end of the stalk, so that I could draw a longer stem  freehand afterwards, using a fine tipped marker pen. Once I had stamped five images, I switched to Smokey Gray Versafine Ink, and stamped the remainder of the images.  I wanted to give the feeling of depth to the flowers, and the grey ink helped some of them appear to fade into the background, as if I were creating multiple layers of flowers.

I coloured the flowers with Polychromos pencils, adding grey pencil to the flowers at the 'back' of the picture, to tone down the colours a bit. I also used much paler colouring for these flowers, making the flowers in the foreground much more vibrant.

I used Distress Ink to colour the background, and added some stencilling, using the same colours of Distress Ink to keep a layered look to the background. I stamped a couple of butterflies from the Harebell and Thistle butterfly stamp sets directly onto the background, and then stamped the images again onto some spare card. I coloured these images with pencil before cutting them out, and decouoaging them onto the background. I added a greeting from the Birthday Words stamp set, and mounted the background onto a large black card blank.

Thanks for stopping by, xx

Monday, 29 February 2016

Vintage Paper projects


Hello everyone, I have been playing with a great mixed media pack available from Chocolate Baroque called the Vintage Style Play Pack. It is jam-packed full of bits and pieces, and will give you plenty of supplies to create lots of projects, combined with some of your existing stash. There are vintage book papers, pieces of grey board, mini envelopes, ribbons, buttons, and other embellishmebts to complete lots of cards and mixed media projects.

I have three projects to show you today, but hope to make several more projects using this great pack in the coming weeks.

For my first project, I took a piece of the book paper, and trimmed it to size, and then stamped and embossed a large flourish from the Nature Swirls stamp set over the background. I used vanilla white embossing powder, which is a lovely off white colour. I added some Fossilized Amber Distress Ink to the background, cleaning over the white embossing with  piece of kitchen paper afterwards. I die cut a flower in three different sizes from both book paper, and a piece of crinoline, and coloured the die cuts with the same colour Distress Ink. I simply patted the ink pad onto a craft mat and spritzed the ink with water, before swiping the flowers through the ink. I dried the flowers with a heat gun, scrunching them up, as they dried, to get them to stay crinkly. I attached them together using a brad, and then stuck one of the buttons from the pack on the top.

To finish the card, I chose a kraft card blank, and added a couple of toning layers of card to mat the book paper onto. I added some ribbon and a strip of hessian from the paper pack across the background, and then die cut some leaves from some extra kraft card, before finally attaching the flower.

For my second project, I decided to use some of the small greyboard panels, and attach them to a long skinny canvas. I stuck some of the book paper to the panels, using matte medium, and left them to dry. I painted the canvas and the panels with a range of acrylic paints in blue, green and yellow tones, using a baby wipe to blend the colours together. I created several layers of colour, drying each layer with a heat gun, and once I was happy with the blend, I added a touch of deep blue and purple around the edges.

I stamped a script stamp onto tissue paper and adhered this using matte medium. I stuck the panels onto the canvas, and then added some stencilling to the background using some coloured texture paste. I wanted to add a bit of interest to the greyboard panels, and so I embossed a cog texture stamp randomly onto them using Versamark, and some copper embossing powder. I also added a butterfly image from The Rose Tree stamp set, which I coloured with pencils.

To finish, I added touches of gilding wax, and a cog kindly donated by my hubby.


My final project was a happy accident, as I had some paint left on my craft mat after the canvas project. I hate to waste paint, and so I added it to another piece of book paper, and created a washed background. I cut a small piece of the hessian strip, and used it as a stencil, with some white acrylic paint randomly over the background.

There was an ATC sized  piece of Stampbord in the play pack, and I chose a pretty floral stamp from the Harebell Butterfly stamp set to stamp and colour on this piece. I used some ultra thick embossing powder to triple glaze the Stampbord, and created a tile effect over the image.

I cut two large rectangles from kraft card, and created a tag top to them, by chopping off the corners. I scored partway down one of the 'tags', and stuck it to the other one, so that the card would stand up, without collapsing. It has its own stand in effect. I added the book paper background, and some pretty tan ribbon from the play pack, before attaching the Stampbord tile to complete the card.


I hope that I have offered you some inspiration as far as this super pack is concerned. I promise to be back with more ideas in the future, thanks for stopping by, xx

Saturday, 7 March 2015

Springtime Krafting


Hello everyone, I have a couple of cards to show you today using the Spring Birds multi-buy rubber stamp set. There are some fabulous little stamps on these stamp plates, that often get ignored in favour of the larger stamps. I wanted to create some cards using these smaller stamps to show their versatility.

I started my first card by cutting a circle in an 8" x 8" kraft card blank. I then stamped and embossed a small motif around the edge of the circle opening, using Versamark and vanilla white embossing powder. I stamped a small flower seven times, masking it each time, so that I did not stamp over it with the next image. I chose two sprig stamps from the Briar Rose Butterfly/Harebell Butterfly multi-buy stamp set to create the background foliage for the flowers. I coloured them with Shaded Lilac and Seedless Preserves Distress Markers. I used first and second generation stamping to create depth in the foliage.

I coloured the flowers, using the same two shades of Distress Markers and a water brush. I stamped two butterflies onto the background and then stamped them again onto a spare piece of card. I coloured the spare butterflies with Distress Markers and then decoupaged them onto the background.


When I was making my coloured seam binding for a previous card recently, I used a scrap piece of card to mop up the excess liquid from the seam binding. The design was really attractive, and I decided to use it as a background for my second card. I stamped the two sets of tulips onto the card, masking one set before I stamped the second. I then stamped both sets of flowers onto a spare piece of card. I coloured the images with pencils before cutting them out and adding them to the background.

I stamped the small motif  across the top and bottom of the background using Archival Ink, to create a border. I added some of the orange seam binding, and then matted the background onto black card. Using another small motif, I created two lacy strips by stamping onto a piece of orange vellum with Versamark and vanilla white embossing powder. I cut the strips out, and stuck them to the top and bottom edges of the black card before placing this onto an 8" x 8" Kraft card blank. Finally, I stamped a sentiment using Archival Ink onto the background.


I hope that I have given you some ideas on how to use some of the smaller stamps. Thanks for stopping by, xx

Saturday, 21 June 2014

Harebell Butterfly


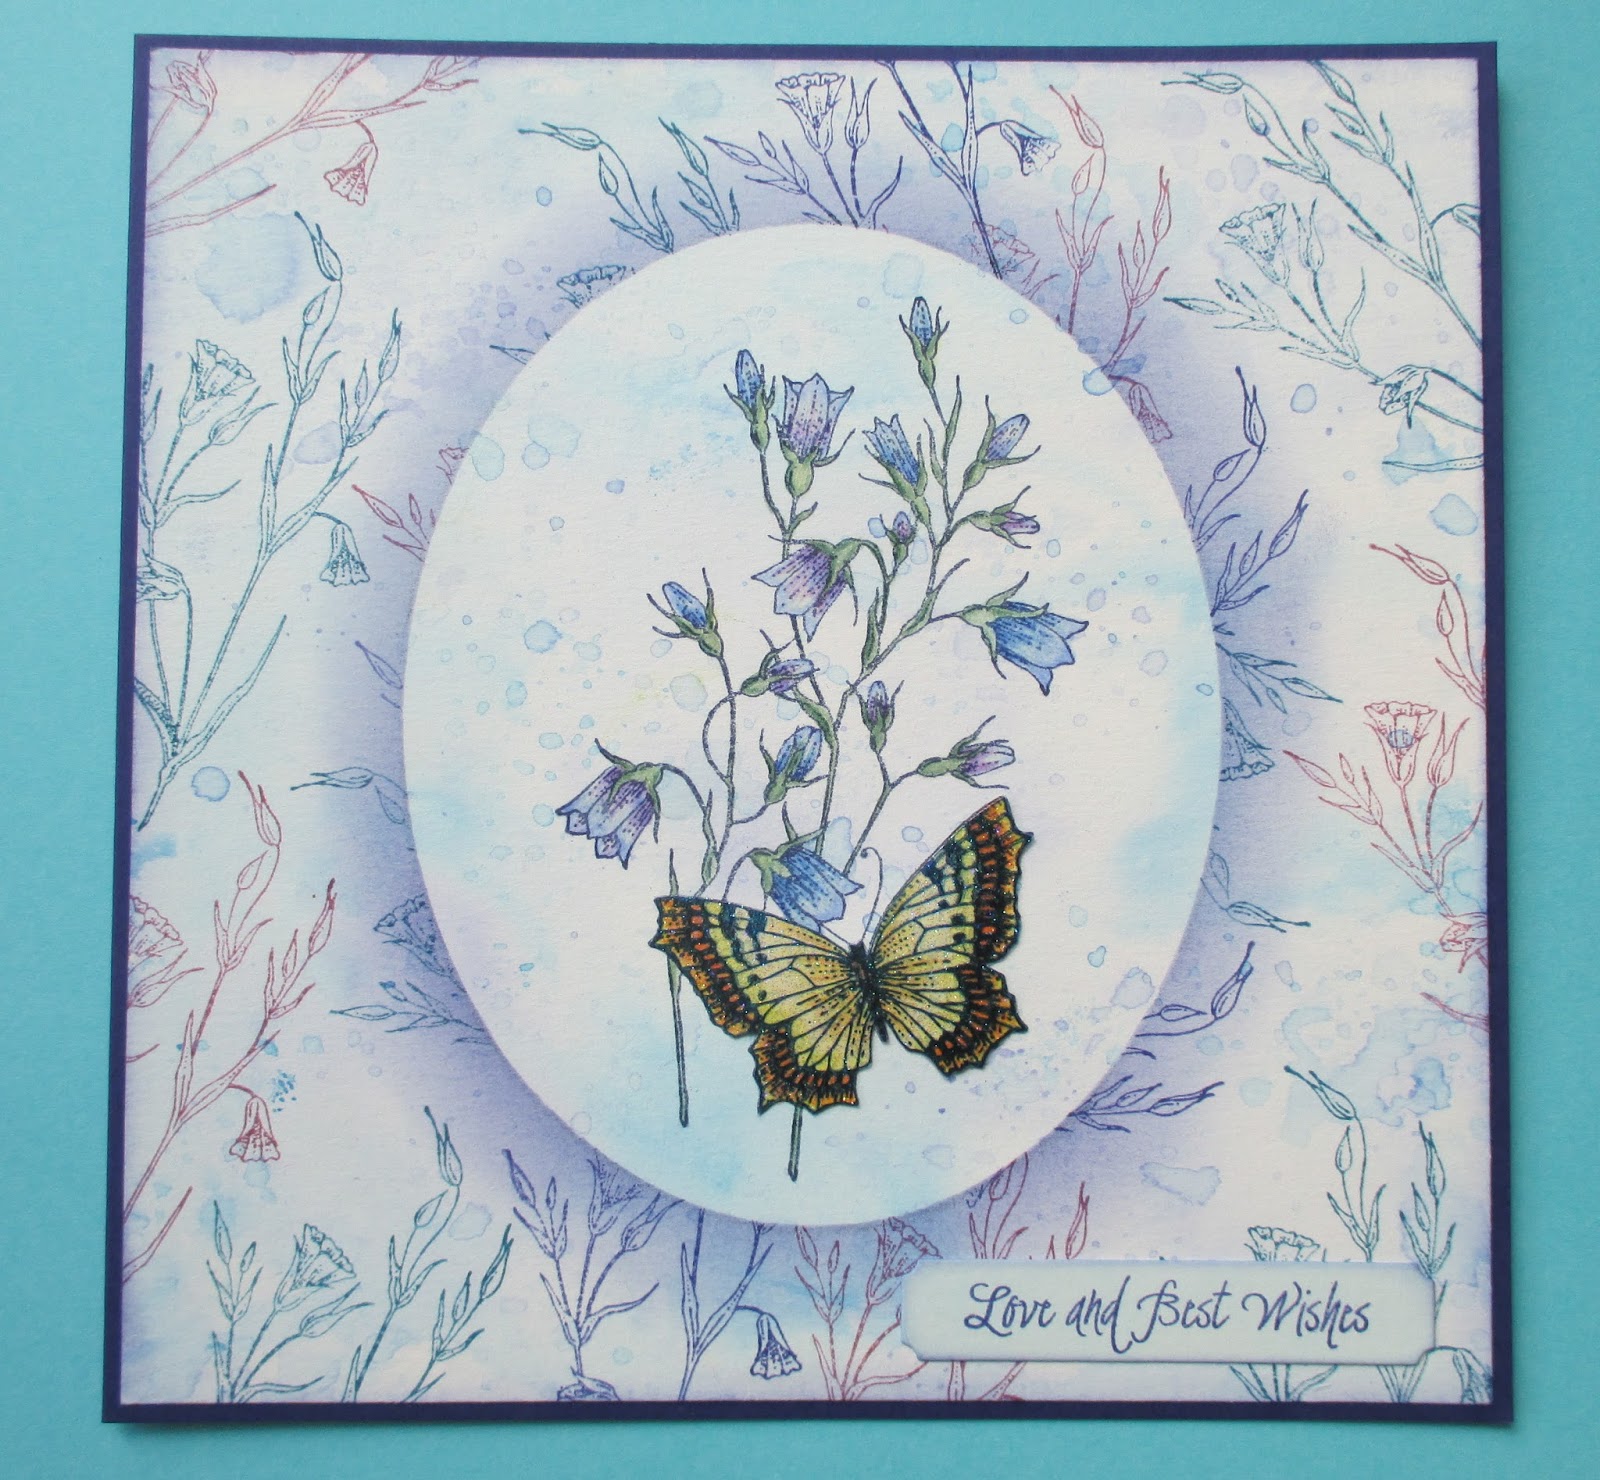
Hi Folks, my sample today uses lots of my favourite colours, namely purple and teal. I often try to work outside my comfort zone when I am making samples and do not often turn to these colours when making a project. it has been a real pleasure dipping into this colour palette.

I started my card by creating a wrinkle free background using smooth watercolour paper, using blue and lilac Distress Inks. I then created an oval mask, which I placed in the centre of the page. I used Paris Dusk Memento Ink and sponged around the edge of the mask, creating a shadow. This helps create a faux layer, which keeps the card flat and saves on postage! I also added the same colour to the edge of the background. Using a flower stamp from the Harebell Butterfly stamp set, I stamped around the edge of the background, and over the edges of the mask. I used a mixture of teal, navy and purple inks. I removed the mask and stamped the main image using Cobalt Archival ink. I stamped the butterfly from the main image again onto a scrap piece of watercolour paper and also onto sparkly acetate.

I bleached the image, and coloured it with pencils. I coloured the second butterfly, and stuck the acetate butterfly over the top. I added these to the main picture. The sentiment comes from the Amazing Birthday stamp set, and I have used a Dienamics die to cut out my little tag.


I added a bit of grey pencil directly around the edge of the mask to deepen the shadow, and this helps the contrast between the background and foreground 'layers'. Thanks for stopping by, xx

Tuesday, 10 June 2014

A Touch of Orange

Hi Folks, my samples have a definite orange feel today. I have used the stamp of the month sets from Chocolate Baroque to create these samples. Both sets are full of lovely flowers and butterflies which are suitable for so many different occasions.


My first card was created by masking the top and bottom of the card, and then colouring the middle of the card with Distress Inks. I stamped the flower sprigs across the bottom of the inked area before I removed the paper masks. I stamped two butterflies onto sparkly acetate, and added some coloured vellum behind them. Finally, I added a sentiment from the Amazing Birthday stamp set in the top corner of the card.
My second card was created by stamping the Big Bold Background Leafy Trails stamp onto a piece of kraft card with green ink. I cut a small rectangle of kraft card, and stamped the rosehip image using the same ink. I coloured the images with pencils, and edged the pieces of card with Distress Inks. I also decoupaged the butterfly. I matted the layers with dark green card, and added a piece of orange ribbon to finish. 

This little card would be useful for lots of different occasions, and would make a great notelet set if you made several of them.

Thanks for stopping by, xx


Related Posts Plugin for WordPress, Blogger...