Followers

Saturday, 30 March 2019

Positive Thoughts

Hello everyone, I have two projects for you today, the first was created using a limited edition kit that we brought to Hochanda last month featuring a wide paintbrush, which I decorated. I painted the brush using a pale blue paint from Little Birdie and dry brushed it with Quinacridone Magenta paint for an accent colour. I stamped some linen fabric which had also been painted with the blue paint, using Plum Archival Ink. I chose one of the ribbon trim images from the Floral Mannequins stamp set. I cut the image out and gathered it up around the top of the bristles with cotton, and stuck it down using double sided tape. I added some Little Birdie Flowers that had been dry brushed with the magenta paint. To complete the project, I stamped part of the large image from The Folk Art Garden onto card, coloured it with Zig clean colour brush markers and cut it out, before adhering it to the paintbrush. Who says paintbrushes should be used for decorating!

To create my second project, I cut a piece of luxury smooth 160 gsm ivory paper to the required size, and made a gelli print. I used two colours of Distress Ink, and added a textured pattern to the plate before I pulled a print. I added the stamped image from The Folk Art Garden all over the background using Sepia Archival Ink. I stamped the sentiment onto a spare piece of paper created in the same way.

To complete the card, I added a strip of hessian, and some toning ribbon before adhering the background to a card blank. The sentiments on this stamp set are so useful to add to a card for someone who needs a bit of encouragement or positivity.

I will be back next month with more projects to share with you. Don't forget to look out for Lesley and I on Hochanda on Tuesday at 10.00 a.m. and 3.00 p.m. with some brand new stamps. Lesley will also be featuring on the screen on Sunday and Monday, so you will have lots of opportunities to see her in action!

Thanks for stopping by, xx


Sunday, 17 March 2019

Folk Art Garden

Hello everyone, I have two projects to share with you today, featuring The Folk Art Garden stamp set, which we shared on one of last month's TV shows on Hochanda. This beautiful stamp set features a wonderful intricate stamp, along with some delightful smaller images, all hand drawn by our designer Sue Page and some fabulous little sentiments which were added by Lesley.

I created my first project by stamping the main image onto some 160 gsm Luxury Smooth White Paper which is perfect for this kind of project. This paper is the same paper that the colouring pages, and the designer papers are printed on. You can colour with pencils, add inks, or watercolour on the paper, it is very versatile. I used Versafine Clair ink in a dark blue, rather than going for a stronger black colour. I partially masked the image using Masking tissue, and added some of the little worker stamps around the edges, to create the effect of a garden running along the bottom of the page.

I added some Distress Ink along the top of the card, masking off a circle for a sun, and using torn paper to create hills. I used a mixture of blue and pink to create the sky. I added yellow for the sun, and stamped a sentiment. I added two little birds from the Landscape Edges stamp set. I used Polychromos pencils to colour the flowers and butterflies. It may seem like it would take ages, but I sit in front of the TV, and the time passes without me noticing!

For the purposes of a TV demo, I needed to create a quicker version of this card, plus Masking Tissue never reacts well under the studio lights! I used the big acrylic block that we sold with the stamp, and covered it with two different colours of Distress Oxide Ink, one blue, and one green, and spritzed them with water. I smooshed the block across a piece of drawing cartridge, (that had a circle mask already added), covering the background in one go. Once the background was dry, I stamped the large image in a dark colour at the bottom of the page, as before, but towards the middle this time. I used the large image to stamp around the edges, filling in the gaps, so that the image was not floating by itself.

I coloured the image with Koh-I-Noor paints, as these cover the Distress Oxide Ink really well. I stamped a sentiment from the same stamp set to complete the card.

By varying the amount of Distress Ink that you add to the block, you can alter how vibrant your background will be. If you do not want such a strong background, add less ink to the acrylic block.

I will be back later in the month with more projects to share with you. Thanks for stopping by, xx

Monday, 4 March 2019

Make Do and Mend

Hello everyone, and welcome to my first post of the month for March. As you read this post, I will be on my way to Hochanda for the first of our TV shows for this month, with another show tomorrow. I do hope that you can watch or record the shows to see what Lesley and I have in store for you. The Design Team have created more beautiful projects to inspire you once again.

For my post today, I am taking you back to last month's TV shows, when I created some fabric samples, using the fabulous Haberdashery range of stamps, and want to share a couple of those with you. I have used stamps from Haberdashery, The Sewing Room, and Floral Mannequins stamp sets.

I created a card background using a damp tea bag, which I wiped over a piece of drawing cartridge, then sprinkled some sea salt on top, leaving the background to dry. Once I had wiped the sea salt away, I stamped a range of the little worker stamps from the sets over the background using dark  brown Archival ink. I created a tag using scraps of fabric and book paper, then added a mannequin which I had stamped onto kraft card using white embossing powder. I coloured the image with Koh-I-Noor paints, which colour on kraft card so well. The little sentiment was stamped onto a scrap of fabric.


The large tag would make a gift in its own right it is so pretty, I made another one in a softer colour option, it feels more vintage in these colours. If you are like me, you have lots of little scraps, and these tags are perfect for adding all of your little bits and pieces. For my TV demo, I simply used double sided tape to attach everything, and did not sew the pieces as I have done in these photographs.

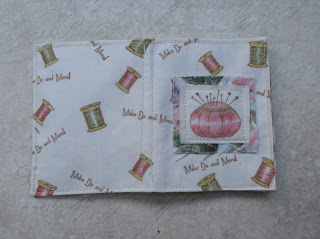
My second project is a little needle case, using lots of the little worker stamps in the stamp sets. I stamped the images onto plain cream fabric using brown Archival Ink, and coloured them with Inktense pencils and a water brush. I added some pretty floral fabric which matched my colours to create the needle case, plus felt for the inside 'pages'.


This was a faily quick project to make and is a great way of using up little pieces of fabric.

I hope that you have enjoyed my projects today, and will try stamping on fabric. As I said during my TV demo, just hold the stamp on the fabric a bit longer than you would on card or paper, there is no need to press any more firmly.

Thanks for stopping by, xx


Related Posts Plugin for WordPress, Blogger...