Followers

Friday, 22 October 2021

Stamping on Coloured Surfaces

Hello everyone, I hope that you are keeping well. I have a couple of projects to share with you today showcasing the stamps from last month's shows on The Craft Store.

For my first card, I decided to stamp the main image from the Chrysanthemum Blueprint stamp set onto a piece of die cut grey card. I coloured the image with Faber Castell Black Edition pencils, choosing a palette of mostly orange and yellow to pop against the grey background. Even the green was a zingy yellowy green hue to stand out against the grey. I added lots of white highlights to lift the image.

I created a wrinkle free distress background using grey Distress Ink on Drawing Cartridge, which was not too fussy, and left lots of white areas. I felt that this worked well for the darker coloured topper in this instance. As with a lot of my cards, I did not add a sentiment, as I quite often add one when I send a card. This card would be useful for lots of different occasions.


My second card also features a coloured background for the focal image; this time I decided to stamp on kraft card. I stamped the main image from the Allium Blueprint stamp set using Versafine Onyx Black Ink, and coloured it with pencils, as before. I used a tea dyed background, and stamped one of the smaller allium heads using Memento Plum ink. Both layers of card were edged with the plum coloured ink before attaching them to the base card.

Thanks for stopping by, take care,


Judith xx


Monday, 11 October 2021

Blueprint Notelets

Hello everyone, I hope that you are keeping well. I have a quick and easy project to share with you today in the form of a set of notelet cards that I created for last month's TV show on The Craft Store, using the Blueprint stamp sets. 

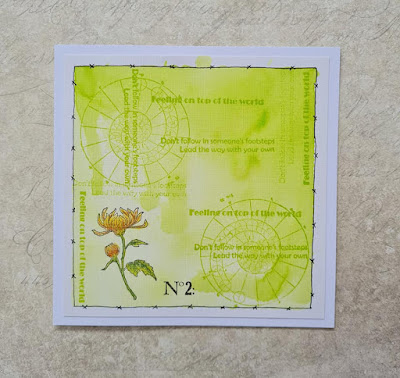
I made four different cards, but the principle was the same for each card. I used a piece of textured card cut to size, slightly larger than a square acrylic block. I coloured the acrylic block with Distress Ink, and lightly spritzed it with water, before stamping the block onto the piece of textured card. I lifted the block away from the card, and left the background to dry. If it was very wet, I tipped the card to let some of the water droplets run, creating more texture on the background.

Once the background was dry, I used the same colour of Distress Ink as the background, to stamp words from one of the the Blueprint stamp plates over the background, and chose one of the little worker floral stamps to stamp in the bottom left hand corner, using Versafine Onyx Black Ink. I added the number on the stamp plate as well. Here we have the image from Allium Blueprint against a pretty Teal coloured background.


I chose Chrysanthemum Blueprint for my second card and a zingy green Distress Ink. I coloured the floral images with pencils, choosing colours on the opposite side of the colour wheel to the backgrounds for a pop of colour.

Lupin Blueprint was the choice for card number three with a soft orange background. The flowers are so pretty on this stamp set.

My last card was created using Echinacea Blueprint and a pale green background. To complete the cards, I drew around the edges using a fineliner pen, creating a border. Each one was slightly different, but you could draw them all the same, it is not important.

These cards were really fun to make, and would be useful for so many purposes. I hope you will try something similar. They would make a lovely gift, or be handy when you need a card in a hurry.

Thanks for stopping by, take care, xx


Friday, 1 October 2021

Creating a Blueprint

Hello everyone, I hope that you are all keeping well. As we head into another month, and the darker nights and cooler weather are definitely with us, I wanted to share a bold and bright card with you to cheer up your day. I have chosen a project that was shown on last month's TV shows, using the Lupin Blueprint stamp set, which is a beautiful set of stamps.

To start my project, I used some of the plain paper found within the Chocolate Baroque Black & White Papers Series 2, which allow you to create your own backgrounds. I stamped and embossed some of the smaller images from the stamp set onto the paper using clear embossing powder and Versamark. I then covered the paper with Blueprint Sketch Distress Ink. I covered the paper with a blank piece of copy paper, and used a medium iron to take off the embossing powder, creating a faux batik effect. If you do this with your regular iron, remember to turn off the steam setting.

I stamped the main image onto a die cut oval and coloured it with pencils. The sentiment was stamped onto a smaller die cut oval. I coloured the edges with the same colour of Distress Ink as I had used for the background.

Thanks for stopping by, I will be back later in the month to share some more projects with you. Take care, xx


Related Posts Plugin for WordPress, Blogger...