Hello everyone, I hope that you are keeping well. I have some projects to share with you today, showcasing stamps that were featured during this month's TV shows on Create and Craft.
My first project was created using the lovely Breath of Spring stamp set. I brayered some Fossilized Amber Distress Ink onto a round gelli plate, and then stamped the pretty leafy scroll image repeatedly onto the gelli plate, using Ripe Persimmon Distress Ink. I used the gelli plate like a big stamp, and pressed it onto a piece of smooth stamping card.
I stamped the main image from the Breath of Spring stamp set onto a spare piece of smooth stamping card. I also stamped the little butterfly that appears on the swirl a couple of times. I coloured these images with pencils and cut them out. I attached them to the gelli plate background, and added the word 'Spring' from the stamp set. Finally, I mounted the background onto some black card.
My second project is a variation of an old project. I stamped the Hanging Flowers image onto a piece of book paper, using a greenVersafine Clair ink. I coloured the image with pencils, and added some shading around the edge with Distress Ink. I made a larger background using Twisted Citron Distress Ink, and stamped the leafy portion of the Hanging Flowers image around the edge in the green Versafine Clair ink to create a border. I also added a dotty stamp from the Floral Clock stamp set, using second generation stamping. I added some ribbon and kraft card mounts to both layers to complete the card.
My next two projects featured a pretty little stamp from the Floral Clock stamp set. I found a watery background in my stash box, which I had originally created using Distress Inks. I stamped the flowers across the background using grey Versafine Clair Ink, adding a butterfly and a sentiment. I then chose a grassy stamp from the Spring Foliage stamp set, and using a green Distress Oxide ink, I stamped the image in second generation stamping. This gave a feeling of a field of flowers in the background, and meant that I did not need to mask off my foreground flowers, great if you want to create quick cards.
I coloured the images with Zig Clean Colour Markers, blending the colours into each other, and using a brush and some water if I needed to even the colour out at any point. Going back with one of the paler colours helps with the blending process anyway. I added a piece of black card behind the background before I mounted the panel onto a white card blank for a great clean and simple card.
I took the idea a little further and decided to create a little wrap around card using exactly the same design. I made the strip slightly longer, and then attached it to a little 4" x 4" black card. This would make a great little notelet for so many different occasions. I love making these small cards, as I think they are so useful; anything from gift tags, to Get Well cards, a pick me up card, or just to say hello card.
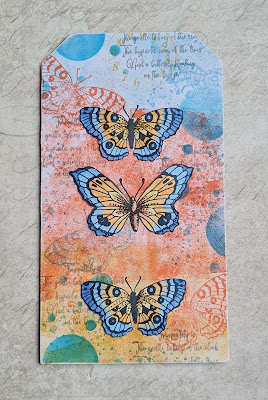
My next project is a variation on an older project, and I have changed the way that I made this slightly. My older project was created by painting over scrapbook paper and creating a masterboard. This time, I used a roller and added Distress Ink to smooth stamping paper. I then created the layers in exactly the same way as before. I added stencilling and stamping, taking images from the Floral Clock and Parsley Clock stamp set. I drew around a chipboard tag and cut out the shape on the background, then attached it to the tag. I sanded the edge to reveal the white edge.
I used a spare piece of smooth stamping paper and stamped three butterflies from these stamp sets, and coloured them with pencils. I cut them out, but before I adhered them to the background, I stamped just the antennae directly onto the background where I wanted to place the butterflies. I then placed my coloured butterflies over the top.
My next four projects are all older projects, but I am sharing them with you again. The first is a die cut circle stamped with images from the Parsley Clock stamp set. I have coloured the images with pencils, and added Distress Ink to the background. I matted the die cut onto a piece of textured card.
My next project was created on a piece of tea dyed Drawing Cartridge for a vintage feel. I added lots of stamped splatters, and coloured the image from the Floral Clock stamp set with pencils.
I used green card for the main image for a change in this next project. I stuck to a simple palette of yellow, orange and green to colour the image from the Parsley Clock stamp set, and my Brusho background mirrors that colour palette.
Finally, I used a Brusho background for this last project, creating a Bokeh effect with a butterfly stencil. I stamped the mushrooms from The Shroom Clock stamp set onto some patterned papers, and added white highlights with a gel pen. I added more stamping to the bottom of the background, which I coloured with pencils.
I will be back next month to share some more projects with you. Thanks so much for stopping by. Take care, xx


