Followers

Friday, 23 October 2020

Having a Lightbulb Moment

Hello everyone, for my final post this month, I am sharing two projects using the beautiful Lupin Blueprint stamp set. This fabulous stamp set is full of beautiful images, and some lovely sentiments. I really enjoyed working with this stamp set and will definitely be using it a lot!

For my first card, I created a background using a technique that Lesley shared with us on a Butterfly Tree get together. I painted a piece of scrapbook paper with white paint, then rolled Distress Ink over the top. I added stamping and stencilling with the same colours to create a collage effect. The whole effect looks very vintage, and makes a great background for the main image. I coloured the image with pencils, coordinating with the background colours. I also added some shading around the edge with Distress Ink.

To create my second card, I used a piece of scrap background from my stash box. This brightly coloured piece of card was crying out for some of the lightbulbs, and I stamped them across the yellow area in the middle of the page. I drew some lines at the top to hang the bulbs from, so that they were not floating in mid air. I created a matching background using the same colours of Distress Ink, and stamped the large lightbulb randomly over the top, using turquoise Archival Ink.

I hope that you have enjoyed the blueprint series of stamps this month, thanks so much for stopping by. Take care, and stay safe. xx


Monday, 12 October 2020

Blueprint Flowers

Hello everyone, I have more projects to share with you today using the beautiful blueprint floral stamps from last month's one day special on Hochanda.  My first two projects were both made using the Chrysanthemum Blueprint stamp set, and although I have used lots of the same stamps, I have used very different surfaces to stamp on.  

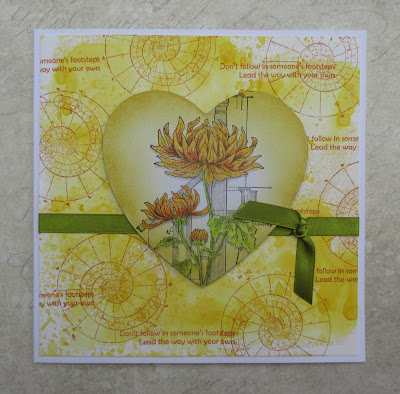
To create my first card, I coloured a piece of Drawing Cartridge with Distress Ink, and then stamped the images using Orange Blossom Archival Ink. I took a whiteboard heart, and added some Distress Ink around the edges, before stamping the main image onto the heart. I coloured the image with Koh-I-Noor Polycolour pencils. I added some green ribbon to finish.


To create my second project, I used a piece of Drawing Cartridge stained with tea for a vintage look. I stamped the images with Archival Potting Shed Ink, choosing lots of the smaller images from the stamp plate to create a collage feel. I then stamped the main image onto a piece of cotton fabric, and coloured it with Inktense pencils. I ran over the image with a waterbrush afterwards, to make the colour permanent.


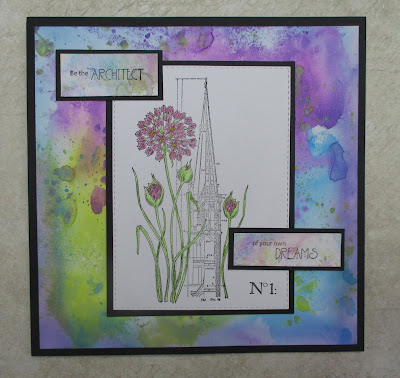
My next two projects were both created with the Allium Blueprint stamp set. I wanted to create a lovely vibrant background for the first card, and chose Distress Oxide Inks, which I applied to Drawing Cartridge. I stamped the image and coloured it with pencils. I chose to split the sentiment, and did this by covering the unwanted half with masking tape before inking the stamp each time. I used a spare piece of the background Drawing Cartridge, picking up some of the Distress Oxide Inks from my craft mat, but made it slightly paler for this purpose. I matted all of my card pieces with black card so that they stood out from one another.

My final card uses a softer colour palette of pale green and purple. I used second generation stamping on the background to allow the foreground image to be the focal point. I used purple Archival Ink to stamp the images and sentiments, which made an unusual change. I edged all of the layers with the same purple ink.

Thanks for stopping by, I will be back later in the month with a couple more projects to share with you. 

Take care and stay safe, xx


Thursday, 1 October 2020

In the Frame

Hello everyone, I have a couple of projects to share with you today showcasing some of the the amazing stamps that Lesley brought to Hochanda during the one day special last month.


My first card looks very simple, but took a little planning. I used a scrap piece of paper first to make sure that it worked, and that would always be my advice to you if you want to try an idea. I cut a piece of paper to the size of my finished card and stamped out the four corners to work out where they needed to go. To create the actual card, I stamped on to Drawing Cartridge, and then masked the four corners using Masking Tissue, before stamping the flowers within the square. I just made sure that I did not ink the ends of the stems, so that I did not have any pieces of stem sticking below the frame. I added some shading with Distress Ink, blue at the top and green at the bottom. I peeled away the Masking Tissue and coloured all of the images with Polycolour pencils. Adding the shading first means that I can colour over any ink that may have gone over the edges of the flowers, saving me the job of masking those as well.


For my second project, I chose to use the same stamp set, Echinacea Blueprint, and stamped onto kraft card, using white embossing powder. I coloured the main image using my Koh-I-Noor watercolour palette. I added a touch of Distress Ink around the edge of both the focal image and the background before matting both pieces onto grey card.

I will be back later in the month with more projects to share, thanks for stopping by,


Judith xx


Related Posts Plugin for WordPress, Blogger...