Followers

Sunday, 22 November 2020

Hello everyone, I hope that you are all keeping well. Today is my Wedding Anniversary, and I should have been in sunny Mexico, but as with so many things this year, it was not meant to be. Like so many of us, I know that family, friends and the simple things in life are far more important than holidays and lots of possessions. Enjoyment of Nature, the changing seasons, and the promise of Spring and lighter nights always seems to spur us on.

I have made some projects using the beautiful stamps showcased on last month's TV shows on Hochanda which I am sharing with you today. The first card uses the lovely Be at Peace stamp drawn by Dawn. I have given the card an Autumnal feel by colouring the leaves in different colours, so quick and simple to do. I added the sentiment in a circle around the tree, and distressed the edge of the background before matting onto kraft card.


My next two projects were created using the Life is Wonderful stamp set. I created a gelli plate background using green ink and a texture tool, and then stamped the little dragonfly over the top. I coloured the image with pencils.

My final card was created by stamping and embossing onto black card with white embossing powder. I painted the image with Koh-I-Noor paints, and added some splatters with white paint. I used one of Lesley's zingy Designer Papers A5- Background Splash to matt the design onto. Definitely much bolder than my previous design!


Thanks so much for stopping by, as always, stay safe, and take care. xx


Friday, 13 November 2020

Splats and Flowers

Hello everyone, I am back to share a few more projects with you using some of the fabulous stamps that were showcased on last month's TV shows on Hochanda.

For my first two cards, I have used the large gerbera stamp from Gerbera and Friends, drawn by the very talented Annabel.

To create my first project, I used a small round gelli plate and added colour using yellow Versafine Clair ink. I added texture with some bubble wrap, before stamping the gelli plate onto the background. I repeated this process until I had filled the background. I stamped over the top of each circle using the gerbera stamp and dark brown Archival Ink. I used the same ink to stamp onto white shrink plastic, and coloured the image with pencils, before I puched a hole at the top of the image and cut it out. I shrunk the image using a heat gun, and flattened it while it was still hot, using an acrylic block.

I stamped the sentiment onto some yellow ribbon, again using the Archival Ink, and once it was completely dry, attached the ribbon to the background. I attached the shrink plastic image to the ribbon using a couple of jump rings.

To create my second card, I added colour to the background using a roller, and then stamped the splatter stamp over the top. I stamped the gerbera images onto scrap card alrrady coloured with blue and purple Distress Ink, and cut them out. I have decoupaged the images, so that the inner sections have been stamped and cut out again for extra depth. I added shading with pencils to create more shadow on both flowers just beyond this central area too. Before I attached the flowers to the background, I selected a  design from the Silhouette Grasses stamp set, and stamped that behind where the flowers were going to be placed. I used the flowers as a guide to help decide where to stamp, and used a lovely plum shade of Versafine Clair ink in first and second generation stamping.

I used a spare piece of the purple card left over from the flowers to stamp the sentiment, and roughly tore the edges, to allow the white edges to show.

My next two projects were created using the Canary Bird Rose stamp. I have really enjoyed creating backgrounds using these two stamps particularly, from the Gerbera and Friends stamp set during this period. As in the previous card, I used a roller to lay colour onto the background, and then I used the splatter stamp and the lines stamp, to create a collage effect. These really are such useful stamps.

I stamped the Canary Bird Rose onto a whiteboard heart using brown ink, and then edged the heart using a green Distress Ink. I coloured the image with pencils.

 My final project was created using kraft card. I stamped the image and sentiment using brown ink, and coloured the entire image using a white pencil. I then coloured over the white pencil with the colours that I wanted to add, creating a very soft look. Finally, I added some white splatters using some white paint.

I hope that you will try out some of my ideas. Thanks so much for stopping by. Stay safe and take care, xx


Sunday, 1 November 2020

New Talent at Chocolate Baroque

Hello everyone, I am sharing a few projects today featuring stamps that were showcased on last month's TV shows on Hochanda. The stamps were designed by Lesley's very talented Granddaughter Annabel, and another new designer to Chocolate Baroque, Dawn. These beautiful floral stamps are absolutely stunning, and we hope that you will enjoy our projects this month, and be inspired by what we have created with the stamps.


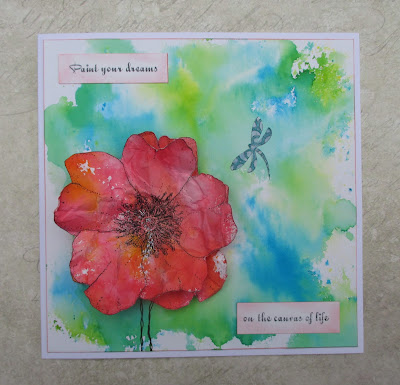
My first project was created with the lovely Dream Petals stamp. I coloured some Drawing Cartridge with Distress Inks, and stamped the image twice. I cut it out, and scunched it up, to give it a crinkled texture. I attached the image onto a Brusho background from my stash. I stamped the sentiment onto a scrap piece of card, masking the part of the sentiment that I did not want to use each time before I inked up the stamp. This enabled me to split the sentiment. I edged the sentiment strips with red Distress Ink to take away the whiteness of the card, and to tie them in with the main flower.

I added a hand drawn stem using a fine liner pen. I stamped the small dragonfly onto scrap card, coloured it with pencils, then decoupaged it onto the background.

I used the same flower stamp for my next card, stamping three times onto book paper, and colouring the images with orange and red Distress Ink. I created a background using Distress Ink, and added the splat from Gerbera and Friends in toning colours. I stamped the dandelion clock, using it as stalks for the Dream Petals flowers, which I laid over the top.


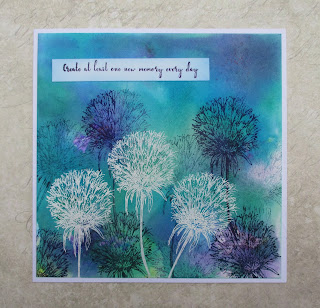
My final card for today uses the same dandelion clock stamp over another Brusho background. I embossed the flower three times using white embossing powder, and then added more of the flowers using Versafine Claie Ink in a teal and purple colour, to give the effect of a field of dandelions. I used first and second generation stamping. This card would be useful for so many occasions, including a sympathy card.


I will be back later in the month with more projects to share with you. Thanks for stopping by. Take care, and stay safe. xx 


Related Posts Plugin for WordPress, Blogger...