Followers

Showing posts with label Steampunk Christmas. Show all posts

Saturday, 23 December 2017

Bold Poinsettia

Hello everyone, as Christmas Day draws near, I hope that you are all nearly ready with your plans and preparations, whatever you are doing. I have a festive card to share with you today, using stamps featured on last month's TV shows on Hochanda.

I created an inky background using a mixture of Distress Inks in blue, green, red and purple, which I spritzed with water, and stamped a leafy spray from the Steampunk Christmas stamp set on the background, and added a sentiment from the Let's Get Festive stamp set. I used a combination of green and purple Versafine Ink to stamp these images.

I stamped and embossed some leaves and a flower centre from the Bold Blooms stamp set onto cartridge paper, using gold embossing paper. I coloured the images with Dr. P. H. Martin's Bombay Ink and a water brush, before fussy cutting them out, and attaching them to the background, to create a poinsettia style flower.

Have a lovely Christmas everyone, and if you get a chance, do try and watch Lesley on Hochanda today. Her shows are on at 12.00 and 3.00. Thanks for stopping by, xx

Monday, 29 June 2015

Christmas Masterboard


Hello everyone, I have a project to show you today using the current stamps of the month available from Chocolate Baroque. I have used one of the leafy Seasonal Fragment designs to create a masterboard with contemporary colours, and then turned it into a Christmas card by using a seasonal greeting and poinsettia style flowers.

I started my background by colouring a piece of smooth white card with Aqua Adirondack Ink, then stamping the leaves using Red Geranium and Library Green Archival Ink. I completed the background using the same leafy stamp and Aqua Ink for a softer feel.

I die cut a long shape, and sponged the edges with Aqua, leaving the die in place, to create a white border, then stamped a sentiment, using Versafine Crimson Red Ink. I hand cut a matting layer using dark red card. I used the same red card to cut out some Crealie shapes to make some flowers, and cut some Crealie leaves using dark green card. I spritzed the flowers with water and scrunched them up slightly to get a more dimensional feel. I put three layers together and added a brad.

I hope that you will give this technique a try, I had more of this background left over for another project;

which is great when I need to make so many Christmas cards! Thanks for stopping by, xx

Wednesday, 5 December 2012

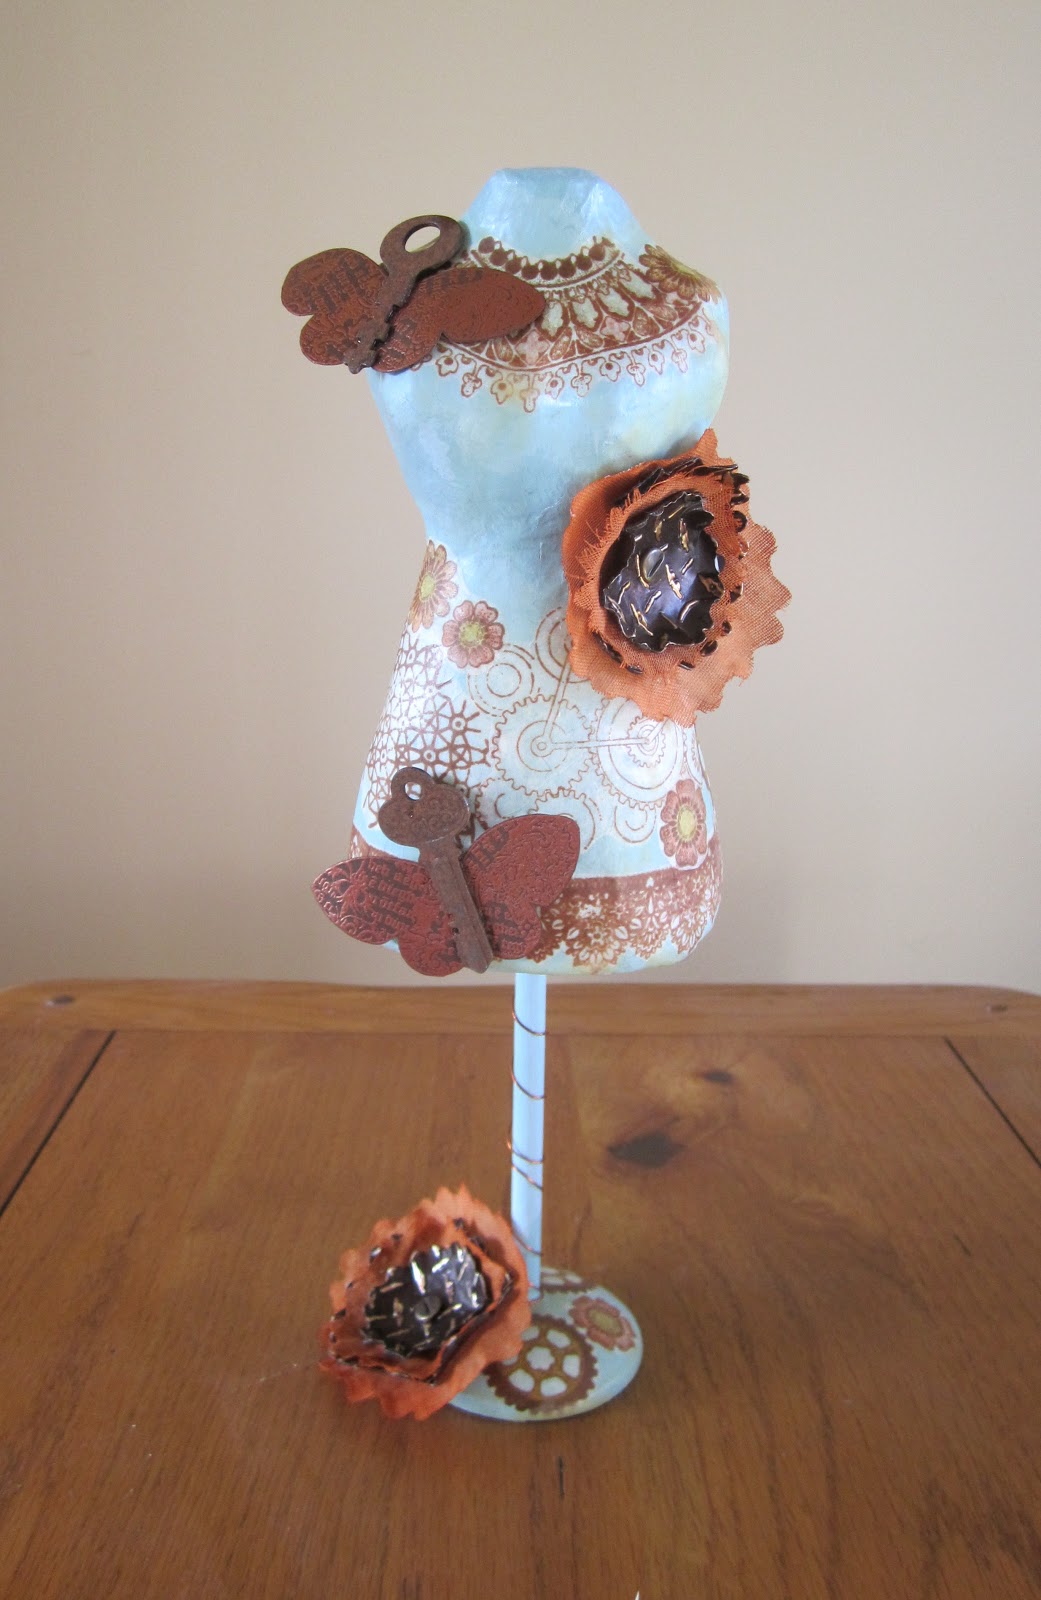
Dressing up in Steampunk Style

Hi Folks, here's a sample showing over on the Chocolate Baroque Design Team Blog today. I'm giving a more detailed description of how I made it over here.

I love using these dress forms, as they are cheap, but look great once they are altered. I painted the base firstly with a coat of gesso, then a coat of acrylic paint and let these dry. I stamped some tissue paper with the images that I wanted to use, and coloured some of the areas with various shades of browns and oranges, using my Polychromos pencils as I know that these do not bleed when using Matte Medium. I cut around the images, and applied them to the dress form and the base, using Matte Medium, covering the top as well. This helps the tissue paper to disappear into the background fairly well.

I then applied a coat of beeswax, using a large brush. I melted this with my heat gun to smooth out any thick areas, and then let it set again. I buffed the whole thing with a duster, to bring up a nice shine.


I stamped a couple of butterflies onto brown card using copper EP, which I cut out and added to the project, using rusty keys for their bodies. I then made some flowers using metal and crinoline. I used the peony die to cut these out, and coloured the crinoline with Rusty Hinge Distress Stain. I embossed the metal shapes with an embossing folder, and then wiped the raised areas with alcohol ink to remove some of the colour. I fixed the layers together with some faux screw brads.


The last touch was to add some copper wire to the stem of the project.


I'll be back in a few days with another explanation. I hope you'll pop back! Thanks for stopping by, xx

Tuesday, 19 June 2012

Pretty Steampunk Beetle


Hi folks, I'd like to show you another sample using the new Steampunk stamps recently released over at Chocolate Baroque I have chosen to use a feminine colour palette for my sample and picked some lovely pinks and oranges, which I have offset with a bright green.

I started by making a background with Pan Pastels, and then sponged through the Reverse Chicken Wire template from Crafter's Workshop with Versamark ink. I went over this with more of the same Pan Pastel colours that I had used for the background. I stamped the large cog and flower stamp from the Punky Romance stamp plate, using Versamark ink again, and covered this with Pan Pastels as well.

I cut out some flowers and leaves from handmade paper, and coloured these with Pan Pastels. The flowers were coloured with pink and orange, and the leaves were coloured with two shades of green. I stamped the darker areas of the leaves with the little coggy tree from the Steampunk Christmas stamp plate.

I stamped the beetle onto white card twice, and coloured it with Polychromos pencils. I decoupaged the layers, and brushed some gold mica pwder over the top, before adding Glossy Accents to the beetle's body and the clock face.

I scrunched the flowers, fixing them together with brads, and attached them to the card. I stuck cogs into the centres and filled these with Glossy Accents. I then filled the centres with seed beads. I added a sentiment and a couple of cogs to finish.

These stamps are such fun to work with. Why not pop over to the Design Team blog over the coming days to see what my Design Team mates have been making with them? Thanks for stopping by, xx

Wednesday, 5 October 2011

This and that


Hi folks, I promised another Christmas sample last week, and never got around to posting it for you. So, I thought I'd post it today. I have created my background using oil pastels and Zest it, which is really quick and easy, plus it smells nice too! I have used some more of the newly released stamps from Chocolate Baroque in particular the lovely holly owl swirl stamp, as my focal stamp, and also a background stamp too.

I also have two samples to show you from the Steampunk Christmas stamp plate that I have had sitting here for a little while. The first, typically in Christmas colours, of Kraft, red and greeen, has been edged with aluminium tape. I ran this through an embossing folder, and coloured it with alcohol inks. I made my flowers with glassine paper, and embossed them with gold embossing powder.


Now, I made this sample a while ago, and I used Queen's Gold embossing powder, a good make. The sample looked lovely. Recently, I've looked at it, and the flowers look terrible, the embossing powder doesn't look shiny anymore, I don't know if glassine just doesn't like embossing powder. Has anyone else had any experiences with glassine and embossing powder?


My final Steampunk sample is not Christmassy at all. I wanted to show the versatility of these stamps, that they could be used for all year round , and so I made this canvas project. I poured UTEE into an oval Nestability, stamped into it and put some micro beads in too. I rubbed some Inka Gold into the cogs, to highlight them. I stamped the wording onto tissue paper, and added it onto the canvas with Matte Medium. I drew around an oval Nestie, adding partial cog shapes, before cutting it out to make a mat for my UTEE piece. I stuck some old keys and cogs on to finish.


Life is kind of busy at the moment. We are going through more than our fair share of ups and downs I feel. However, so are a lot of people, and we are no worse than many of you out there. If you are going through tough times, I feel for you. I am thankful for my crafting and very good friends.(If my lovely Daughter happens to read this, then I love you too, Megsi!)

Anyway, thanks for stopping by today, xx


Related Posts Plugin for WordPress, Blogger...