Followers

Sunday, 22 August 2021

Beautiful Poppies

Hello everyone, I am back with some projects featured on last month's TV shows. 

My first project was created by using Distress Ink on some Drawing Cartridge. I then stamped the main image from Polygon Poppies, adding a smaller corresponding stamp and a bee from the Honey Bee stamp set. I coloured the image with pencils, and decided to add pops of blue to coordinate with the bee wings. I added the silhouette hexagon stamp in blue and edged the background using the same colour. Finally, I chose a couple of the sentiments from the stamp set and added them to the background.

I created another Distress Ink background for my second card using a pale pink and bright green. I stamped the image from Flora and Fauna around the edges and coloured it with pencils. I added a sentiment from Loving Sentiments in the centre. 

For my final project, I created a plain coloured background using a gel plate and Fossilized Amber Distress Ink. I used a variety of hexagonal images from Polygon Poppies, creating a collage, and sticking to a palette of black, orange and red. I added some of the numbers into the blank hexagons, and coloured the images with pencils. I added a few bees from the Honey Bee stamp set, and overstamped a few of the words from Polygon Poppies.
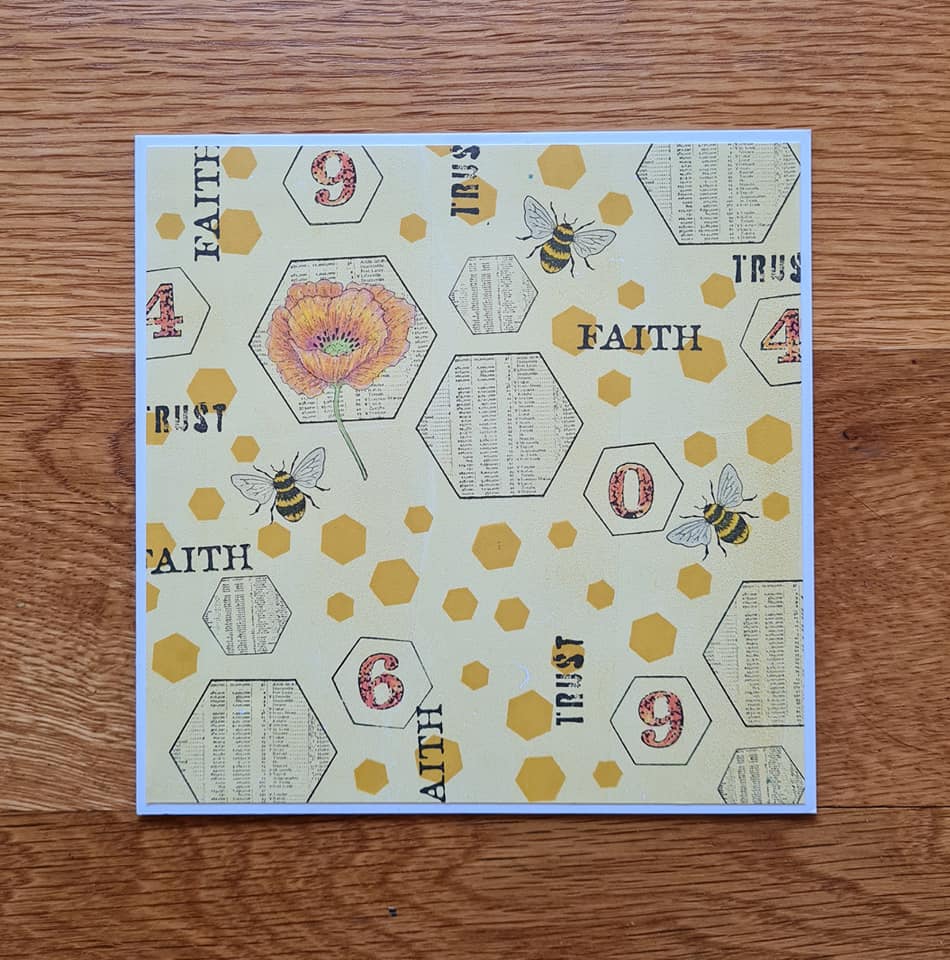
Poppies are one of my favourite flowers to work with and these stamps are no exception. I hope that you have enjoyed some of my ideas. Thanks for stopping by, take care. xx


Wednesday, 11 August 2021

Focus on Florals

Hello everyone, I hope that you are all keeping well. I am back to share more projects from last month's TV shows.

My first project was created with a piece of scrap corrugated packaging, the sort that comes as a parcel containing books or anything flat, really. I opened it out, took off any extra pieces, and peeled away the top surface to reveal the ridges underneath. 

I created a large piece of A4 background paper by using one of the little worker stamps from the Flora and Fauna stamp set, stamping and embossing it randomly over the background using white embossing powder. I then coloured the whole background using Fossilized Amber Distress Ink and a blending brush. I chopped the background into three pieces to fit my corrugated panel, and added a bit of torm script paper to the lower portion. I die cut three tags from Drawing Cartridge which had been stained with tea. I stamped the main images from Walk Tall onto the tags, and edged them with Black Soot Distress Ink. On one tag, I added a sentiment directly, and on the other two, I added a piece of black ribbon and a little piece of card with a sentiment. I stuck the tags to the background and added lace and black buttons. I matted the yellow background to black card for definition before adhering it to the corrugated card. I chose to score the corrugated card to make a tryptich that would stand up, and for stability, I added washi tape to the back.

I created a similar background for my second project, using another little worker stamp from Flora and Fauna, embossing the stamp using white embossing powder over the background. This time, I chose Blueprint Sketch Distress Ink as the background colour. I stamped the image from the same stamp set onto a piece of Drawing Cartridge, and coloured it initially with Distress Inks and a waterbrush. I added shading with pencils. I stamped a sentiment from Punky Expressions onto a small die cut rectangle. I edged all of the card pieces with Distress Ink before adhering them to the card blank.

I chose to use the very pretty foxglove from the Honey Bee stamp set as the main focus for my final card. I stamped the image three times, along with two of the bees, and masked the images, before adding colour to the background with Distress Ink. I spritzed the background with water. I stamped the silhouette image using first and second generation stamping using green and purple ink. I removed the masks and coloured the images with pencils. Finally I added the sentiment from the same stamp set.

I will be back later in the month with more projects to share with you. Take care, and thanks so much for stopping by, xx


Sunday, 1 August 2021

Birds of a Feather

Hello everyone, I am sharing a couple of projects showcasing stamps from last month's TV shows.

My first project uses the fabulous large crane from the Majestic Crane stamp set. I stamped the image onto a piece of Drawing Cartridge and masked it before colouring the background with Distress Inks. I spritzed the background with water, mopping up some of the droplets with a paper towel. I coloured the image with pencils, and added some white charcoal over the background to soften it somewhat, blending it with my fingers. I added a sentiment from the same stamp set. 

This is a really large stamp and makes a great feature on a card. It is fabulous for both male and female cards alike, if you are looking for something particularly useful.

To create my second project, I used a large manilla tag, and covered it with some of Lesley's Chocolate Baroque Black & White Papers Series 1. I coloured the background with Distress Inks. I stamped the main image onto a piece of smooth stamping paper, and coloured it in with pencils. I wanted to use non Christmassy colours, and chose to colour the bird to represent a blue tit. You could use the tag as an attachment for a Birthday present at any time of year, not just at Christmas by colouring it this way.

Thanks for stopping by, take care and stay safe. xx


Saturday, 17 July 2021

Painted Butterflies

Hello everyone, I have a couple of projects to share with you using stamps that were featured on last month's TV shows.

My first project was created using a stencilled background and three different colours of Distress Ink.  I used a piece of Smooth White Stamping Paper and moved the stencil across the page to cover the entire area. If you look closely, you can see where I have joined the two sections together, but it doesn't really matter, as it is just a background, and the butterflies from the Steampunk Butterfly stamp set mostly cover it up. The stencil I have used is one by Craft Emotions called 'Botanical'.

I chose three words from the Punky Expressions stamp set, and stamped them onto the background using Versafine Black ink, to represent the butterfly bodies. I stamped the butterfly wings onto some Drawing Cartridge using the same ink, and coloured them with Inktense pencils, blending the colours with a waterbrush. Any watercolour pencils would do. I cut the wings out and adhered them either side of the words. Finally, I added the sentiment, also from Punky Expressions.

For my second card, I created a background using a piece of Drawing Cartridge and Distress Inks in shades of brown and green. I added stamps from Make Your Mark, Timeless and Steampunk Butterfly. I stamped and embossed two butterflies from the last set using copper embossing powder, and coloured them with Inktense pencils and a waterbrush, again, you could use any watercolour pencils. I cut the butterflies out and added words from Punky Expressions. I edged the background using a dark brown ink.

I had a lot of fun creating these cards, the stamp sets are so versatile, and as you can see, they all mix and match so well. I hope that I have inspired you to try out some ideas. Thanks for stopping by, take care, xx


Thursday, 1 July 2021

From The Deep

Hello everyone, I have a few projects to share using stamps that were featured on last month's TV shows on The Craft Store.

My first card was created on a piece of glossy card, and I used an inky plate to create the background. I brayered a selection of Distress Inks onto the plate, and then pressed the card onto the plate to get a print. I trimmed the card to size, and then placed a square of Masking Tissue in the centre. I stamped the images from Mermaid Queen and Seashell Collage around the edges using Archival Ink. I added some shading using grey Archival Ink before removing the Masking Tissue. I stamped the bird and sentiment from the Seashell Collage stamp set within the faux frame, amd added a touch of pencil colouring to the image.

To create my second card, I used a piece of Smooth White Stamping Paper and stamped the Ammonite image in the foreground using black ink. I masked the image using Masking Tissue, and proceeded to stamp the image again in grey ink, masking as I went along, until I had filled the page. I only needed three masks in total to achieve this effect, and as they are reusable, I will be able to put them to good use in future projects. I used colouring pencils to complete the project, choosing a rainbow palette, and using three different colours on each shell to give a good variation of shading. I started with the lightest colour each time. I added a sentiment from Birthday Words. I added grey pencil around the shells to give even more definition to the shells and make the card feel more 3D.

My third card was created using Drawing Cartridge and Distress Inks. I added salt to the background while it was still wet to create an underwater effect, like bubbles in the sea. Once the background was dry I added some foliage along the bottom from Something Fishy, and completed the sea bed by drawing in some lines and dots with a fineliner pen. I added lots of the fish, and stamped a few extra fish and shells onto to some sticker sheets which I coloured separately, all with pencils. I added a few fronds of colour to represent seaweed using my Koh-I-Noor plalette and a waterbrush. 

This last project is a golden oldie which I am sharing again for those readers who have not seen it before. I used Ink and mica powder on the bckground covered up with scrunched up cling film. Once the background was dry, I stamped all of my images from Mermaid Queen with Archival Ink and coloured them with pencils. I have joined the images up with dots to make them appear to be part of one big scene using a fineliner pen, and used toning colours throughout.

Thanks for stopping by, I will be back later in the month with more projects to share with you. Take care, and stay safe, xx


Wednesday, 23 June 2021

Bottle and Jug and a Cup of Tea!

Hello everyone, I hope that you are keeping well. I have a project to share with you from last month's TV shows on The Craft Store. 

I found a background in my stash that I thought would be perfect to use with Kim Moody's Bottle and Jug stamp, and so my card was dictated by these colours. I had coloured the original background with tea and added an image from Baroque Ephemera 1. I then dry brushed the background with pale blue acrylic paint.

I stamped the main image onto a smaller piece of tea dyed drawing cartridge to match the main background. I masked the image and stamped a tree from Trees a Crowd, and added blossoms from Orchard Design a Tree stamp set. I added a few splats using a stamp from the Timeless stamp set. I removed the mask and coloured the image with pencils.

These images have been an absolute delight to work with and are so versatile.

Thanks for stopping by, stay safe and take care.

Judith xx


Saturday, 12 June 2021

Cloudy Skies

Hello everyone, here are a couple of projects that I created for last month's TV shows on The Craft Store, using the fabulous new house stamps from Kim Moody.

 I created a background using Distress Inks in shades of blue and green. I stamped Luv Shack onto a smaller piece of Drawing Cartridge and masked the image. I stamped a couple of trees from Woodland Design a Tree and extended the hedge using a fineliner pen. I coloured the background using Distress Inks and a blending brush, I used a stencil over the top with more Distress Inks to add the clouds. I added foliage to the trees and grass using stamps from Glade Design a Tree stamp set. The image was coloured with pencils. I edged both pieces of card with ink to create more definition before I adhered them to the base card. Finally, I added a sentiment from Say it Vertically.

To create my second card, I chose three of the houses - Luv Shack, Cotswold Stone, Urban Chic, and stamped them on a piece of Drawing Cartridge, masking them as I went along. I coloured the background with Distress Ink, and coloured the images with pencils. I added a sentiment from Amazing Mackintosh Words. I stamped some foliage from Silhouette Grasses along the front.


I will be back later in the month with another project to share with you. Take care and stay safe, xx


Tuesday, 1 June 2021

Colourful Bookmark Houses

Hello everyone, I hope that you are all keeping well and that you have been enjoying some better weather. I have a few projects to share with you over the next few weeks that will hopefully make you think of sunnier days, the colours are certainly bright and cheerful!

My first card was made using one of the bookmark style houses featured on last month's TV shows on The Craft Store, Turret House. This has a fairytale castle feel, with Russian elements in the rooftops. I have coloured the building in bright colours to match my background, which was created with Brushos. I placed a stencil over the top and added some Distress Ink. I used the Orchard Design A Tree stamp set, to create a forest around the building. 

I used pencils to colour the image, a fairly cheap set this time from Faber Castell. I seem to go through phases of what I like to use, but I am trying to use some of my neglected stash if I can at the moment. These pencils work quite well, and although they did not cost much to buy, I like the effect that I can achieve with them.

My second card was created using the lovely Italian House. I used lots of stamps from Make Your Mark to create the background, and added texture paste through a stencil. I coloured the images with pencils. The text comes from  the Words of Wisdom stamp set, and I have used the Orchard Design a Tree stamp set once again. I chose not to add any foliage this time, simply added a bit of pencil colouring to suggest the feeling of leaves on the branches.

I will be back soon with more projects to share with you. 

Thanks for stopping by, and take care.

Judith xx


Saturday, 22 May 2021

Time for Nature

Hello everyone, I hope that you are keeping well. I am sharing my last few projects this month featuring stamps from last month's TV shows on The Craft Store. 

My first card features stamps from the beautiful stamp set Sow the Seeds. These large stamps are perfect for journaling or creating eye catching, distinctive cards for someone special. I love the seed heads, and wanted them to shine in my project. I created a background using my inky plate and soft colours. I stamped the images, and added some pencil where the shading was present. I added extra foliage from Silhouette Grasses, such a useful stamp set.

My next card features the fabulous pine cone from Mother Earth as a focal point. I stamped this three times onto kraft card, using brown ink, and cut it out and scrunched it up to give it added texture. I created a background on a piece of tea dyed drawing cartridge, using stamps from Sow the Seeds and Make Your Mark.

The next two cards are older samples that I posted here on my blog a little while ago, but I will share them with you again. A simple piece of white embossing, and then the image was painted with Koh-I-Noor watercolours:

The leaf was stamped using different colours of ink, and then lightly coloured with pencils to accentuate the shading:

Finally I created a card using the Scripts and Timepieces stamp set, which was only available during the TV shows. I coloured my background with Distress Ink, and stamped the scripts using dark brown ink. I added splatters from the Timeless stamp set. The cental piece was created by stamping onto a piece of stampbord which I had coloured with Distress Ink, and I then added triple embossing for a shiny glaze.

Thanks for stopping by, take care,


Tuesday, 11 May 2021

Setting the Scene

Hello everyone, I hope that you are all keeping well. I am sharing more projects today from last month's TV shows on the Craft Store, where we showcased the fabulous Retro Vases and Retro Floral stamps. As I mentioned in my last post, if you would like these stamps, you can give Lesley or David a call at the unit, and they will take an order from you, as these stamps are not available on the website.

I decided to create a little scene for my first card. I used some torn strips of paper to create some hills, using Distress Ink and a blending brush. I added a circle mask to create a sun. Once the background was created, I chose some suitable silhouette stamps from the two sets and stamped those using various colours from the Versafine Clair range of inkpads. I used first and second generation stamping to create some depth to the foliage. The little butterfly stamp comes from the Butterfly Blush stamp set, so useful for this kind of scene. The sentiment comes from the Life is so much Better stamp set.

My next two cards followed the same basic principles, I used a piece of fabric and stamped circles in analogous colours, (next to each other on the colour wheel), using different sized circle stamps from the sets and coloured Archival ink. I then chose some of the retro images and stamped over the top using black Archival ink.

For this first card, I used an inky plate background.

For the second card, I used a Brusho background. Matting the layers onto black card adds more definition. The sentiments are from the Say it Vertically stamp set.

My final card was a quick card created straight onto a card blank. I stamped three vases using Versafine Clair ink, which I masked with Masking Tissue. I then coloured the floral staps with Koh-I-Noor brush pens and stamped them above the vases, before removing the masks. I added a bit of shading with a grey pencil to 'ground' the vases.

I really had a lot of fun working with these stamps, and hope that you have found some inspiration in my projects. Thanks for stopping by, take care, xx


Saturday, 1 May 2021

Watercolour Backgrounds

Hello everyone, I have a few projects to share with you today, featuring stamps from last month's TV shows on the Craft Store. I really enjoyed creating these projects, as they were a slightly different approach for me. I had recently taken a watercolour course with Lucia from The Wild Ink Workshop, and these backgrounds were a result of my practices. 

I started by creating the backgrounds, using scraps of watercolour paper, drawing cartridge, etc. These are of varying size, some are really small, and very cute! I have used a mixture of Jayne Davenport watercolours and Derwent watercolours, just whatever I had in my stash.

They would make lovely thank you cards, or little notelets, I love the whole concept. I stamped the silhouette images, and added some white details with a gel pen. 

I even had a go at drawing some foliage by hand as recommended by Lucia. This was such a relaxing thing to do, and I will definitely try to do this more often, time permitting.

I created a couple of backgrounds for the larger cards to tone in with the little panels. I used clear embossing powder to stamp and emboss the silhouette flowers first, then added Distress Inks with a blending brush.

On the second example, I ironed off the embossing powder, creating a faux batik effect, so that I could stamp a sentiment over the top. (You will need to place some copy paper over your background to protect your iron, and turn the steam off, if your iron has a steam setting!)

I have added a touch of gold watercolour to link the squares together, I used Gansai Tambi metallic watercolour, which is very creamy, and perfect to layer over regular watercolour paint, the gold really pops. These cards were relatively quick to make, and would be suitable for so many occasions. Chocolate Baroque has so many silhouette stamps. If you made lots of backgrounds, and then rummaged through your stamps, you could create a big pile of cards in no time.....


Lesley and David have said that although these stamps are not on the website, you can order them by phone - Retro Vases and Retro Florals, as they were a one off for the TV shows.

My final card was created using Distress Inks for the background, and stamping a selection of stamps from Make Your Mark to build up layers of depth. I used Versafine Clair coloured ink, and added circles in black ink, which I wanted to be more prominent. I then chose some floral elements from the two Retro stamp sets.

Make Your Mark is such a versatile stamp set, we reach for it again and again to create our backgrounds and to add an extra something to our cards.

I will be back later in the month with more projects to share with you. Thanks for stopping by, take care and stay safe xx


Saturday, 24 April 2021

Florals in Reds and Golds

Hello everyone, I have a few more projects to share with you, featuring stamps from last month's TV shows. 

My first card was created using a Brusho background, I have lots of these in my stash, waiting to be used when I need them. I make a batch in lots of different colours, which I can pull out when I need them in a hurry. Very handy when I am making DT samples!

I stamped a leafy sprig from the Autumn Poppy stamp set randomly over the background. It is not an exact match to the main image, but is close enough. I coloured the image with Staedtler Ergosoft pencils, choosing a lovely olive green and soft red. These are fast becoming a favourite medium to use.

I die cut an oval and stamped the Flora Musica image, adding a bit of Distress Ink around the edges to soften the whiteness of the card. I coloured the image with pencils once more, coordinating with the colours of the background. I chose some toning ribbons to pull the project together. 

To create my second project I made a wrinkle free distress background, using Distress Inks on a craft mat, which I mopped up with a piece of drawing cartridge. I stamped around the edges with the Large Crackle Background, and added the splatter stamp from the Timeless stamp set. 

I die cut a rectangle and stamped the Crackling Rose which I coloured with pencils. The sentiment comes from the Life is so much Better stamp set.


The stamp from my final card was not actually featured on the show Song Thrush, its silhouette companion made an appearance. I made this card and so will share it as you could create something very similar. I used a tea stained background, and stamped a leafy image from Brocade Backgrounds over the top.

I stamped the main image twice, and coloured the images with pencils. I decoupaged some of the flowers before matting the layers onto brown card. The sentiment once more is taken from Life is so much Better. 

I had so much fun this month working with a lot of these older stamps. For some of you they will be brand new. It was great to revisit the images and get to use them again, mixing them with newer stamps that were not around when the stamps first came out.

Thanks for stopping by, stay safe and take care, xx


Related Posts Plugin for WordPress, Blogger...