My first project was created using drawing cartridge and Brushos. I wanted a zingy background, and chose yellow, red and orange to create the first layer. I sprinkled the Brushos first, and added water to get the lovely mixture of colours. I blotted another piece of drawing cartridge over the top, and saved that piece for another day's project. I added some stencilling using red and yellow ink, and stamped randomly over the background using the Klimt Panel cling mounted rubber stamp. I held the stamp in my hand rather than on a block to get just bits of the image here and there.
I stamped and embossed some chess pieces from The Art of Chess stamp set onto black card using gold embossing powder, and cut them out. I also stamped the sentiment onto a spare piece of my background card. I mounted the backgrounds before adding them to a tag shaped card.
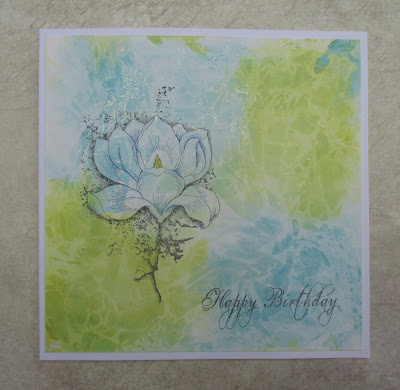
The backgrounds for the next three cards were all created in the same way, I simply finished them off in different ways. The colours are so pretty, and I really enjoyed making the backgrounds. I made a lot, and still have some left for another creative session. I used Distress Oxide Ink spread onto a craft mat, which I spritzed with water. I placed my drawing cartridge over the top, and then added some gold mica spray, giving it a generous spritz. I put some crinkled cling film over the background and left it to dry completely. When the cling film is removed, you are left with some beautiful patterns, highlighted by the mica spray. There are lots of variations for this technique out there on the Internet, so do give it a try.
For the first of the three cards, I stamped the heart from Music Fanfare five times on a pink background, and once on green. I cut the green heart in half, and edged the cut side with black ink. I stamped the large music segment twice using a toning ink, and added a piece of velvet ribbon to the background. I scrunched, then arranged the hearts into a flower, tucking the green segments behind to resemble leaves. I wanted the flower to look more 'crumpled', and by scrunching the petals first, it gives them far more texture. I added a big black button in the centre. To finish, I added a sentiment from the Loving Sentiments stamp set and matted the background onto black card.
For the next two cards, I used the beautiful Floral Grunge stamp. I used patterned papers for the first card, paper piecing the image, and adding a butterfly cut from the papers themselves. I added one of the ephemera stamps using toning coloured ink, matching the background colours. You can really see the shimmer of the mica spray in this photo.
Finally, I added a bit of pencil colouring to the image on this last card, adding some grey pencil around the flower to give some shading and to give a feeling of dimension. I chose toning colours once again, and although this was a very quick card, it would make a lovely Birthday card. I used a sentiment from the Birthday Words stamp set.
I hope that I have given you a few ideas, and that you will try out some of the projects that I have shared with you today. Thanks for stopping by, xx


