Followers

Saturday, 23 February 2019

Flowers, Butterflies, and Lots of Colour!

Hello everyone, I have a couple of projects to share with you today, showcasing the lovely Perfumery range of stamps that we aired on last month's TV shows on Hochanda. I am focusing on some of the smaller stamps in the sets this time, rather than the larger perfume bottles.

To create my first project, I stamped the rose image from the Rose Perfumery stamp set five times onto a piece of Drawing Cartridge, masking it each time. I stamped the leafy sprig in the gaps to create a wreath shape.

I added some Turquoise, Sea Green and Ultra Marine Brushos and spritzed the background with water before removing the masks. I coloured the flowers and leaves with the same colours of Brushos that I had used for the background, and added a bit of Stickles for sparkle. I stamped the sentiment in the centre, and picked out the letters with a white gelli roll pen.

To create my second card, I stamped the butterfly image from the Butterfly Perfumery stamp set onto fabric which I had gessoed three times, using Archival Ink. I coloured the butterflies with Colourcraft fabric paint, watered down slightly, and cut them out, leaving a small border.

I found a background in my stash box which matched the butterflies, and stamped a sentiment using Versafine Onyx Black ink and clear embossing powder. I attached the butterflies, and drew some stitched lines using a black permanent fineliner pen. A matching coloured card was used as matting layer.

I will be back next month, with some more fabric based samples to share with you. Thanks for stopping by, xx

Saturday, 16 February 2019

Butterfly Tag

Hello everyone, over on the Chocolate Baroque Design Team blog today, we are sharing our monthly Fifteen Minute blog post, a bumper feature which aims to give lots of tips and ideas for creating quick cards and projects in fifteen minutes or less. I have a project within the blog post, a tag, and am sharing it here as well.

I have made a quick tag, which could be added to a gift, used as a bookmark, or added to a card. I have used a scrap piece of background from my stash to make the tag, which was coloured with blue and purple Distress Inks, (a favourite colour combination), and water, then sprinkled with salt and left to dry.  I stamped and embossed the butterfly border from the Butterfly Perfumery stamp set over the top and coloured it with Inktense pencils and a waterbrush. I chose two sets of contrasting colours for the butterflies, both of which worked well with the background. I added a sentiment, which had been stamped onto a piece of scrap card that I had coloured with the same colours of Distress Ink. I distressed the edges and inked them with Seedless Preserves Distress Ink. I distressed and inked the edges of the tag, and added a complementary ribbon through a hole that I had punched at the top.


The butterfly border is straight, but on my tag, I was going for a more curvy effect, it has worked quite well. I will be back soon with more projects to share with you. Thanks for stopping by, xx


Wednesday, 13 February 2019

Masculine Birthday Card

Hello everyone, I have needed to make a couple of masculine Birthday cards lately, and thought that this great image from France's Kevin and so was just ideal. It reminded me of someone sat in front of the TV in their comfy armchair wearing their favourite slippers.

I created a wrinkle free distress background using shades of blue, yellow and green Distress Ink first of all. I stamped the image using dark brown Archival ink onto a smaller piece of card, edging the background with Fossilized Amber Distress Ink, to take away the whiteness of the card. I coloured the image with Inktense pencils and a waterbrush, adding shading with darker colours afterwards, for more depth. A lttle bit of grey pencil around the chair legs and the foot helps to ground the image.

I added a sentiment using the brown ink as before, straight onto the background. I edged both pieces of card with blue ink before constructing the card.

This is such a fab, quirky image, my Father-in-Law laughed out loud when he opened his card! Thanks for stopping by, xx


Saturday, 9 February 2019

The Smell of Perfume in the Air

Hello everyone, I have a couple of cards to share with you showcasing the beautiful stamps featured on last month's TV shows on Hochanda.

For my first card, I wanted to show how to 'colour' the perfume bottle using the background paper. Lots of perfume bottles are made of lovely coloured glass, and this was the look that I was going for. I made two pieces of background paper using drawing cartridge, sprinkling Red, Yellow and Orange Brushos on one of them, spritzing it with water, and pressing the other piece of drawing catridge on top. I set the pieces of drawing cartridge to one side to dry.

I die cut an oval, and stamped the main image from the Butterfly Perfumery stamp set , stamping it again onto a piece of spare card. I coloured these images with Koh-I-Noor pencils, choosing colours to match the Brusho background, and cut out the butterfly and flower from the spare image. I also stamped the perfume bottle area onto the second piece of the Bruso background and cut that out. I decoupaged all of the elements onto the die cut oval.

On the first background, I stamped around the edge with the silhouette swirl to create a bold border. I attached the oval to a slightly larger black oval, before adding to the Brusho background. A black mat finished the card.

To create my second card, I made a winkle free distress background on drawing cartridge, using Distress Inks and water. I chose Fossilized Amber and Shabby Shutters to colour the background. I stamped the little leafy sprigs over the top, and coloured them with Distress Markers.

I die cut a rectangle of card, and stamped the main image from the Floral Perfumery stamp set, and stamped the image again onto spare card. I coloured the images with Distress Inks and a water brush. I cut the flowers from the spare image, and decoupaged them onto the main image. I added a sentiment, and a hand drawn border with a fineliner pen to finish.

These images are suitable for so many occasions, and so I have deliberately left them either without a sentiment, or fairly generic. They would make great Birthday cards, Get Well, or beautiful Mother's Day cards, what do you think?

I will be back later in the month with more projects to share, thanks for stopping by, xx


Monday, 4 February 2019

Cup of Tea Anyone?

Hello everyone, I hope that you are keeping warm, and looking forward to longer, lighter days to come. As you read this post, I will be at Hochanda with Lesley for two days of TV shows, I hope that you will be able to catch the shows, as we have some lovely demos and great products to share with you. The Design Team have made some beautiful samples again this month.

For my post today, I am sharing some projects that I demonstrated on last month's Anniversary show on Hochanda, using the fabric panels. If you caught the shows, you will have seen these samples during the afternoon show. My first project was unfinished at the time, and I have now made it into a useful book cover, and I thought I would share a few photographs with you. Katya is from the set of 3 Ladies fabric panels.

I coloured the fabric panel with tea first of all, dipping the whole thing into a bowl of the warm liquid, and gently squeezing out the liquid, and letting the panel dry. You can decide how dark you want the panel to be, by dipping the panel more than once, or leaving it to soak a bit more.

Once the panel was dry, I coloured the image with Inktense pencils, and blended them with a waterbrush, to give a watercolour effect. The whole effect looks very vintage, which is exactly what I wanted. I like the blotched effect that the tea has given, as if the fabric is old, and has been in storage for a long time.

I created a book cover by adding some felt wadding, and two pieces of contrast fabric to make a 'sandwich', using a journal as my template. I turned the ends in to make the inside flaps, and hand stitched those in place. I really liked this red floral fabric, as I felt that it created a folk art feel to the project.

I will be able to reuse the cover once I have finished with the journal. The wadding makes the cover feel very luxurious. Katya's headdress would be fabulous for embellishing with beads and lace, you could really have lots of fun with this image. I have left it fairly plain, but why not have a rummage through your stash and see what you have that you could add to create lots of texture?

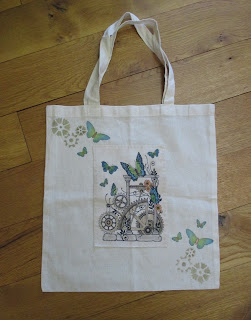
My second project is a canvas bag, from the Timeless set of fabric panels, that I showed as a finished example on the show. I had already coloured the Steampunk image with Inktense pencils as before. The panel had been dipped in tea, but I had created a lighter finish, which teamed up with the canvas bag perfectly. I used a blend of pencil colours to create a stone and metallic finish, so easy when you are colouring. I used green, orange and brown for the metal, to give a rust-like appearance.

On the bag itself, I used a couple of stencils, Tando Mini Cogs, and Chocolate Baroque Mask- Kaleidoscope of Butterflies to create a background. I used Inktense pencils, colouring through the stencils, and then used a waterbrush to spread the colour. I placed a piece of paper inside the bag to protect the reverse of the bag while I was working.


I decided to outline the butterflies with a permanent marker for a bit more definition.

I simply hand stitched the panel to the bag, but could just as easily have machine stitched it to the bag. I hope that you have enjoyed my projects, and reading about how I put them together. I will be back later in the month with more projects to share with you, thanks for stopping by, xx


Related Posts Plugin for WordPress, Blogger...