Followers

Showing posts with label Butterfly Dreams. Show all posts

Tuesday, 13 December 2016

Greyboard Tag

Hello everyone, I have a last minute Christmas project to share with you that could be suitable as a memento to send to someone, or as a piece of decor to place on a shelf or mantlepiece. I have used some of my favourite stamps from Chocolate Baroque to create this piece, along with one of the newest Christmas stamps as well.

I took a large Tando greyboard tag, and spritzed it with a variety of green, blue and purple Decoart Media sprays, adding a touch of white to tone down the colours slightly. I added a sentiment from the Christmas Sparkle stamp set, and a flourish from the Butterfly Dreams stamp set, using Versamark and silver embossing powder. I stamped an image from the Pears and Baubles stamp set onto a spare piece of coloured card, which I found in my scrap box. (I had previously coloured the piece of card with Brushos, using the same range of colours). I used the same colour embossing powder as before. I attached the image to the tag using 3D foam pads for added dimension.

Finally, I added some pale green gilding wax to the edges of the tag, and attached some toning ribbon through the hole at the top.

As a tip, I added some coloured paper to the reverse of my tag as well, because I did get a small amount of ink on the back. This means that it looks much nicer, and will enable me to write a message if I want to. I used a piece of gelli printed paper from my scrap box.  


Thanks for stopping by, xx

Wednesday, 15 June 2016

Paisley Butterfly

Hello everyone, it's time for a brand new challenge over on the Chocolate Baroque Challenge Blog this week, and I am providing part of the inspiration using the scrumptious new colours.

I created my background by adding some Squeezed Lemonade Distress Ink to the centre of a piece of smooth watercolour paper, before placing my stencil onto the background. I then added Fossilized Amber, Ripe Persimmon, and Fossilized Amber again in bands radiating out towards the edge of the background. With the stencil still in place, I spritzed some gold shimmer spray over the background, and then removed the stencil. I dried the background with a heat gun.

I stamped around the edges with a small leaf design from the Nature's Paisleys stamp set, using Plum Archival Ink. I added the body of the large butterfly from the Patchwork Butterfly stamp set in the centre of the stencilled area, by masking off the wings, and inking only the body and antennae, and then removing the masking tape before I stamped the image.

I coloured a scrap piece of card with Shaded Lilac Distress Ink, and dried the card thoroughly with a heat gun. I then stamped a large paisley design using Plum Archival Ink, adding clear embossing powder over the top. I repeated this until I had four images. I stamped the paisley design onto a scrap piece of paper and drew a paisley shape arpund the image to create a template for the butterfly wings. I used the template over the top of the four Plum images on the lilac card, drew around the areas and cut them out. I added some shading around the edges of each wing with Seedless Preserves Distress Ink. I stamped an extra butterfly body onto a piece of card that I had coloured with Fossilized Amber Distress Ink, and cut it out.

I assembled the butterfly using dries clear glue, adding the extra body over the wings. I added a sentiment from the Butterfly Dreams stamp set. I used Seedless Preserves Distress Ink to add some shading to the edge of the background before matting it onto to some plum card, and then onto a large white card blank.

I hope that you will pop over to the Challenge blog to see the rest of the Design Team inspiration, check out the new colour swatch, and join in the challenge, you could win a £15 voucher to spend at Chocolate Baroque!
Thanks for stopping by, xx


Saturday, 16 April 2016

Pan Pastel favourites

Hello everyone, I am revisiting a couple of my favourite stamp sets today; Butterfly Dreams and Loving Sentiments.  I have chosen to use a couple of the smaller stamps to create backgrounds, using Pan Pastels to colour my card first, and then stamp the images over the top. This always seems to give a lovely crisp impression.

For my first card, I have used some linen textured card, and shades of green and purple to colour the background, before stamping the leaf image using Versafine Olympia Green and Archival Pum Ink over the top. I coloured a smaller piece of card in the same way, and stamped a sentiment using Olympia Green as before. I added burgundy card as a matting layer for the linen card.

I chose a piece of smooth card to colour with the purple shades of Pan Pastel, and then stamped a butterfly from the stamp set over the top, using Versafine Onyx Black Ink. I cut the image out, and added some flower stamens to replace the antennae.

For my second card, I coloured a piece of smooth card with turquoise Pan Pastel, and then stamped another leafy image over the top with Versafine Deep Lagoon Ink. Using Versamark Ink, I stamped the large flourish, and added a dark blue Pan Pastel to the image.

I coloured another smaller piece of card with the turquoise Pan Pastel as before, and stamped a sentiment. I added a few flat-backed gems to finish.
Don't forget to keep visiting the Design Team blog, where my team mates are revisiting their favourite stamps all month. Thanks for stopping by,  xx

Saturday, 3 January 2015

Everyone should have a Heart

Hello everyone, I hope that you all had a good Christmas and a very Happy New Year.  I am working with the Punky Hearts and Fluttering Hearts stamp sets this month, and want to show you how versatile these sets can really be.

My first card is a very quick card for those occasions when you do not have much time to make something. I stamped a large flourish from the Butterfly Dreams stamp set onto a small square card using Versafine Vintage Sepia Ink. On a piece of scrap paper from my stash, I stamped the apple and half of the butterfly from the Fluttering Hearts stamp sheet. I used Distress Markers to ink the stamps, enabling me to get the multi-toned effect. I also stamped a half butterfly directly onto the card. I cut the images out and attached them to the card, and finally added the sentiment in the bottom corner.
 My next card is again very CAS in style, as I wanted to create a masculine card suitable for an Anniversary or Valentine's card. I masked off a large area of the background, leaving only a horizontal strip showing, and then stamped the area with the floral heart using black ink, covering it with clear embossing powder. I then added some colour using three different tones of Distress Inks, before removing the paper masks. I stamped and embossed the heart once more onto a piece of kraft card, before cutting it out, and adding it to my design with 3D foam pads. Finally, I added a sentiment from the Words of Love stamp set and matted my background onto black card.
 My last project is a mixed media tag, using a real mixture of stamps, which I love to do when creating my projects. I already had the tag in my stash, coloured using the wrinkle free Distress method in a mixture of blues and greens. I had used the tag to mop up some spare ink on my craft mat left over from another project, rather than just waste the ink.

I took some Pearl Soft Form Relief Paste and added some Brusho powder to it on my craft mat, using a palette knife. Once the colour was mixed thoroughly, I spread some of the paste over my chosen stamp, the large steampunk heart, and left it to dry overnight. I used some of the left over paste through a stencil onto the tag. (I actually had enough to do another tag as well, waste not, want not!) There is a brilliant review of this product written by Lesley on the Chocolate Baroque website that you can read if you want to know more about it: Testing the new Soft Form Relief Pastes.

Once the paste was dry, I carefully peeled the stamp away from the heart shape, and started to change the colour, as it was too bright for my project. I added some black acrylic paint, just a small amount, almost dry brushing it onto the heart shape, and the harlequin area of my tag. I then added some gilding wax to help create a patina effect. I gave the areas a good buff with some kitchen towel.

To complete the background of my tag, I stamped a script stamp from the Eccentric Edwardian stamp set, using jet black Archival Ink, and the thistle artichoke from the Mellow Fruitfulness stamp set. I added some chain and jump rings for some added texture.  

 I hope that I have given you some inspiration with my projects. Thanks for stopping by, Judith xx

Wednesday, 31 December 2014

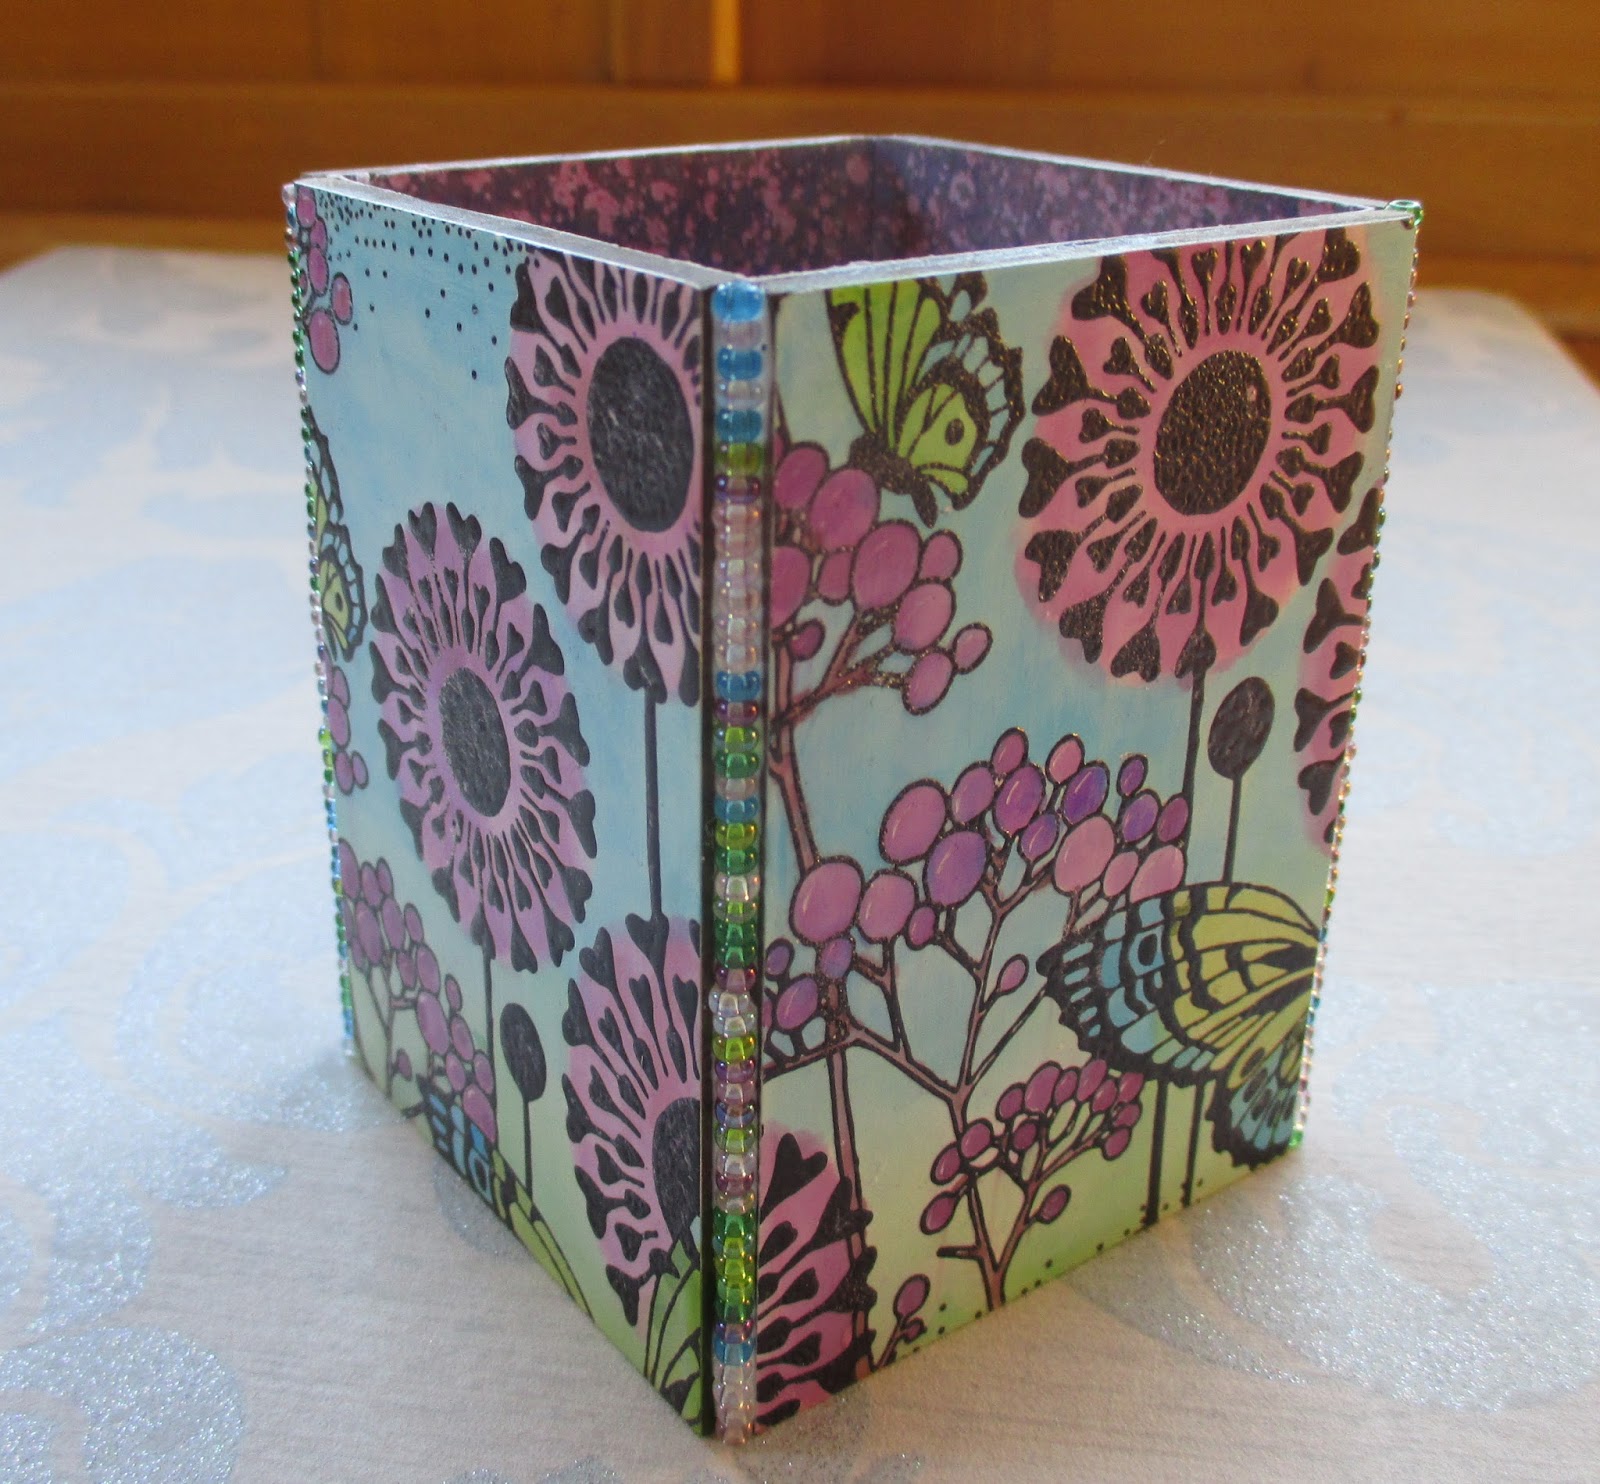
Stampbord Pencil Box

Hello everyone, it is time for another week on the Chocolate Baroque Challenge Blog, and this week, it is time for me to share a tutorial with you. I first made one of these little pencil boxes with Glenda many years ago, and love how easy they are to put together.

Ingredients:

4 pieces of Stampbord 2.5" x 3.5"
1 piece of mountboard 2.5" x 2.5"
A piece of patterned paper 3.5" x 10.5"
Butterfly Dreams stamp set
Archival Jet Black Ink
Brushos
Waterbrush
Palette
Glue
Seed beads on a string.

Instructions:
  1. Stamp the four pieces of Stampbord each with a different part of the large stamp from the stamp set, using Archival jet black ink and emboss with clear embossing powder. (I found it easier to place the stampbord on the stamp, not the other way around).
  2. Colour the images using Brushos, mixing the powders in a palette using a water brush.
  3. Stick the patterned paper across the back of the Stampbord, overlapping the join slightly.
  4. Run a line of glue around the edge of the mountboard and slide it into the bottom of the pencil pot. Allow the glue to set.
  5. Run a line of glue along each outside corner and lay the seed beads on the glue, pulling the thread out slowly, to keep the seed beads nice and straight.
(Optional) Apply a thin layer of matte medium over the Stampbord to protect the surface, being careful not to over work the medium, or it will cause the colours to run.

I hope that you will give this project a try as it is such fun to make. There is more inspiration from some of my Team mates on the challenge blog, so please take a look. Thanks for stopping by, Judith xx

Monday, 11 August 2014

A Pear of Christmas Trees!

Hi Folks, I have some Christmas cards for you today, using the lovely selection of seasonal stamps currently on offer at Chocolate Baroque.

My first card uses stamps from the Snowy Scenes/Turtle Doves multibuy stamped onto green paper using white embossing powder. I added tiny red gems to the tree and snowflakes for a little bit of Christmas bling. To complete the background, I added a stamp from the Nature Fragments stamp set, stamped in Cottage Ivy Memento ink. I also stamped a sentiment from the Christmas Magic clear stamp set in the same colour onto a piece of scrap paper. I edged all of the pieces of paper with green ink and then matted them onto dark green card before assembling my project.


My second card was created by stamping a large ornate pear from the Pears and Baubles stamp set onto my background using Rich Cocoa Memento ink. I coloured the pears using a mixture of green and yellow Distress markers and a waterbrush. I filled in the background between using my Stormy Sky Distress marker pen and a waterbrush, I made the background very watery using a wide waterbrush where possible. The main image was stamped onto a die cut piece of card using gold embossing powder, and coloured in with the marker pens in the same way. I edged the background with Stormy Sky Distress Ink. I added a large flourish from the Butterfly Dreams stamp set, using gold embossing powder.

I matted the layers onto dark brown card and added a piece of dark brown organza ribbon to finish. I hope that these two cards have given you a little bit of inspiration. I always enjoy mixing the new stamps with some of the other stamp sets already available. Thanks for stopping by, Judith xx


Saturday, 11 May 2013

Punky Butterflies


Hi Folks, here's another sample using those fabulous Punky Flowers from Chocolate Baroque. I've been using the Dylusions sprays to make my backgrounds again, this time I used some zingy pinks and yellows. I stamped some of the large flowers onto the large background with Distress Inks, and then swiped the edge with some pink to give it a darker border.

I stamped a focal flower onto the circle, and bleached the flowers so that I could colour them with my Polychromos pencils. I added some stamped coils along the bottom of the circle in gold and silver embossing powder. I made two butterflies using petals from the same focal flower, and added metal corners for their bodies, and coiled wire for their antennae. The sentiment comes from the Butterfly Dreams stamp set.


Watch out for my next sample, it's a bit different! Thanks for stopping by, xx


Sunday, 10 April 2011

Chocolate Baroque Giveaway

Hi folks, happy Sunday to you all! I hope the weather is as lovely with you, as it is here. I'm here to tell you about a great giveaway over at the Chocolate Baroque Design Team Blog Glenda is giving away three sets of stamps,

Doodle Butterfly


Doodle Birds


Butterfly Dreams


To be in with a chance of winning a set of one these fabulous stamp plates you need to leave a comment either on the Design Team blog, or on one of the Design Team members' blogs, that includes mine! Glenda will then choose random commenters to receive the prizes.
You've already seen some samples on my Blog using these lovely stamps, but here is another one for you today.


I wanted an opulent feel to my card, so I stamped my bird onto the reverse of a metal oval, and embossed each line with an embossing tool while resting on a soft mat. I turned the oval over, and refined the lines. I then used alcohol inks to colour the metal, and gently swiped the raised areas with gold.
I created a tag by stamping a peacock feather in black Stazon Ink on an acrylic tag, and applying metal leaf to the reverse.
I used gold mirri card to mat my Artylicious backing paper, and my metal oval, and hung the tag from a piece of teal ribbon, using jump rings.
Thanks for stopping by today, and don't forget to visit the other Design Team members' blogs to see what they have been up to, Judith xx


Related Posts Plugin for WordPress, Blogger...