Followers

Saturday, 17 November 2012

Snowy Trees

Hi Folks, just a quick post to show you some batch cards and tags that I have been making for Christmas. I have made some masterboards using white embossing as a resist, then covered the backgrounds using the wrinkle free distress method. I blended Distress ink over each snowflake using Cut 'N' Dry foam, to make them really pop.

I left the end third of each background free from embossing, and cut my ovals from that section. I then stamped the trees with dark brown ink, and once this was dry, embossed the image with white embossing powder, offsetting the image slightly. This makes the trees look like they are covered in snow. This is the beauty of clear stamps, as you can line them up exactly, then move them just a tiny bit, before placing them down again.


I cut some tags and co-ordinating strips for the Christmas cards from the remaining pieces of card. I layered the ovals onto toning scalloped ovals, and stamped a sentiment taken from the Warm Christmas Greeting stamp set onto each card.


Once I had created the background card, these projects were very quick to make. These are perfect at this time of year, when as a crafter, I need to have lots of items in my storecupboard to send to friends and family.

 I hope that I have given you some ideas using these stamps anyway. Thanks for stopping by, Judith xx


Wednesday, 14 November 2012

Leafy Zentangle Butterfly

There are some lovely leaves on the Tangled Garden stamp set, just released at Chocolate Baroque and I wanted to make a feature of a few of them in this design. I decided to create a rambling frame, by stamping and masking them around the outside of the background, which I had painted with Ecoline ink. I then linked the leaves with small areas of tangled designs. They are simple twirls and dots, not very complicated at all.

I coloured the leaves with pencils. I then stamped the Butterfly onto a spare piece of card and coloured it with pencils as before. I added some wire and some toning pearls for antennae. I stamped a sentiment taken from the 'Patchwork Butterfly' stamp set onto the background to complete the card.


I love using butterflies in my card making, and I think that this one will become a firm favourite. Thanks for stopping by, xx

Tuesday, 13 November 2012

Autumn Fairy


Hi Folks, I've had a chance to do a bit of crafting today, and decided to ink up a couple of unused stamps. I've wanted to use these stamps for a while, but just haven't had the time. They are both from Designs By Ryn, a Canadian Company, and Ryn the owner and designer, sells some fabulous stamps.

I coloured the fairy, and used a bit of artistic licence, making her little friend a red squirrel, using Polychromos pencils. I used rich Autumn colours, our trees are still covered in these shades and are really stunning at the moment. I stamped the background with the Circle cluster set, using Crushed Olive Distress Ink. I then made a flower using handmade paper cut from Nestability shapes, and a couple of leaves, using the Sizzix Tattered Leaves die. I inked the shapes using Distress Ink, spritzed them with water, and crinkled them, before heat setting them with a heat gun. I added a brad to the flower, which I coloured with Pesto alcohol ink to achieve the perfect colour.


This card is going to someone as a Birthday card, so it is already on its way to the recipient.

Thanks for stopping by, xx


Monday, 12 November 2012

Recycle/ Anything Goes

Hi Folks it's time for another challenge over at the Artistic Inspirations Challenge Blog and the theme this week is Recycle/Anything Goes.

I have chosen to make a Christmas card using a great image from one of the sponsors this week, Robyns Fetish.I printed the image and coloured it with my Polychromos pencils, before cutting it out. I layered the image onto some cardboard packaging from a box that held Milk cartons. I stripped off the top layer of paper, and sanded any remnants away, revealing the ridged surface. I edged the card with Tarnished Brass Distress Stain. I also used a piece of ribbon left over from a flower arrangement, which I laid over the top of the ribbed card.

The background paper is a digital download from Chocolate Baroque called 'Holly Tumble' it is really pretty, and the colours suit my project perfectly. I added a sentiment from a clear stamp set, also from Chocolate Baroque, and edged the tag and kraft background with cranberry adirondack ink.

There are some great prizes on offer this week on the blog:

Sassy is offering the Winner 4 digis of their choice

Teri is offering the winner 4 digis of their choice

Susan is offering the winner 5 digis of their choice

So why don't you hop along to the blog and see what my design team mates have made, and have a go at making something yourself? It can be any kind of project, a card, tag, box, altered item, whatever you like.

I am entering my card into the following challenges:
Robyns Fetish Anything Goes
Southern Girls Challenge Thinking About Christmas
Through the Craft Room Door Anything Goes

Thanks for stopping by, xx


Saturday, 10 November 2012

Autumn Leaves

It doesn't really feel like Autumn now, more like Winter really, but the colours are really splendid. We live in an area surrounded by forests, whichever direction we drive. The trees are just beautiful at this time of year in their various cloaks of gold, copper, rust, and bronze, it is really spectacular. Soon, the branches will be bare, and they will look a bit forlorn, but for now, I am enjoying the leafy firework display whenever I venture outside the warm house.

I have made a card using a new stamp set from Chocolate Baroque, called Terrific Treescapes, which tries to reflect this time of year. I have also incorporated one of my favourite all time sayings from the same company, I just love this phrase. I used Pan Pastels for my background, and then stamped two of the tree images over the top. I took some of the small Sofft sponges, and picked up colour and dotted it across the trees to try and give the impression of leaves blowing in the wind. I have also created a carpet of leaves on the ground, underneath the trees. I then took a leaf from the Sunny Sunflowers stamp set, and stamped this across a piece of Kraft card in various Autumnal colours. I also edged the card with ink to give it a border.


I am going to enter my card into the following challenges:

JellyPark Challenge Back To Nature
Do You Stack Up Leaves and Trees
Pixie Dust Studio Fabulous Fall Colours
Simply Create Anything Goes
Crafting For All Seasons Falling Leaves

Thanks for stopping by, Judith xx


Thursday, 8 November 2012

Monochrome Blossom

Here is another sample using the Tangled Garden set of stamps from Chocolate Baroque I've used the large open blossom, and filled the petals with various zentangle patterns, using a Micron pen. I stamped the image three times, to create a layered effect, and coloured the petals with watercolour pens and a blender pen. I've added white highlights.

I drew a freehand addition myself in the form of a swirly stem, and added an aura around the outside. I then coloured this with pens as before. By using the blender pen with watercolour pens, it gives a lovely variation of shade, especially in larger areas.

I used a piece of black card to mat my design, and then placed this onto a cream textured card. I added some flat-backed pearls to finish.


I'll be back soon with another sample, thanks for stopping by, xx

Saturday, 3 November 2012

Zentangle Butterfly

Here's a Design Team sample that is posting on the Chocolate Baroque Design Team Blog today. I have used a large butterfly stamp from the new stamp set 'Tangled Garden', that I mentioned in my previous post.

The full details of how I created the card can be seen on the design team blog page. Basically, I have created a wrinkle free Distress background after masking off the string, and edges of the background. I have then drawn the Zentangle patterns in the white areas, and coloured the designs with watercolour pens using a blender pen.I coloured the butterfly and flower the same way.


I find the process of tangling very relaxing, and have really enjoyed working with these stamps. I'll be back in a few days with another sample. Thanks for stopping by, xx


Friday, 2 November 2012

A piece of ZIA


There are some gorgeous new stamps over at Chocolate Baroque right now and I've been busy making samples with them for the Design Team blog However, here is a project that I made just for fun.

I drew a frame on a piece of watercolour paper, this is a piece of HOT pressed watercolour paper, and is very smooth. It is ideal for this type of work, as the pen flows very easily across the paper. I stamped the large flower onto the paper, and then made a mask using Eclipse paper, which I placed over the flower, once the ink was dry. I stamped the leaf image twice, and removed the mask. I stamped a couple of small dragonflies onto the background, and then filled the remaining area with the Tangle pattern Florz. I used a filler design inside the frame.

I stamped a couple more large flowers, and a butterfly image onto a spare piece of watercolour paper, and filled in some of the areas with tangle patterns. I then coloured the designs in with pencils, and cut them out before assembling the project.


I'll be showing you a few more designs using these lovely stamps over the coming days, so please  keep popping back.


Thanks for stopping by, xx

Monday, 29 October 2012

Vintage Elusions challenge Fantasy/Anything Goes


Hi Folks, it's time for another challenge over on the Vintage Elusions Challenge Blog and the theme this week is Fantasy/ Anything Goes. I have been working with a great image from a company called Gingerloft Designs. I decided to go for a one layer card, with postage very much in mind, it costs so much these days, doesn't it? However, I could easily enhance my design, with addition of some extra leaves and flowers if I was going to hand deliver the card.

I started by printing the image onto card, and then stamping some stars onto the white space using Matte Medium. I allowed this to dry, before I used various colours of Distress Ink over the top. The Matte Medium acts as a resist, and causes the stars to show as white against the background. I used a small star cluster fom Lavinia stamps to stamp randomly inbetween the larger stars. The large word stamp is also from Lavinia stamps. I have then simply coloured the image with pencils.

I like the fact that I could use this card for Christmas if I wanted to, or for a general Birthday card, it will be a useful addition to my storecupboard card collection.

Tami is offering 3 Digis of the Winner's choice

 
Heather is offering 3 digis of the Winner's choice


There are some great prizes up for grabs this week from our sponsors on the challenge blog, so why don't you hop over and take a look? See what my team mates have been up to as well, and try and make something for the challenge. It can be a card, an altered item, a tag, whatever you like.

Thanks for stopping by, xx


Tuesday, 16 October 2012

It just goes to show....


Hi folks, I've got a couple of samples to show you using the new Gothic Fragments stamp set recently released by Chocolate Baroque This is a great set of stamps with fragments of church windows, spires, and elements of stonework taken from Gothic buildings. They are so versatile, and can be used for lots of occasions.

When I received the stamps, I could see the potential for Halloween, Weddings, and Christmas straight away. Yesterday, one of my Designs was posted on the Design Team Blog which is based on a Christmas theme. I have a couple more samples to show you today.

The first one is perfect for Halloween, as I have created a stormy night scene around a couple of the spire top stamps.  I stamped one of them, then masked it before stamping the other one twice. I created a deliberately troubled sky, by not blending my ink colours as smoothly as I would do normally, then coloured the spires in with pencils. I added a little owl to one of the spires, and the word 'Spooky' taken from one of the new Halloween clear stamp sets. Some cobwebs in the bottom corners add to the creepy effect. The building that I have created reminds me a little bit of Notre Dame, and I have given the central spire a touch of a verdigris feel for contrast.

My second card has a completely different finish. I wanted to make a Wedding card, with a clean and simple feel, so I used some cream pearlescent card as a base, stamping a large flourish with white embossing powder. I made a chiffon flower, which I like to add to special occasion cards, and stamped some leaves onto vellum. These came from the Sunny Sunflower stamp set. I stamped the long window onto a piece of watercolour paper, and then coloured it with Distress Markers and a water brush.

So it just goes to show, how versatile a set of stamps can be!
Thanks for stopping by, xx


Monday, 15 October 2012

Vintage Elusions- Ephemera/Anything Goes

Hi Folks, it seems an age since I last posted on my poor neglected blog, but a lot has happened since my last post. As usual, I have been dotting about all over the place, visiting various family members and I even managed to fit a couple of Craft Shows in as well! This weekend, I went to the Big Stamp and Scrapbooking Show at Kettering, organised by Creative Expressions. It's a brand new show, a sister to the one that they run at Ally Pally every year. It was a great show, in a roomy venue, that is really easy to get to. It's a doddle for me from where I live, making a change from the longer journeys that I normally undertake to reach the quality shows. There were some great exhibitors there, as you would expect, and I also met up with two of my special craft buddies, which was another bonus. The third one was unfortunately out of the country, so she couldn't be with us sadly, but she is taking a very well-earned break.

Another development lately, which some of you already know about, is that we have taken on two seven week old kittens. Their Mum died when they were two days old, and they have been hand-reared. They are absolutely gorgeous, but they are keeping me on my toes! We have called them Poppy and Cody:

They are so sweet, but very different in character. Poppy, the little black cat, is the mischievous one; she is into everything, the first to play with a new toy, or to investigate something. Cody, who is slightly larger, is a bit more timid, and watches her first, to suss things out, then he will give something a try.

Their Mum was a British Blue, grey with blue eyes, I am hoping that they will both keep their blue eyes, but we will see. My older cat is not so keen on them at the moment, but we are taking the integration slowly, and giving her lots of fuss.

Anyway, onto today's project! I have made a card using two images, a treasure map from Delicious Doodles, that I have printed in sepia onto a piece of prepared watercolour paper. My printer takes 300 gsm thickness card without jamming, which I really like. I had already coloured the paper with Distress Inks, and dried it before printing the map. I then cut the image out, and stuck it onto a piece of brown card. My second image is from Sassy Studio, of Captain Jack Sparrow, which I have printed out and coloured with Polychromos, adding lots of Dark Sepia to everything, to make him look particularly shabby and a bit grungy. He always looks like he could do with a good bath in the films! I have then added a playing card with the letter 'J', and a dagger charm in one corner, then a few coins in the opposite corner.


Please pop along to the Vintage Elusions Challenge Blog to see what the rest of the team have made. There are some great prizes up for grabs again this week:

Sassy is offering the winner four digis of their choice
Susan is offering the winner four digis of their choice
Teri is offering the winner four digis of their choice

The theme this week is Ephemera/ Anything Goes. You can make a card, tag, altered item, whatever you like. If you are unsure as to what Ephemera means, then think of it as something that you would not normally collect, save, cherish or keep. For example, ticket stubs, game pieces, playing cards, dominoes, office objects, old maps, postcards, packaging, wire, feathers, leaves, etc.

Thanks for stopping by, xx


Wednesday, 3 October 2012

Vintage Elusions challenge-Wings

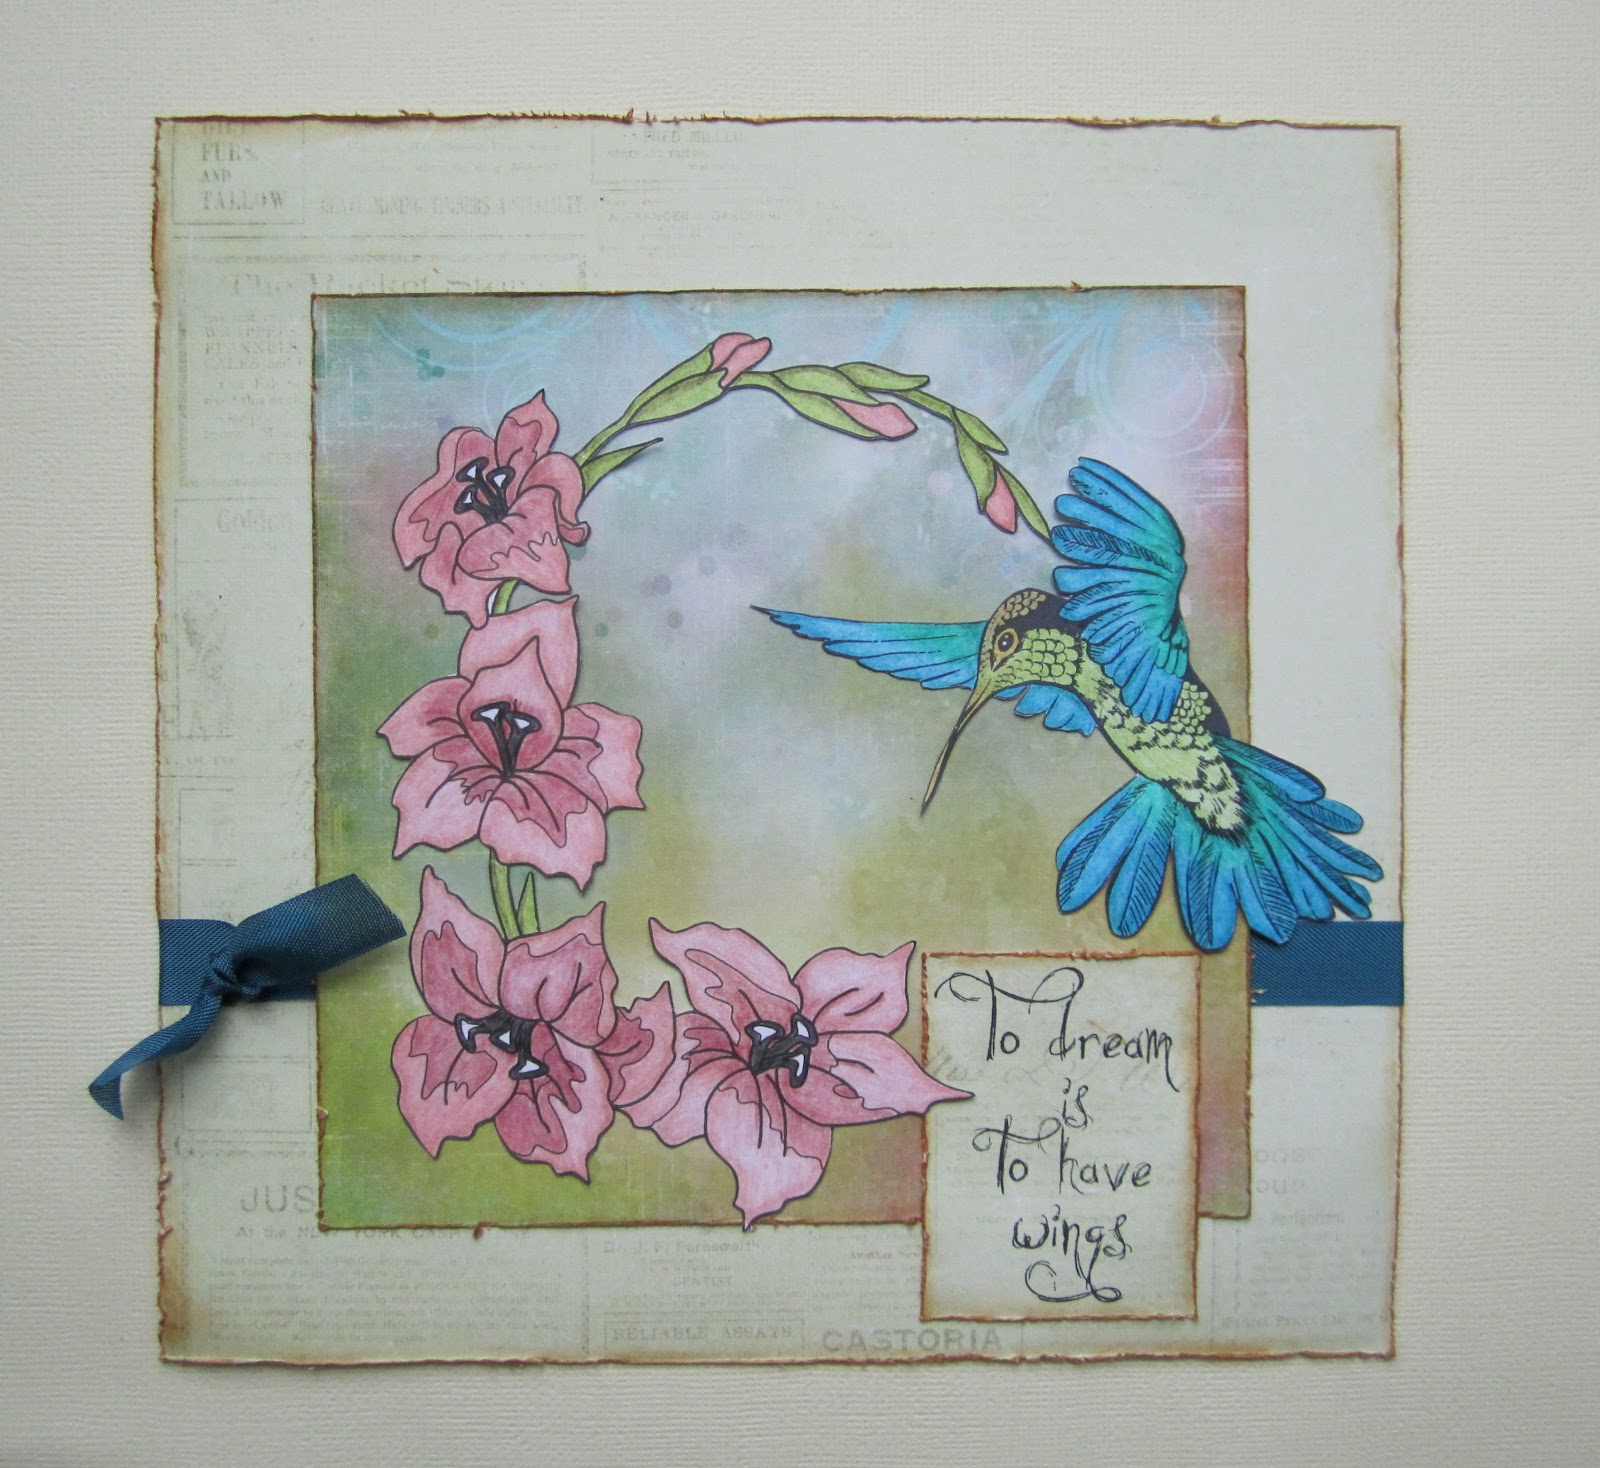
Hi Folks, well I'm back from my travels again very temporarily, and I'd just like to show you what I made for the challenge this week over on the Vintage Elusions Challenge Blog The theme this week is 'Wings/Anything Goes, so if you don't fancy making anything with a wings related theme, you can make whatever you like! You can make a card, tag, altered item, a mixed media project, whatever you like to make, can be entered into the challenge. Please pop along to the blog to see what my Design Team mates have made this week to inspire you. My own project is a little late going on to the blog, as I have only just arrived back home, and I couldn't upload it to the blog, but it's going on there shortly.

I have made a card this week, using an image from Delicious Doodles. It is a floral frame, which I have coloured with Polychromos pencils. I have used some fabulous backing papers from Prima, which I have layered after distressing the edges and colouring them with Tea Dye Distress Ink. I have also stamped a lovely Hummingbird image from Designs by Ryn, also coloured with Polychromos. The sentiment is one from Stamp Camp, which I bought on my recent visit to Happy Stampers.

I simply used a piece of the left over backing paper to stamp the sentiment. It's a lovely pale green with script stamped randomly all over. The main backing paper is taken from the new 'Firefly' collection. Those papers are gorgeous, and I can see myself using every single one of them.

As usual there are some great prizes on offer on the challenge blog:
Teri is offering the Winner 4 digi images of their choice
Susan is offering the Winner 5 Digi images of their choice
Keilly is offering a £10 voucher to spend in the shop

Thanks for stopping by, xx


Related Posts Plugin for WordPress, Blogger...