Followers

Monday, 12 October 2020

Blueprint Flowers

Hello everyone, I have more projects to share with you today using the beautiful blueprint floral stamps from last month's one day special on Hochanda.  My first two projects were both made using the Chrysanthemum Blueprint stamp set, and although I have used lots of the same stamps, I have used very different surfaces to stamp on.  

To create my first card, I coloured a piece of Drawing Cartridge with Distress Ink, and then stamped the images using Orange Blossom Archival Ink. I took a whiteboard heart, and added some Distress Ink around the edges, before stamping the main image onto the heart. I coloured the image with Koh-I-Noor Polycolour pencils. I added some green ribbon to finish.


To create my second project, I used a piece of Drawing Cartridge stained with tea for a vintage look. I stamped the images with Archival Potting Shed Ink, choosing lots of the smaller images from the stamp plate to create a collage feel. I then stamped the main image onto a piece of cotton fabric, and coloured it with Inktense pencils. I ran over the image with a waterbrush afterwards, to make the colour permanent.


My next two projects were both created with the Allium Blueprint stamp set. I wanted to create a lovely vibrant background for the first card, and chose Distress Oxide Inks, which I applied to Drawing Cartridge. I stamped the image and coloured it with pencils. I chose to split the sentiment, and did this by covering the unwanted half with masking tape before inking the stamp each time. I used a spare piece of the background Drawing Cartridge, picking up some of the Distress Oxide Inks from my craft mat, but made it slightly paler for this purpose. I matted all of my card pieces with black card so that they stood out from one another.

My final card uses a softer colour palette of pale green and purple. I used second generation stamping on the background to allow the foreground image to be the focal point. I used purple Archival Ink to stamp the images and sentiments, which made an unusual change. I edged all of the layers with the same purple ink.

Thanks for stopping by, I will be back later in the month with a couple more projects to share with you. 

Take care and stay safe, xx



Thursday, 1 October 2020

In the Frame

Hello everyone, I have a couple of projects to share with you today showcasing some of the the amazing stamps that Lesley brought to Hochanda during the one day special last month.


My first card looks very simple, but took a little planning. I used a scrap piece of paper first to make sure that it worked, and that would always be my advice to you if you want to try an idea. I cut a piece of paper to the size of my finished card and stamped out the four corners to work out where they needed to go. To create the actual card, I stamped on to Drawing Cartridge, and then masked the four corners using Masking Tissue, before stamping the flowers within the square. I just made sure that I did not ink the ends of the stems, so that I did not have any pieces of stem sticking below the frame. I added some shading with Distress Ink, blue at the top and green at the bottom. I peeled away the Masking Tissue and coloured all of the images with Polycolour pencils. Adding the shading first means that I can colour over any ink that may have gone over the edges of the flowers, saving me the job of masking those as well.


For my second project, I chose to use the same stamp set, Echinacea Blueprint, and stamped onto kraft card, using white embossing powder. I coloured the main image using my Koh-I-Noor watercolour palette. I added a touch of Distress Ink around the edge of both the focal image and the background before matting both pieces onto grey card.

I will be back later in the month with more projects to share, thanks for stopping by,


Judith xx


Sunday, 27 September 2020

Choose Your Own Colours

Hello everyone, I have a couple of projects to share with you today showcasing the beautiful stamps that were on last month's TV shows on Hochanda. Both projects feature the lovely Parsley Clock stamp set.

 My first project is a very clean and simple card, and I started out by die cutting a large circle from a piece of drawing cartridge. I stamped the images from the stamp set across the bottom of the circle, and coloured them with pencils. I added some shading to the background loosely with Distress Inks, not worry about getting to close to the images, as this gave a feeling of a cloudy sky, leaving patches of white.

I went around the edge of the circle with a pair of scissors to give a distressed finish before attaching it a piece of Textured Art Card and then to a white card blank.

To create my second project, I painted a small canvas with acrylic paint in various pastel shades. I stamped the large Parsley Clock onto tissue paper, and coloured the image with pencils. I went around the image with a wet brush, and gently pulled away any excess tissue paper, leaving a ragged edge. I added matte medium to the reverse of the image, and adhered it to the canvas.I added more matte medium to the image to blend it into the canvas.

I added some background stamping using grey Archival ink, a sentiment from the same stamp set, and the very useful splatter from the Floral Clock stamp set.You could recreate something very similar to this in card form, but I really like making these canvases, they do not take very long at all. I have not coloured my parsley regulation white in either case, but I wanted to show that you can choose to colour your flowers however you like, there are no rules. Just go with the flow and enjoy yourself.

I hope that you have enjoyed what I have shared with you this month, and will try out some of my projects for yourself. Thanks for stopping by, take care and stay safe. xx


Friday, 18 September 2020

Magic Mushrooms

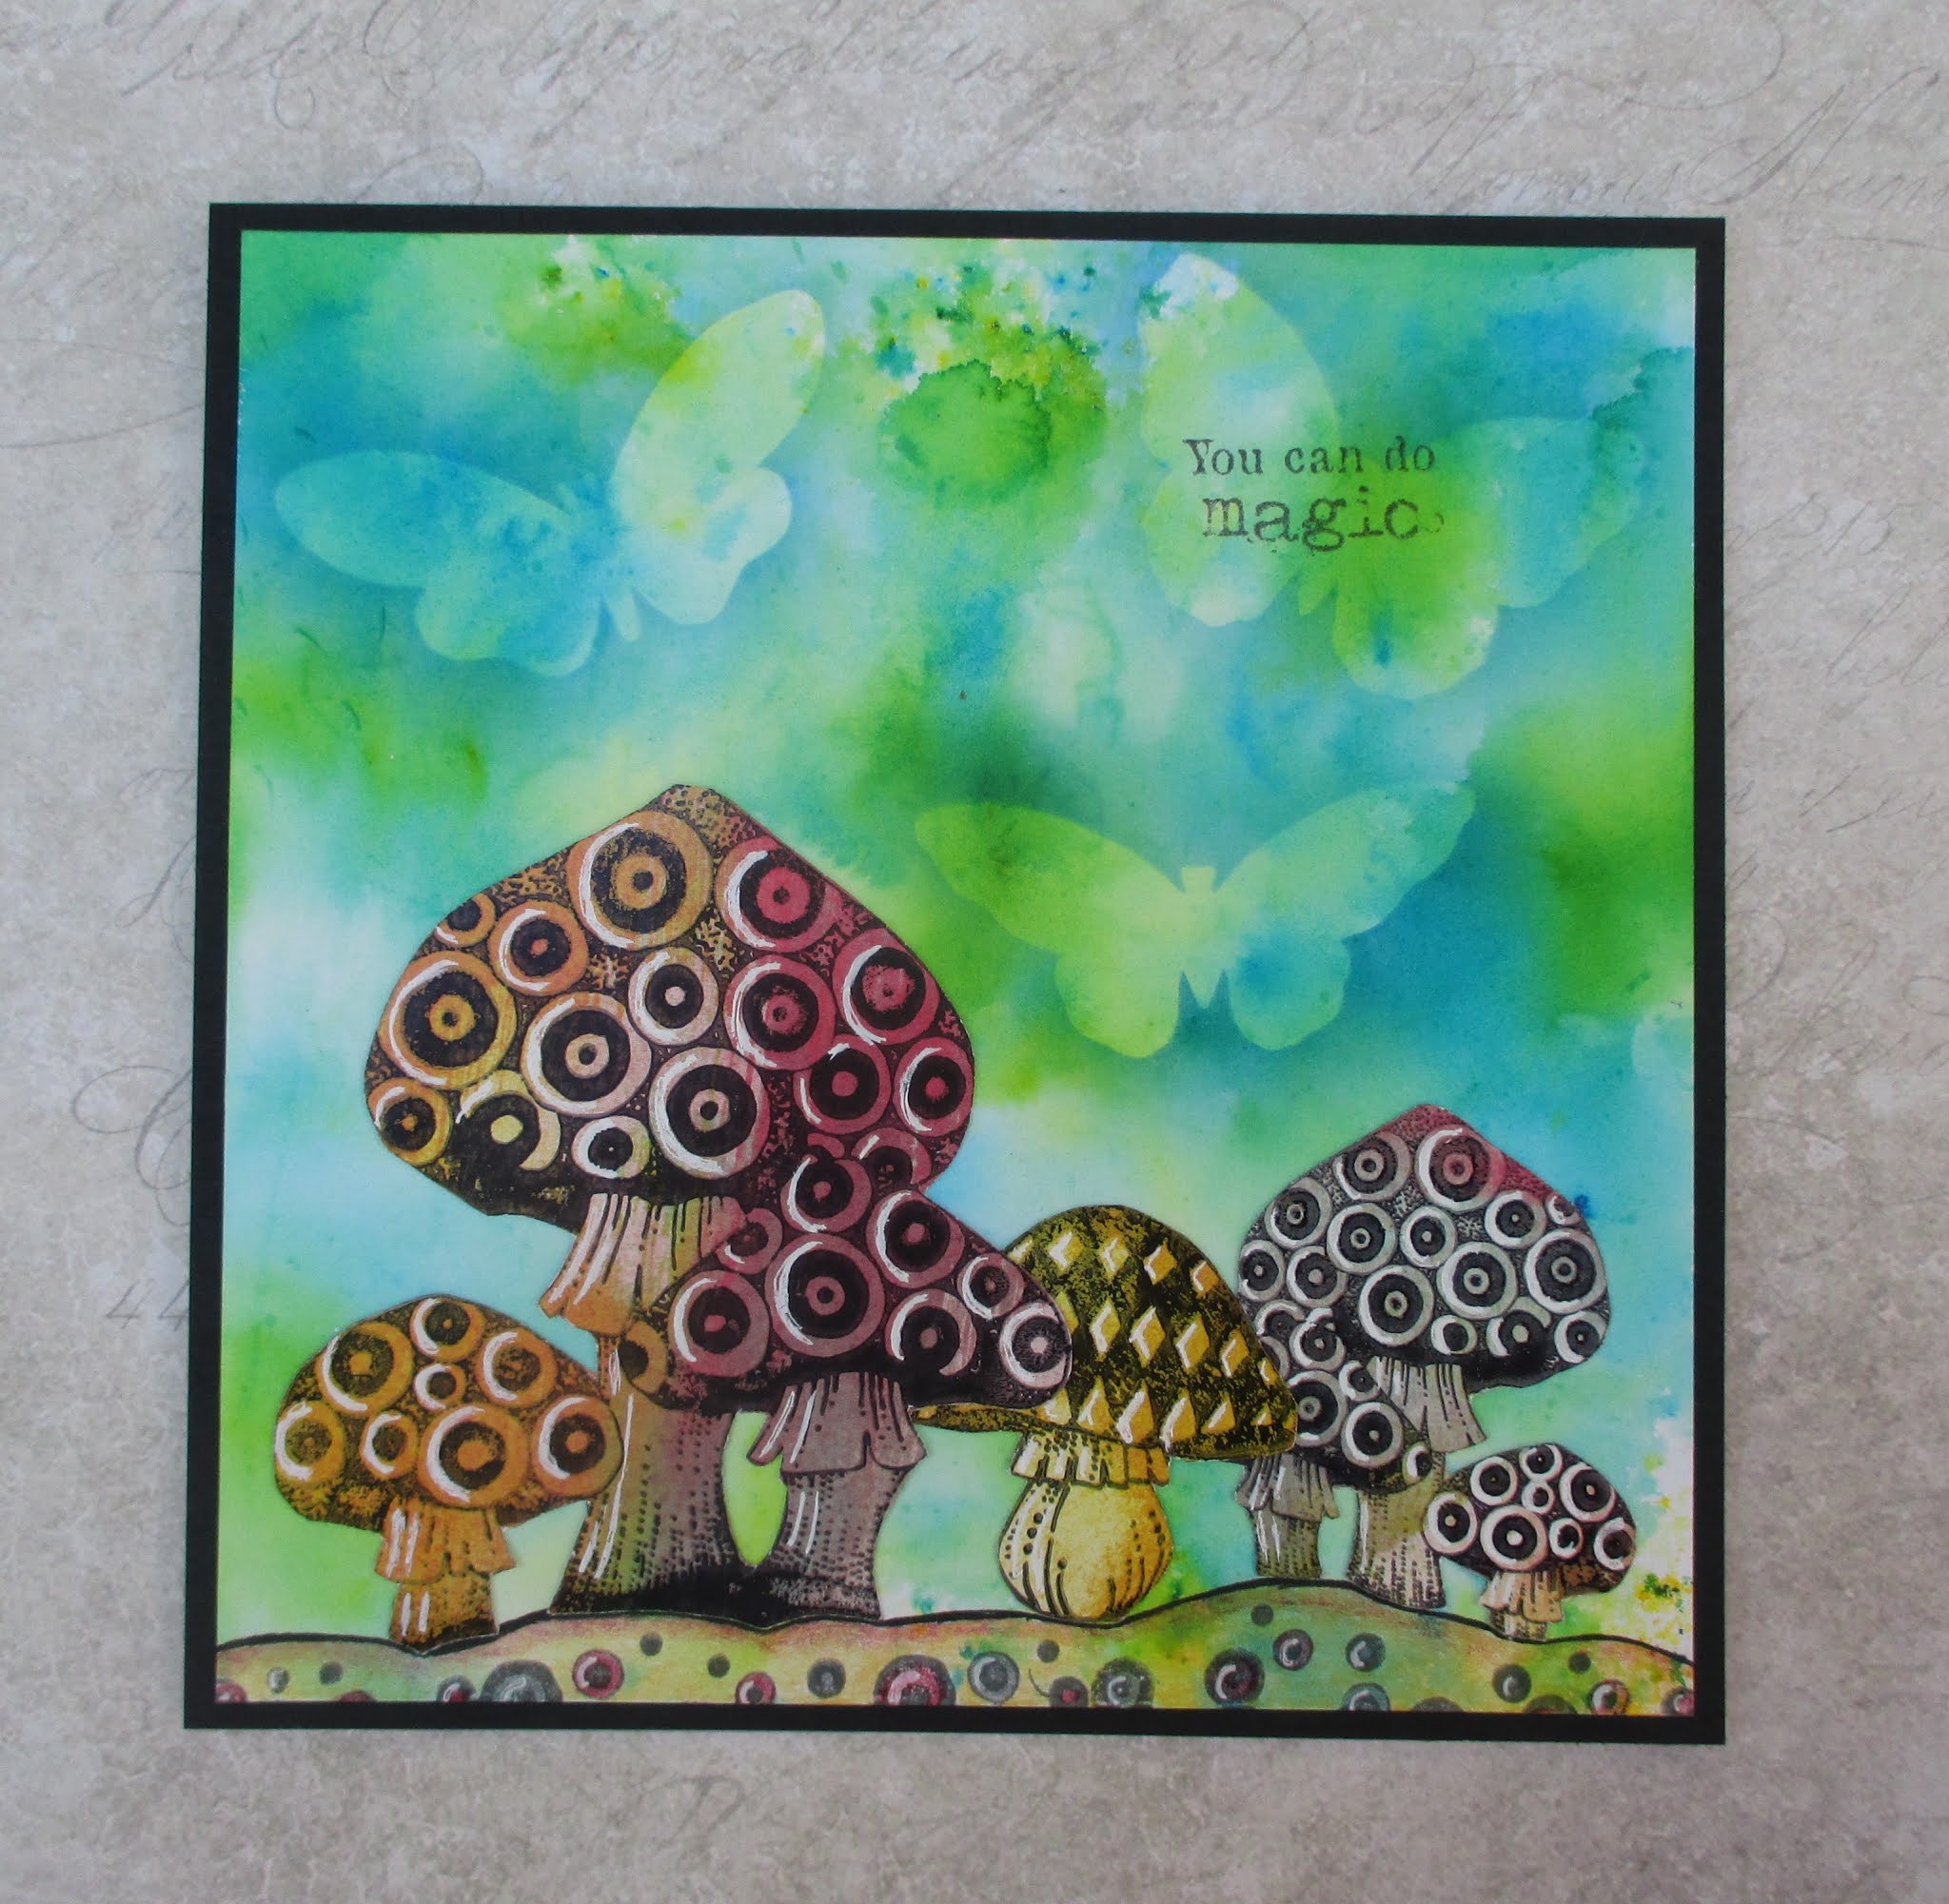
Hello everyone, I hope that you are all keeping well.  I have a couple of vibrant projects to share with you today using stamps from The Shroom Clock stamp set featured on last month's TV shows from Hochanda.


My first project was created by using a background from my stash created with turquoise and green Brushos. I stamped the mushrooms onto some of the Seriously Gorgeous A6 Postcards using Archival Ink, and cut them out. I adhered them to the background, and using a fineliner pen, I created a landscape for them to perch on. I added stamping using the small texture stamp from the plate which matches the mushrooms across the bottom of the background, and coloured the ground with Koh-I-Noor Polycolour pencils. I added white highlights on the mushrooms with a gel pen.

To finish my card, I stencilled in the sky area using the Chocolate Baroque Mask - Kaleidoscope of Butterflies and some turquoise Distress Ink. Finally, I added a sentiment.


To create my second project, I used another Brusho background, similar in colour to the first, to which I had added some stencilling with white Brilliance ink to create a bokeh effect. I stamped the large Shroom Clock onto the background, and stamped this again onto a spare piece of card. I coloured the image using Koh-I-Noor watercolours, and cut the image out. I added some splatters of blue ink at the bottom of the background to create a feeling of grass, and added shading at the base of the mushrooms. I decoupaged the image onto the background, and added white highlights with a gel pen once more.

I will be back later in the month with more projects to share, take care, and stay safe, xx


Thursday, 3 September 2020

Vintage Clocks and Butterflies

Hello everyone, I have a couple of projects to share with you today. I have used stamps that were featured on last month's TV shows on Hochanda, a beautiful mix of clocks and florals.


My first project was created by using a piece of drawing cartridge coloured with tea. I love this method of colouring a background, as it gives an instant vintage feel to a project. I stamped the main image from the Parsley Clock stamp set using brown Archival ink, and added the splatter stamp randomly over the background as well. The splatter stamp is just brilliant for creating an aged look to the images. If you caught the shows, you will have heard Lesley say that all of the clock images are based on original metal clocks that she has bought, they are just fabulous.

I coloured the image with Koh-I-Noor Polycolour pencils, using the cream pencil to blend the other colours. By using a grey pencil for shading around the image, it helps to create a three dimensional effect, as if I had decoupaged the image. I added a sentiment, and matted the background onto brown card.


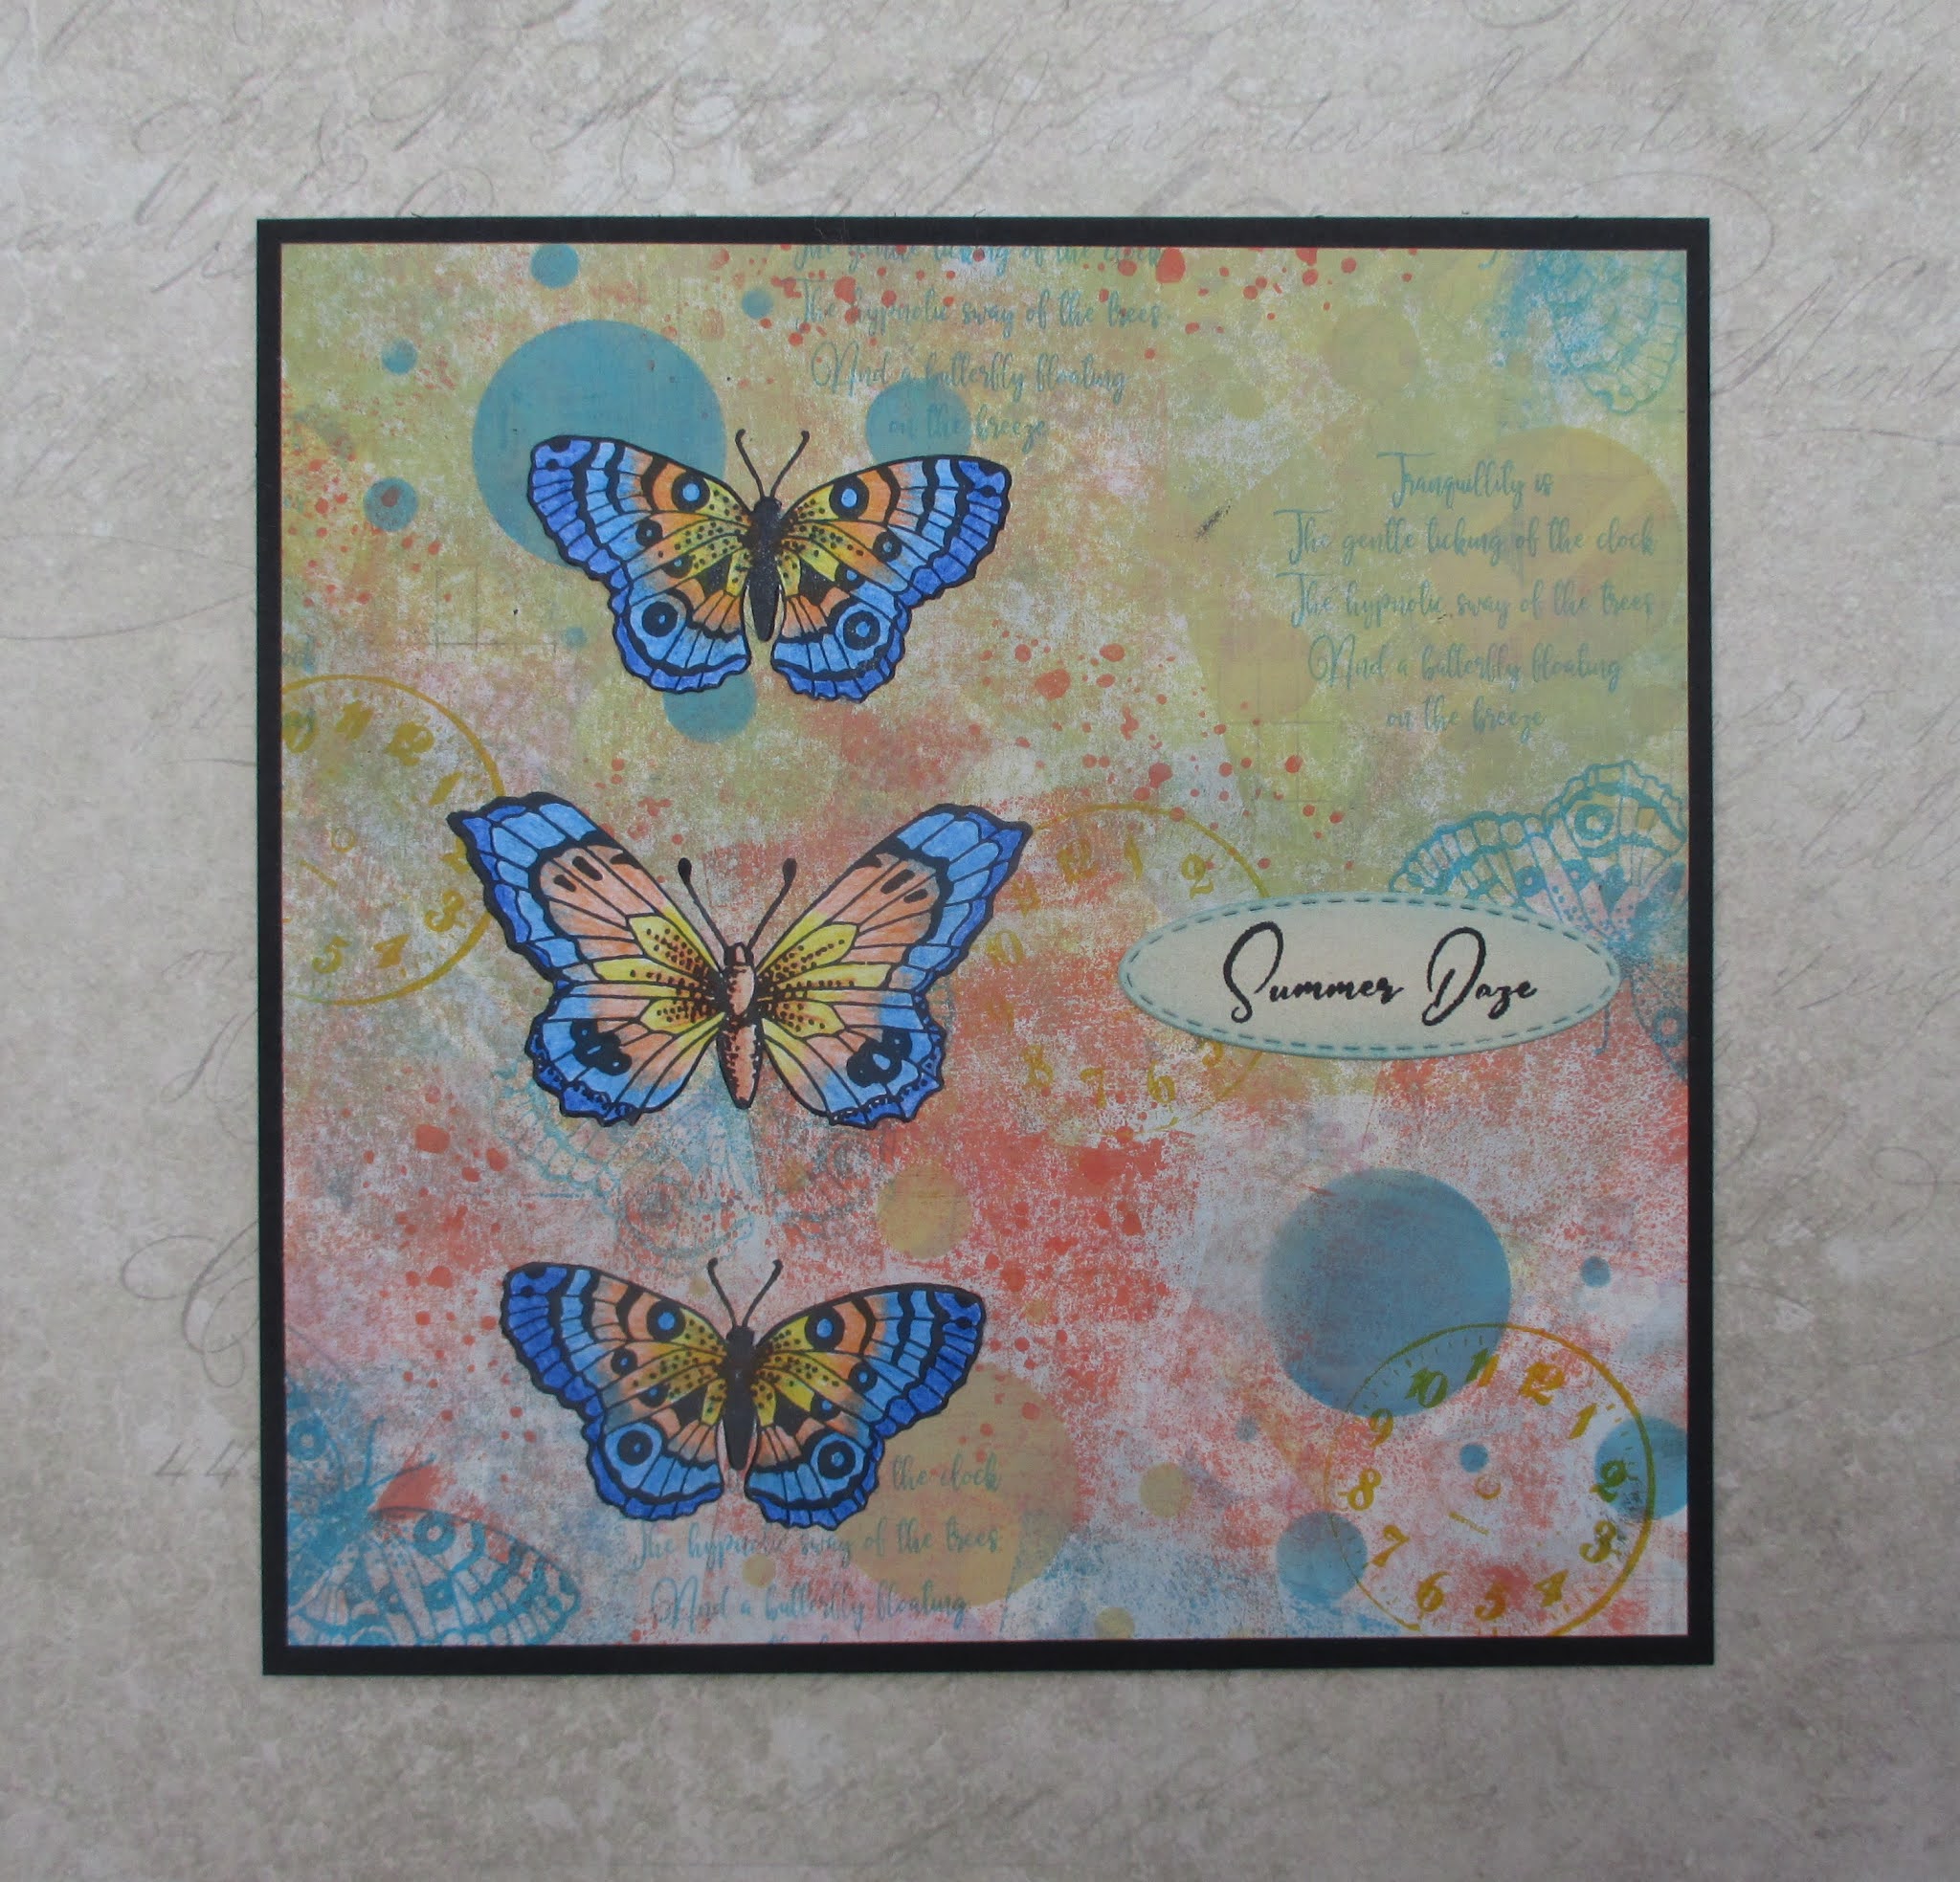
To create my second project, I made a masterboard, using a technique that Lesley showed us recently in one of the Facebook Butterfly Tree get togethers recently. I painted a piece of scrapbook paper with Tinting Medium, (you could use gesso or white paint), and added Distress Ink over the top with a roller. I added stamps and stencils to finish.

I coloured three butterflies from Parsley Clock and Floral Clock stamp sets to match the background, and added a sentiment.

I will be back soon with more projects to share with you, thanks for stopping by. Stay safe and take care, xx


Friday, 21 August 2020

Acrylic Tags and More

Hello everyone, I have a couple of projects to share with you showcasing the stamps featured on last month's TV shows on Hochanda.


My first project is a couple of acrylic tags. I stamped images from Hold On and Do Right Always using second generation stamping and a brown Archival ink, to create a subtle background, onto some plain pieces from the Designer Papers 8"x8" - Chic Script. Next, I stamped the totem pole and peace pipe onto the backgrounds using a black Archival ink, and added a sentiment. I coloured the images using Polycolour pencils from Koh-I-Noor. Watercolour pencils will NOT work for this project.


I covered the background with matte medium and adhered it to the acrylic tag. Once the glue was dry, I trimmed the piece, and added some yarn through the hole at the top.

My second project was a very quick and simple card. Rainbows have been very much on my mind lately, with everything that has been happening around us, and one of the sentiments on the Do Right Always stamp set was just perfect for this project. I took a sunburst stencil, any one would do, and chose seven different colours of Distress Ink. I applied them through the stencil to create a rainbow effect, and then simply stamped the sentiment using black ink.


It just goes to show how useful and versatile these stamp sets can be, the sentiments themselves lend themselves to so many occasions. The stamps can be used for journalling, for home decor, and are perfect for both masculine and feminine cards alike. I will be back soon with some more inspiration for you.


Thanks for stopping by, and stay safe,


 xx


Friday, 14 August 2020

Limited Colours Make a Bold Statement

Hello everyone, I have a couple of projects to share with you showcasing the fabulous stamps from last month's TV shows on Hochanda. These lovely stamps hand drawn by Kim Moody for Chocolate Baroque are so useful, and I wanted to show that they could be used for a range of different occasions.


My first card was created using a background that I found when rummaging through my stash. I had used Distress Inks in shades of blue and green, and thought that it looked very cheery. I made a smaller piece of background very quickly to match, and stamped the frame and skin from Hold On, adding a little motif that I decoupaged from the dreamcatcher from Catching Dreams. The cacti stamped on the main background can be found on Hold on and Do Right Always, they make a lovely overall background softly coloured with Koh-I-Noor pencils, as I have done on this card. I kept to a set colour palette throught the card, and the pop of red against the blue and green adds a lovely warmth to the design.


Although there is quite a lot of colouring on this card, it was relatively quick to complete, and I would certainly make this design again, varying the sentiment to suit the occasion.


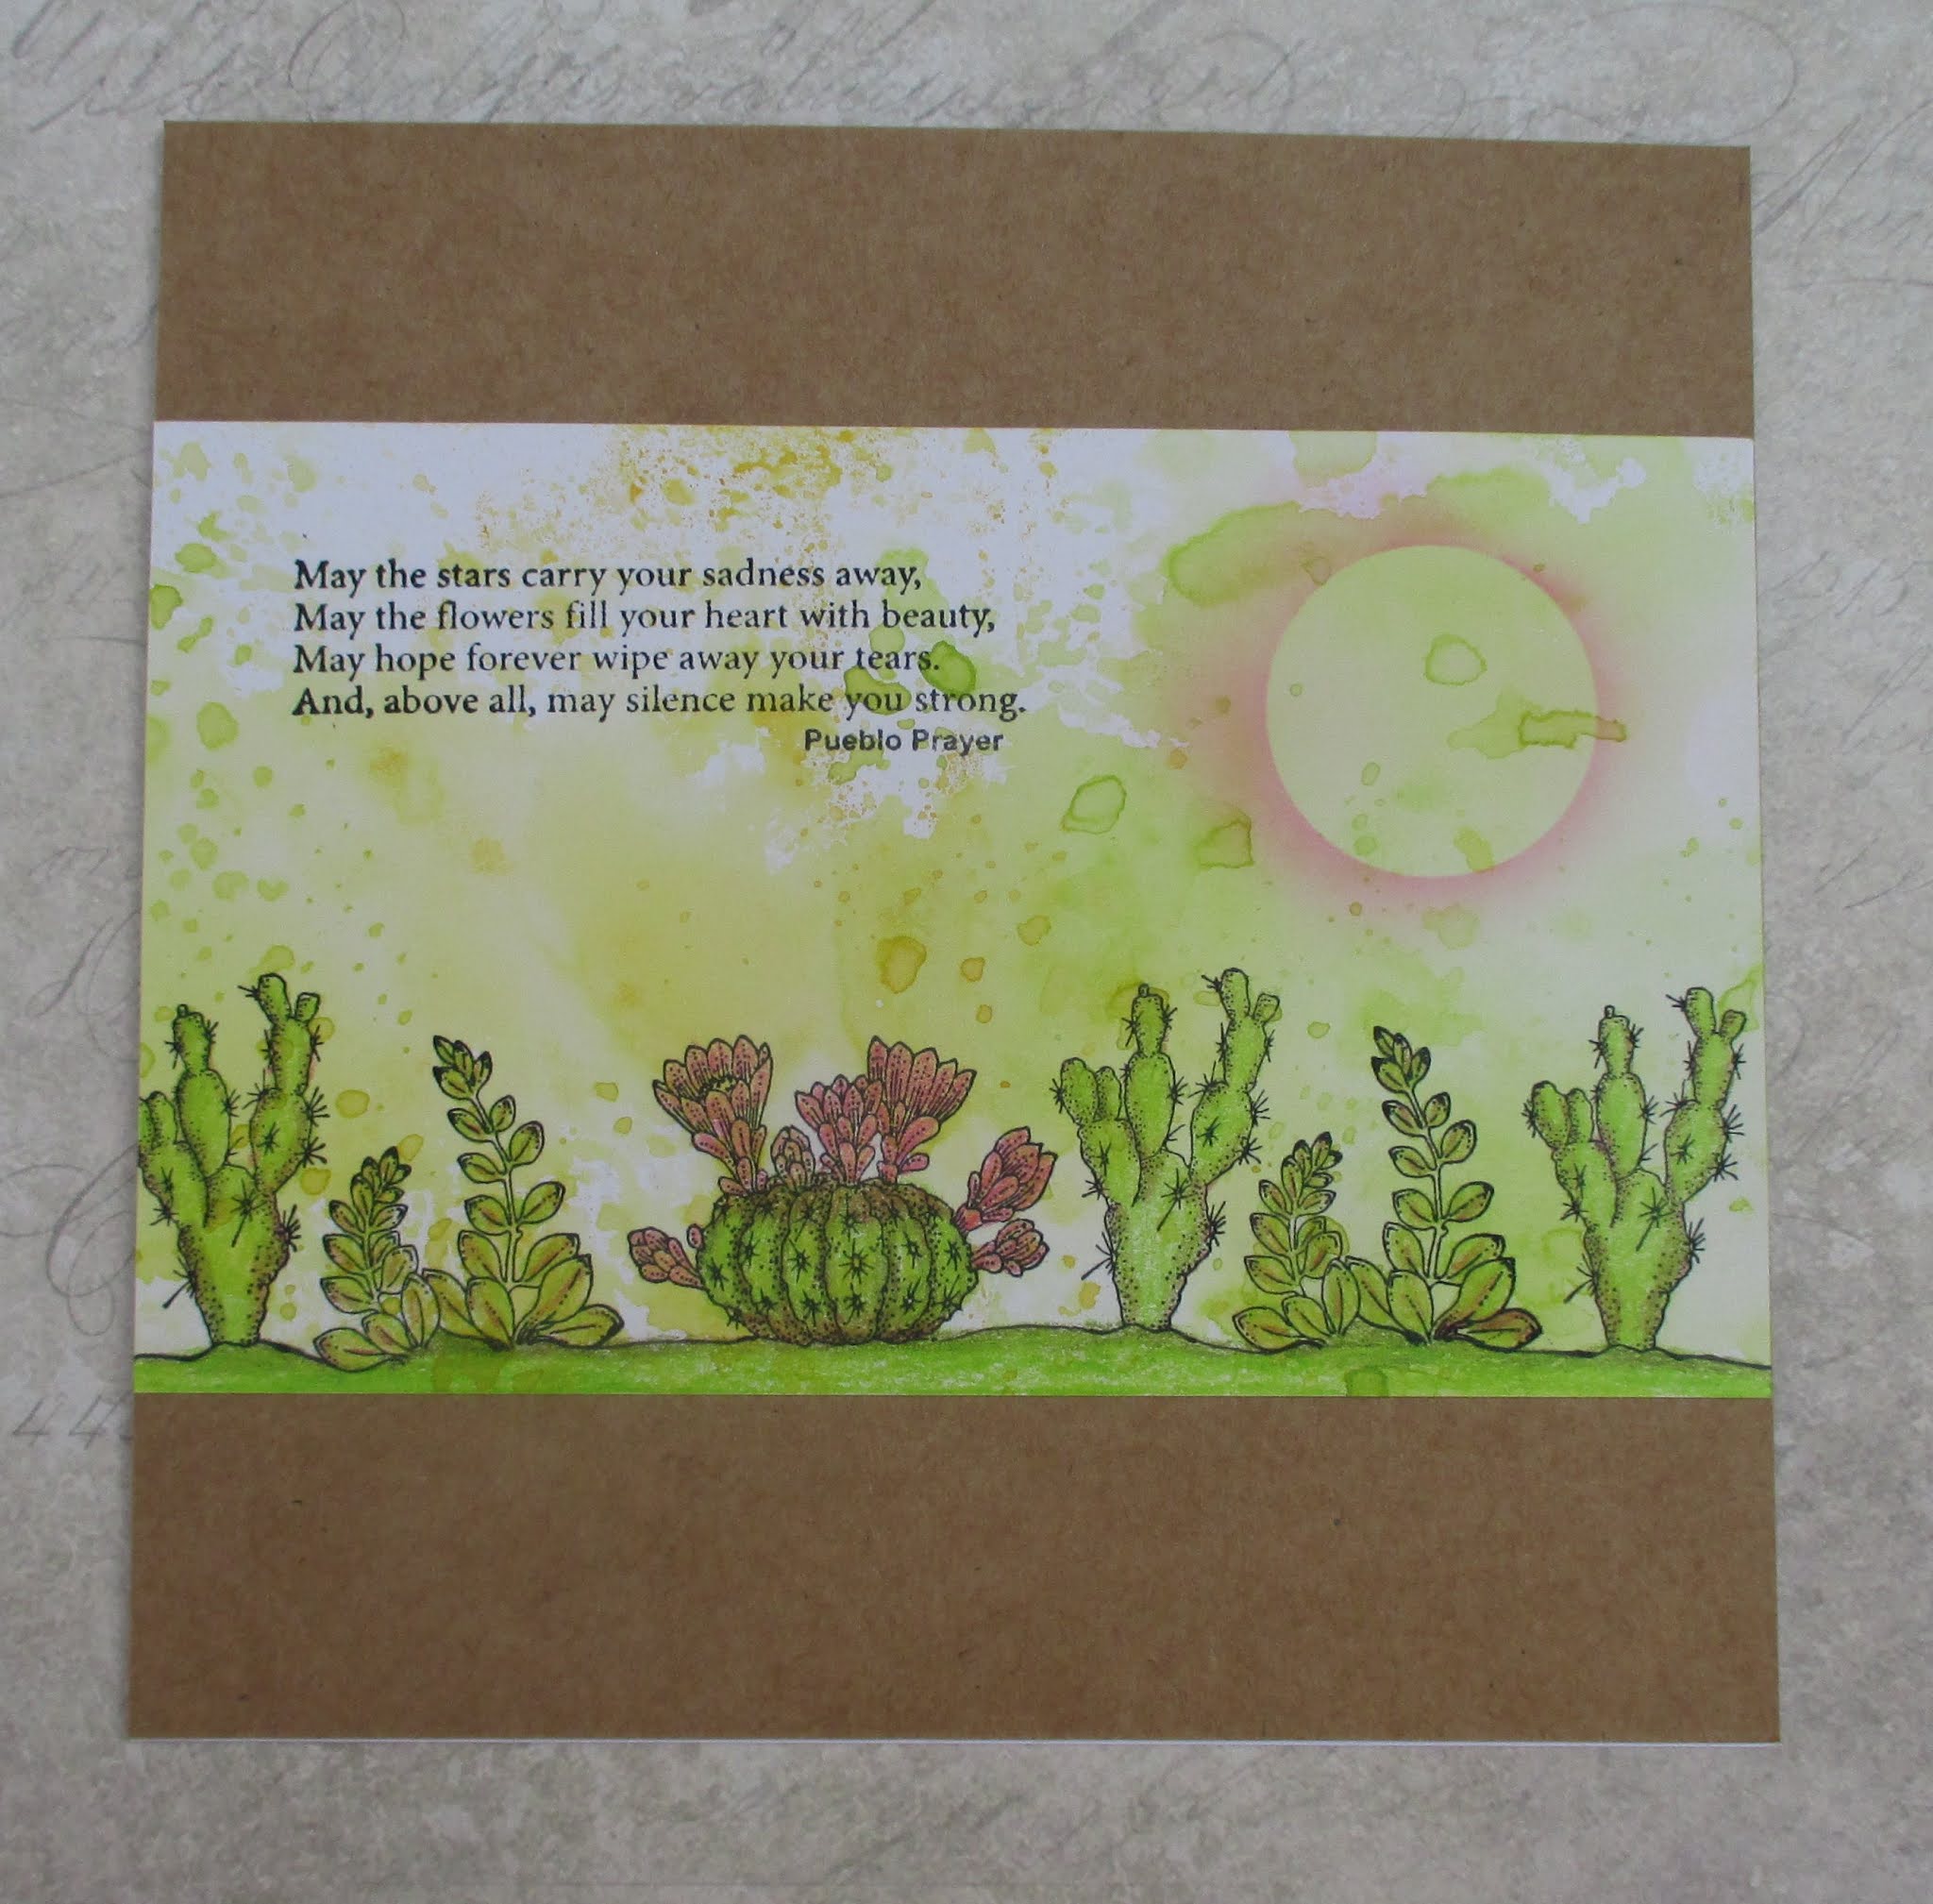
My second card was created using an offcut of drawing cartridge. We often have these, and do not always know how to use them up. I again created a Distress Ink background, and stamped a row of cacti, adding a few lines with a fineliner pen to finish off the landscape. I coloured the cacti and the grass with pencils, added a quick bit of shading with a stencil for a sunset, and stamped the lovely sentiment from Hold On. I mounted the piece onto a kraft background for a quick and simple card.


I will be back later in the month with a few more projects to share with you. Thanks for stopping by, xx


Wednesday, 5 August 2020

Journal Planning

Hello everyone, I hope that you are all keeping well, and enjoying the recent warm weather. I have a couple of projects to share with you today that were first shown on last month's TV shows on Hochanda. These very versatile stamp sets were drawn by Kim Moody for Chocolate Baroque, and have been such a pleasure to work with.

I fell in love with these images as soon as I saw them, and knew straight away what I wanted to do for my first two designs. I created a plan in my journal, sketching a layout and trying out a colour scheme for these two cards. I used Katya, masking off her headdress, and stamped just the face, the dangly decorative pieces of the headdress, and the shoulders. I drew a headband and some hair, and also extended the dangles up to the headband. I added a pattern onto the headband, and also added a similar design onto the bodice. Once complete, I used some Masking Tissue, and traced the design, before cutting it out, and covering the image.

I stamped the dreamcatcher from Catching Dreams and coloured the background with a light wash. I added some feathers and the sentiment from Hold On. I coloured the images with koh-I-Noor pencils, sticking to a fairly limited colour palette of ochre, red and green and brown.

For my second project, I wanted to create a Native American landscape, incorporating the teepees, and the cacti. I stamped the main image from Do Right Always, and added the cacti to one side. I added extra lines to complete the scenery using a fineliner pen. I added more rocks and grass at the front, and mountains at the back. I coloured the picture using watercolour pencils, blending several colours together, to create a more natural feel. I used lots of terracotta to create a very scorched dessert look to the earth.


I wanted to show you my unfinished journal sketches, so that you could see how true the final cards were to my original plans. They were pretty close!


I will be back later in the month with more projects to share with you. Stay safe, and take care, xx


Thursday, 23 July 2020

Rainbow Tree

Hello everyone, I have a project to share using stamps from last month's TV Shows from Hochanda. I have created a cheery card using the Tangled Birch stamp and a sentiment from the Words of Wisdom stamp set.

I stamped the Tangled Birch image using Versafine Onyx Black ink, and extended the landscape using a fineliner pen. I coloured the image using Koh-I-Noor pencils, and then covered the coloured image with Acrylic Wax. You could use masking fluid and rub it off afterwards, but the acrylic wax is so quick. (Or you could use bleach to take the colour out of the tree if you apply the background colour first, and then colour the image afterwards). I added shading over the background with seven different colours of Distress Inks to create a rainbow effect, and buffed the image with a piece of paper towel.

Rainbows are a symbol of hope and unity right now, I felt that this background would be so uplifting for someone who is feeling down, or for a special person that needs a card sending to them during this time.

Look after yourselves, and stay safe. Thanks for stopping by, xx


Monday, 6 July 2020

Creating Backgrounds

Hello everyone, I hope that you are all keeping well. Even in times like these, I hope that you have been able to find some enjoyment in your crafting, in whatever form that has taken. A lot of you have been saying that your mojo has taken a walk, but hopefully the inspiration on the Chocolate Baroque Design Team blog, on the Facebook Group, and Lesley's daily Facebook live posts are continuing to provide you with lots of ideas.

I have created a card for you using the lovely Katya, and stamps from the Timeless stamp set. I used a piece of Drawing Cartridge from my stash that had been washed with a tea bag dipped in warm water. This gives the card a lovely aged feel, perfect for the look I wanted. It's a very quick way of colouring a background.

I stamped Katya using dark brown Archival ink, and covered the image with masking tissue before adding the large image from the Timeless stamp set a couple of times. I then added lots of the smaller images using second generation stamping to fill the rest of the space, and overstamping the other image as well. I used sepia tones, keeping in with the general colour palette.

I removed the mask, and coloured Katya with Koh-I-Noor Polycolour pencils, these blend really well, and add a pop of colour to the main image. I felt that the main decorative piece on Katya's headdress reminded me of a cog, and so she fitted so well with the 'Timeless' theme, a lady from a bygone era.


To create my second card, I added pink and green Distress Inks to a piece of Drawing Cartridge with some water, and then stamped the little butterflies from Baroque Meadow across the background using toning colours of Versafine Clair inks. I used a whiteboard postcard, and stamped a sentiment from Words of Gratitude across the background using grey Archival Ink. I added some shading around the edge of the postcard using Distress Ink and stamped the Tangled Birch over the top using black ink, which I coloured with pencils as before.


My final card, which I shared at the time of the TV shows was a really quick card, a simple Brusho background with the same wording added. I then stamped the images from Baroque Meadow in black ink, and added a piece of black ribbon, before mounting the project onto black card.


These lovely stamps are so versatile, always a pleasure to create with. I will be back later in the month with more ideas to share with you.

Take care and stay safe,

Judith xx

Friday, 26 June 2020

Patchwork Sunset


Hello everyone, I hope that you are enjoying this warm weather! I thought that I would share a brightly coloured project with you today, showcasing some of the stamps from last month's TV shows on Hochanda. These colours probably reflect the tropical temperatures right now!

I started my project with a background created using Yellow and pink Distress Inks and water. I stamped some images from Patchwork Landscape using Versafine Clair ink. I added some lines using a fine liner pen to complete the scenery, and coloured the images with Koh-I-Noor Polycolour pencils. I stuck to a limited colour palette, and coloured the grass, adding shading using the same colours that I had used in the foliage and flowers, (pinks and blues). This stamp set is really great for scene building, and is so useful for lots of different purposes. You could vary the colours and create quite masculine cards by using grey, terracota and ochre, for example. Stamp and emboss in white on kraft card for a completely different look, there are so many possibilities.

Take care, and thanks for stopping by, xx

Monday, 8 June 2020

Tree of Hope

Hello everyone, I hope that you are all keeping well during these uprecedented times. Life is still very uncertain for lots of us, and for this blog post, I wanted to create a card with a message of optimism.

I started my project with a piece of kraft card, and stamped a large image from Trees a Crowd, using brown Archival ink. I added a little image from Sticks and Stones as foliage, using first and second generation stamping. I coloured the image using Koh-I-Noor watercolour pencils, and ran a waterbrush only over the first generation stamped images, as I wanted the colours in the other images to remain very soft. Adding water tends to brighten the colour somewhat. I added some colour under the tree to ground the image. A sentiment from Patchwork Landscape was perfect for this card.

To create a border, I ran the edge of an old credit card through the inkpad, and drew it along the card at various angles around the edge of the background. I added some shading with Rusty Hinge Distress Ink.

Thanks for stopping by, and take care, xx


Related Posts Plugin for WordPress, Blogger...